

Review sản phẩm
16 Mẹo Chỉnh Sửa Ảnh Đơn Giản Để Nâng Tầm Bức Hình Của Bạn

Th4
16 Mẹo Chỉnh Sửa Ảnh Đơn Giản Để Nâng Tầm Bức Hình Của Bạn
Chỉnh sửa ảnh là một kỹ năng quan trọng giúp biến những bức hình bình thường trở nên ấn tượng và chuyên nghiệp hơn. Dưới đây là 16 mẹo đơn giản mà bạn có thể áp dụng để cải thiện chất lượng ảnh của mình:
1. Cân Bằng Trắng: Điều chỉnh nhiệt độ màu để ảnh trông tự nhiên hơn.
2. Cắt Ảnh: Loại bỏ những chi tiết thừa, tập trung vào chủ thể chính.
3. Điều Chỉnh Độ Sáng và Tương Phản: Tăng độ sáng và tương phản để ảnh rõ nét hơn.
4. Sửa Màu Sắc: Tăng cường hoặc giảm bớt độ bão hòa để tạo hiệu ứng phù hợp.
5. Làm Sắc Nét: Tăng độ sắc nét để chi tiết ảnh rõ ràng hơn.
6. Xóa Vết Bẩn: Loại bỏ những chi tiết không mong muốn bằng công cụ xóa điểm.
7. Thêm Hiệu ứng Bokeh: Làm mờ hậu cảnh để chủ thể nổi bật hơn.
8. Sử dụng Filter: Áp dụng bộ lọc để tạo phong cách riêng cho ảnh.
9. Chỉnh Sửa Mắt Đỏ: Khắc phục hiện tượng mắt đỏ trong ảnh chụp đêm.
10. Thêm Văn Bản hoặc Logo: Tạo điểm nhấn bằng cách thêm chữ hoặc logo.
11. Điều Chỉnh Bóng và Sáng: Cân bằng ánh sáng và bóng tối để ảnh hài hòa hơn.
12. Sử dụng Gradient: Tạo hiệu ứng chuyển màu để ảnh thêm phần nghệ thuật.
13. Chỉnh Sửa Da: Làm mịn da và loại bỏ khuyết điểm trong ảnh chân dung.
14. Thêm Khung Ảnh: Tạo điểm nhấn bằng cách thêm khung viền cho ảnh.
15. Điều Chỉnh Tỷ Lệ Khung Hình: Thay đổi tỷ lệ để phù hợp với mục đích sử dụng.
16. Lưu Ảnh Đúng Định Dạng: Chọn định dạng phù hợp (JPEG, PNG) để đảm bảo chất lượng ảnh.
Với những mẹo trên, bạn có thể dễ dàng biến những bức ảnh thông thường thành tác phẩm nghệ thuật. Để có thêm công cụ hỗ trợ chỉnh sửa ảnh chuyên nghiệp, hãy tham khảo các sản phẩm công nghệ cao tại Queen Mobile – địa chỉ uy tín chuyên cung cấp điện thoại iPhone, máy tính bảng và phụ kiện chính hãng tại Việt Nam.
Mua Ngay Tại Queen Mobile
Queen Mobile tự hào là đơn vị phân phối các sản phẩm công nghệ hàng đầu, đảm bảo chất lượng và giá cả cạnh tranh. Với đội ngũ tư vấn chuyên nghiệp, bạn sẽ tìm được sản phẩm phù hợp nhất để hỗ trợ công việc và sở thích của mình.
Hãy truy cập Queen Mobile ngay hôm nay để sở hữu những thiết bị công nghệ hiện đại và bắt đầu hành trình sáng tạo của bạn!
#ChỉnhSửaẢnh #NângTầmNhiếpẢnh #QueenMobile #CôngNghệHiệnĐại #iPhone #MáyTínhBảng #MuaSắmThôngMinh
Giới thiệu 16 simple editing tips and tricks to improve your pictures
: 16 simple editing tips and tricks to improve your pictures
Hãy viết lại bài viết dài kèm hashtag về việc đánh giá sản phẩm và mua ngay tại Queen Mobile bằng tiếng VIệt: 16 simple editing tips and tricks to improve your pictures
Mua ngay sản phẩm tại Việt Nam:
QUEEN MOBILE chuyên cung cấp điện thoại Iphone, máy tính bảng Ipad, đồng hồ Smartwatch và các phụ kiện APPLE và các giải pháp điện tử và nhà thông minh. Queen Mobile rất hân hạnh được phục vụ quý khách….
_____________________________________________________
Mua #Điện_thoại #iphone #ipad #macbook #samsung #xiaomi #poco #oppo #snapdragon giá tốt, hãy ghé [𝑸𝑼𝑬𝑬𝑵 𝑴𝑶𝑩𝑰𝑳𝑬]
✿ 149 Hòa Bình, phường Hiệp Tân, quận Tân Phú, TP HCM
✿ 402B, Hai Bà Trưng, P Tân Định, Q 1, HCM
✿ 287 đường 3/2 P 10, Q 10, HCM
Hotline (miễn phí) 19003190
Thu cũ đổi mới
Rẻ hơn hoàn tiền
Góp 0%
Thời gian làm việc: 9h – 21h.
KẾT LUẬN
Hãy viết đoạn tóm tắt về nội dung bằng tiếng việt kích thích người mua: 16 simple editing tips and tricks to improve your pictures
Summary
- Google Photos is the default Gallery app on Android, offering backup, editing, and creating memories.
- Some editing features require a Google One subscription for full access.
- Google Photos offers various editing tools, AI-based tweaks, filters, and video effects, making it a comprehensive editing app.
ANDROID POLICE VIDEO OF THE DAY
SCROLL TO CONTINUE WITH CONTENT
Google Photos is the default Gallery app on Android. It’s your one-stop solution for backing up media files, editing images and videos, and creating beautiful memories. Google Photos’ editing capabilities have evolved, and you don’t need a dedicated photo editing app to make small tweaks. Most media editing features are limited to Android and iOS apps and remain unavailable on Google Photos for the web on Windows, Mac, and ChromeOS.
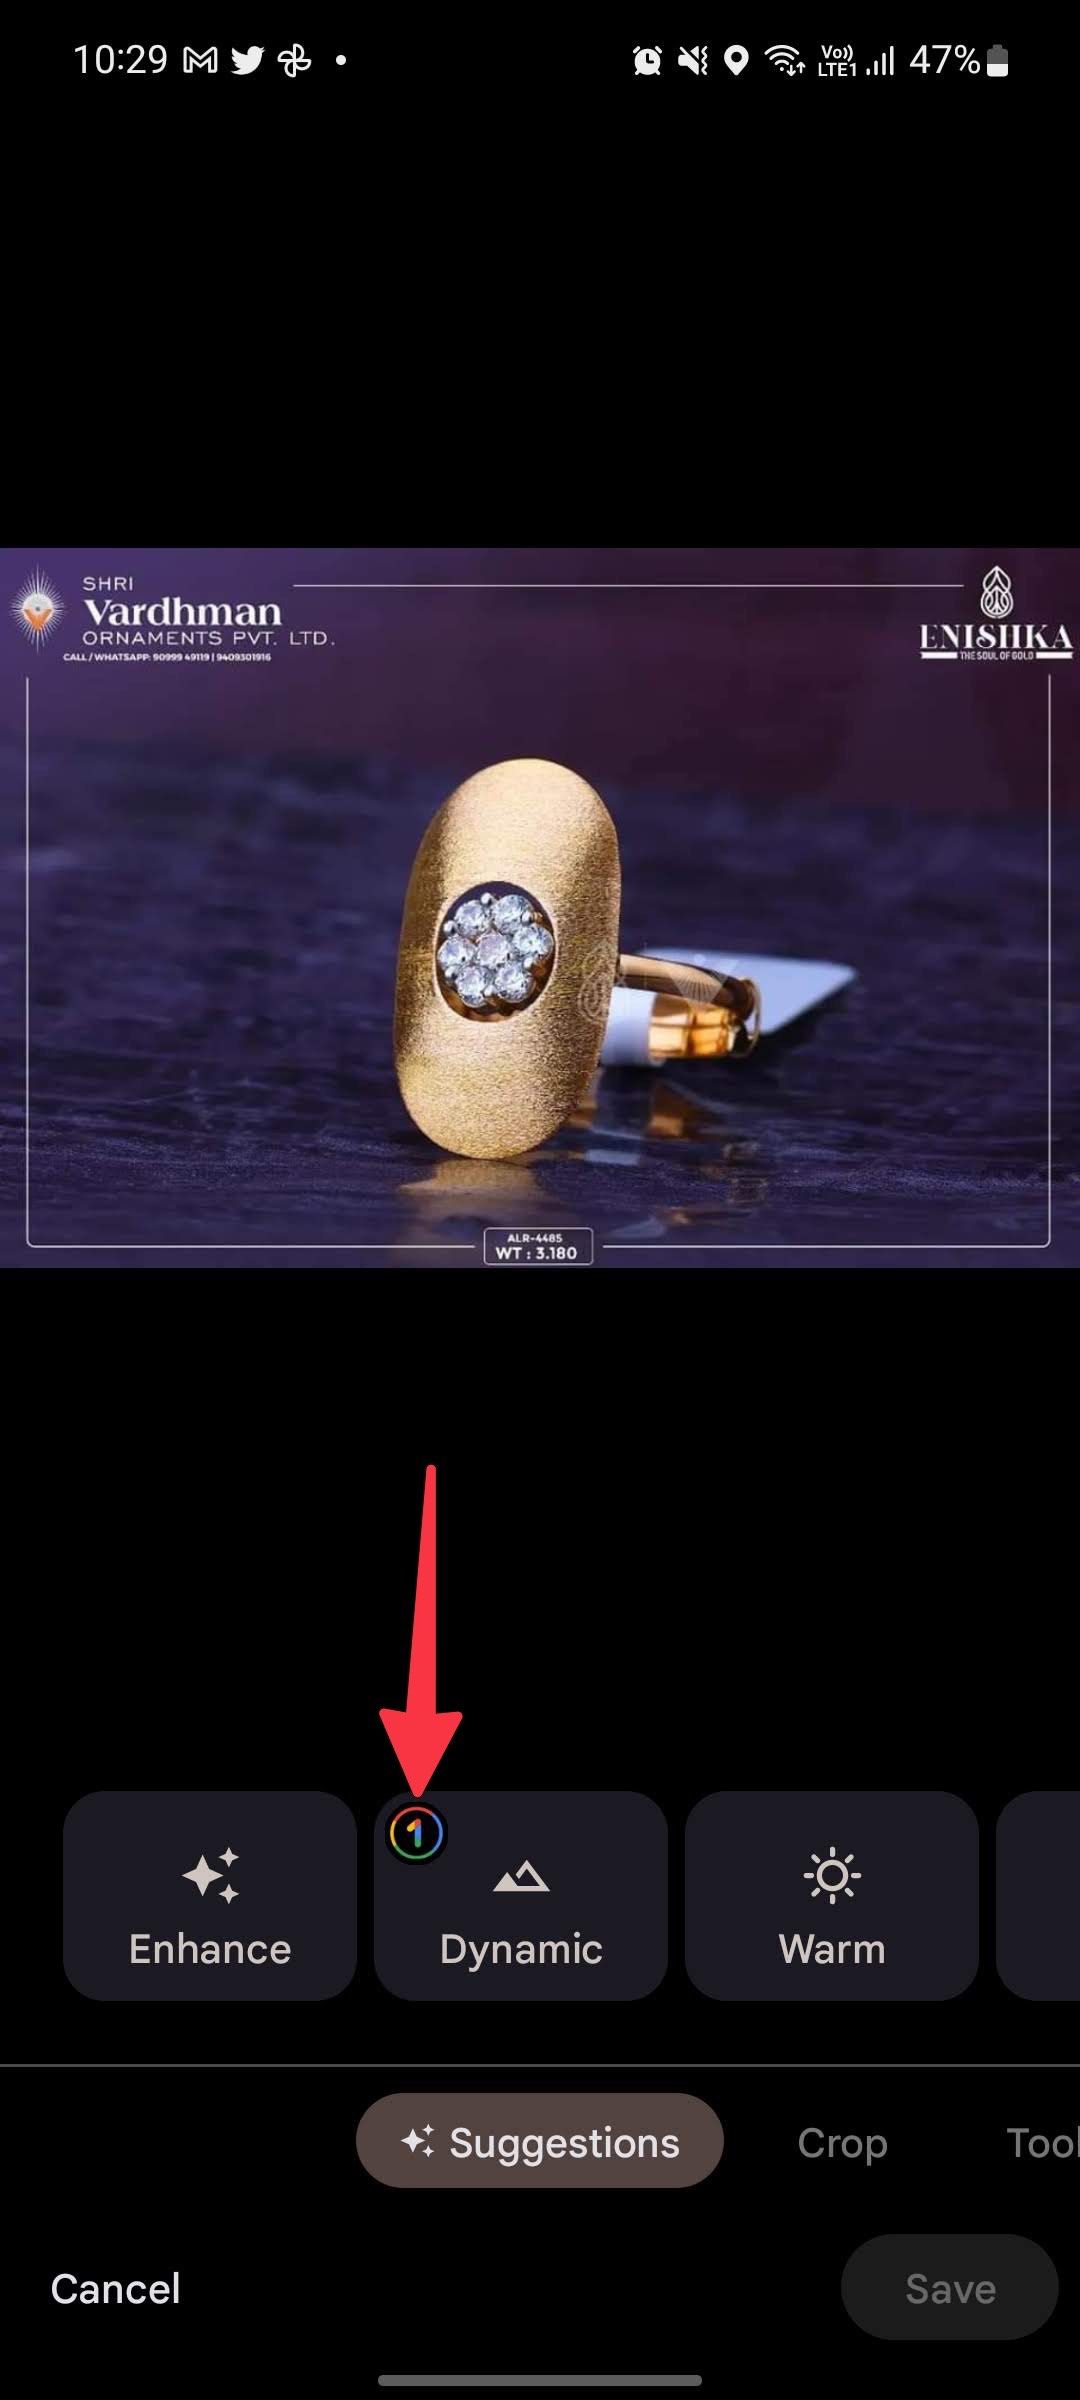
Not every Google Photos editing feature is available to free accounts. Some Google Photos editing functions carry a colorful circular icon, requiring an active Google One subscription. Subscribe to a Google One plan to unlock more storage and editing features on your iPhone or budget Android phone.
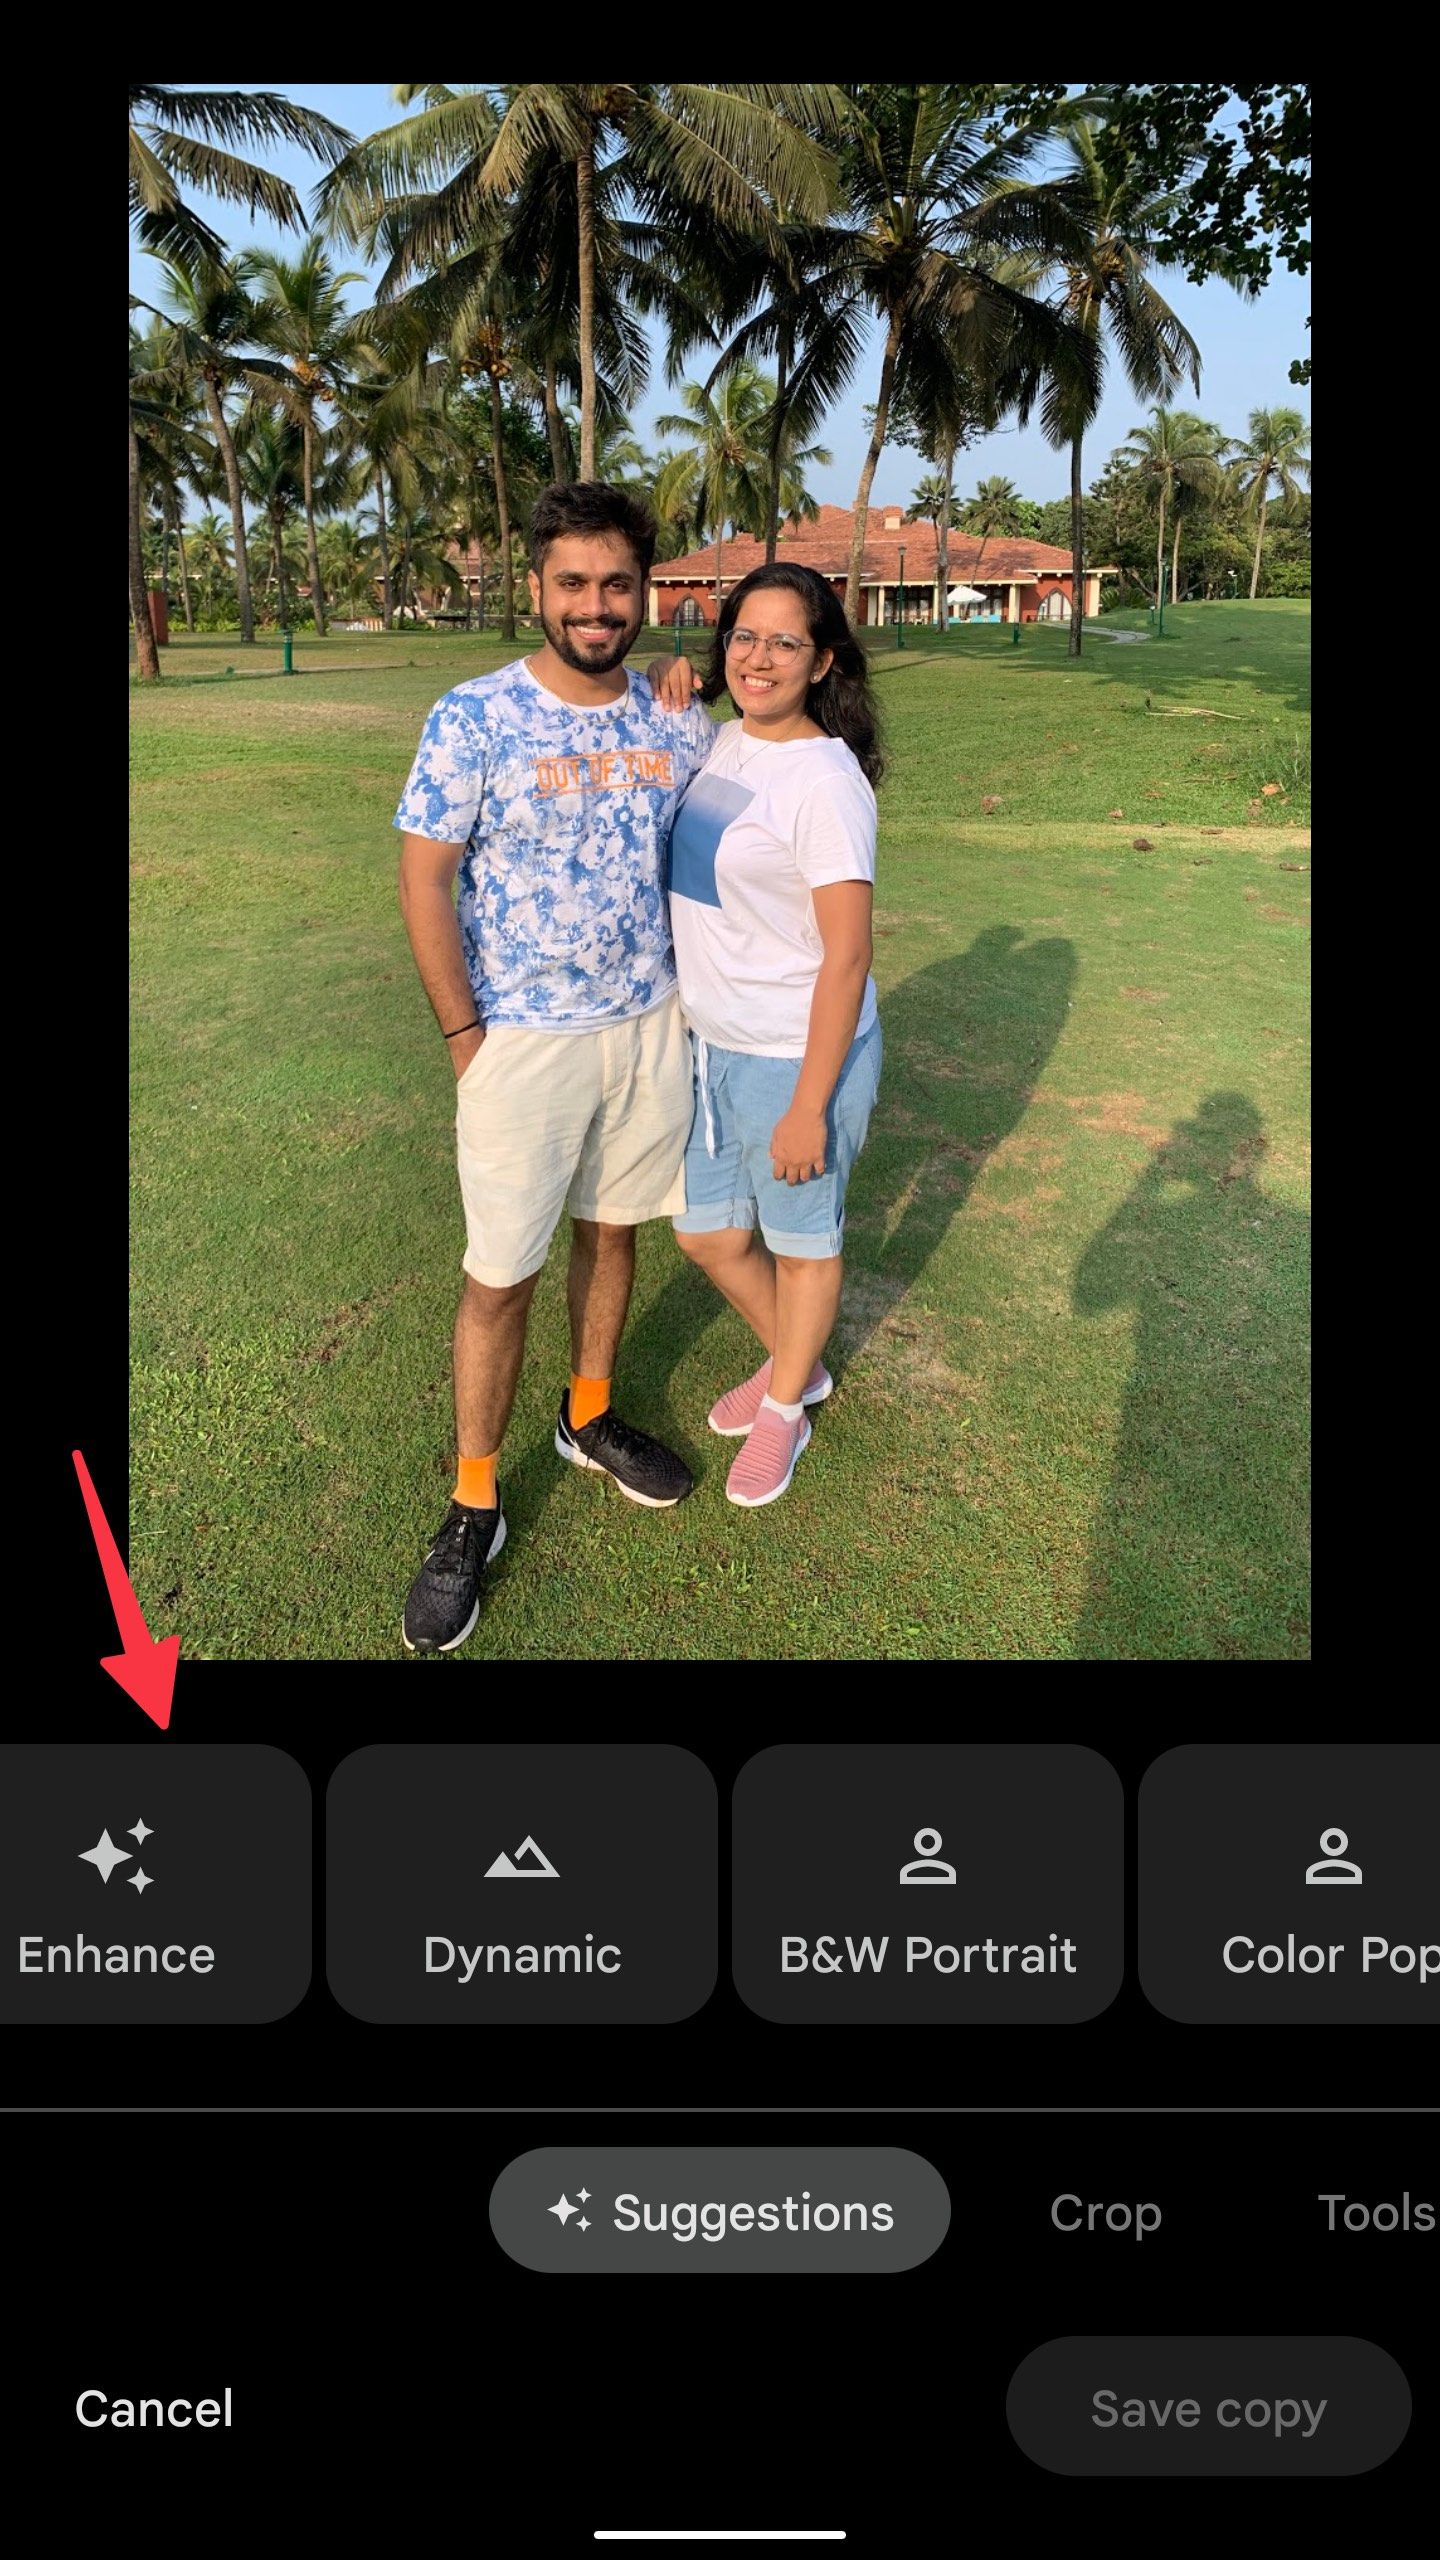
Enhance your photos
The Google Suggestions tab is a lifesaver if your phone struggles with low-light photography. Suggestions offers editing options based on your photo. You can check suggestions like Luminous, Radiant, Stormy, B&W Portrait, and Color Pop to make changes with a single tap.
-
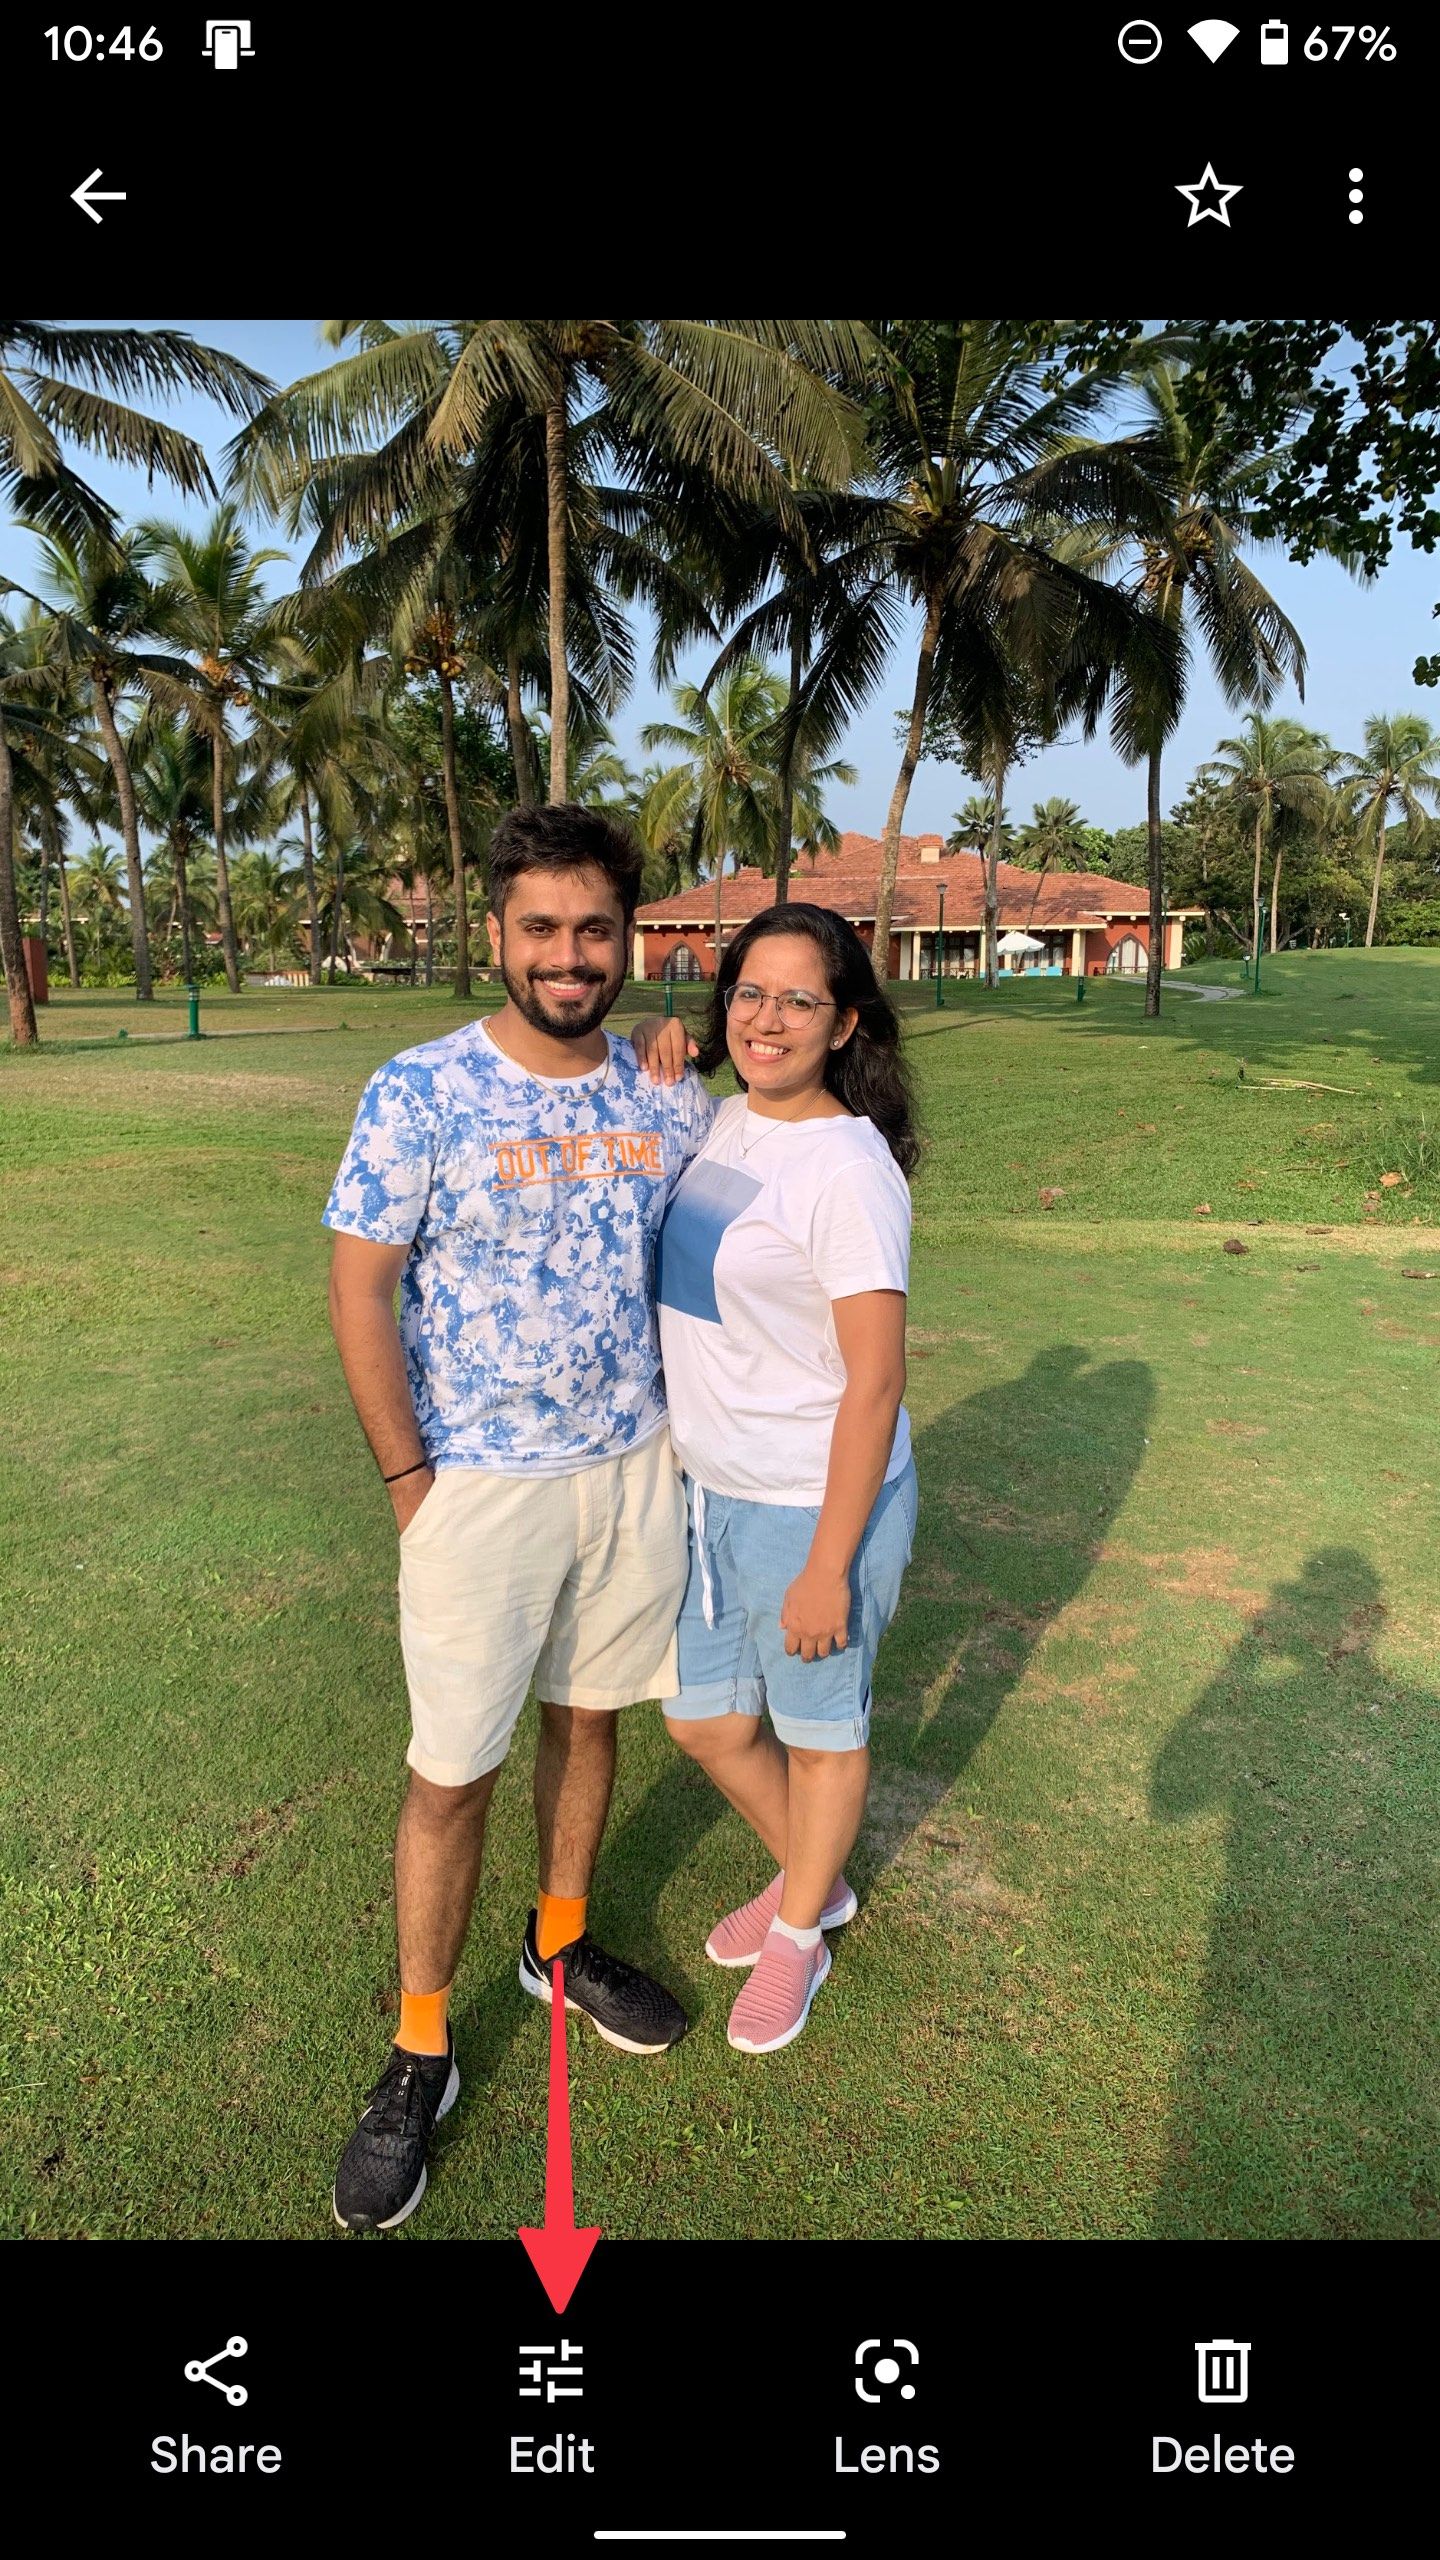
Launch
Google Photos
on your phone and select an image you want to edit. -
Tap
Edit
at the bottom. -
Try the suggestions to improve your photo.
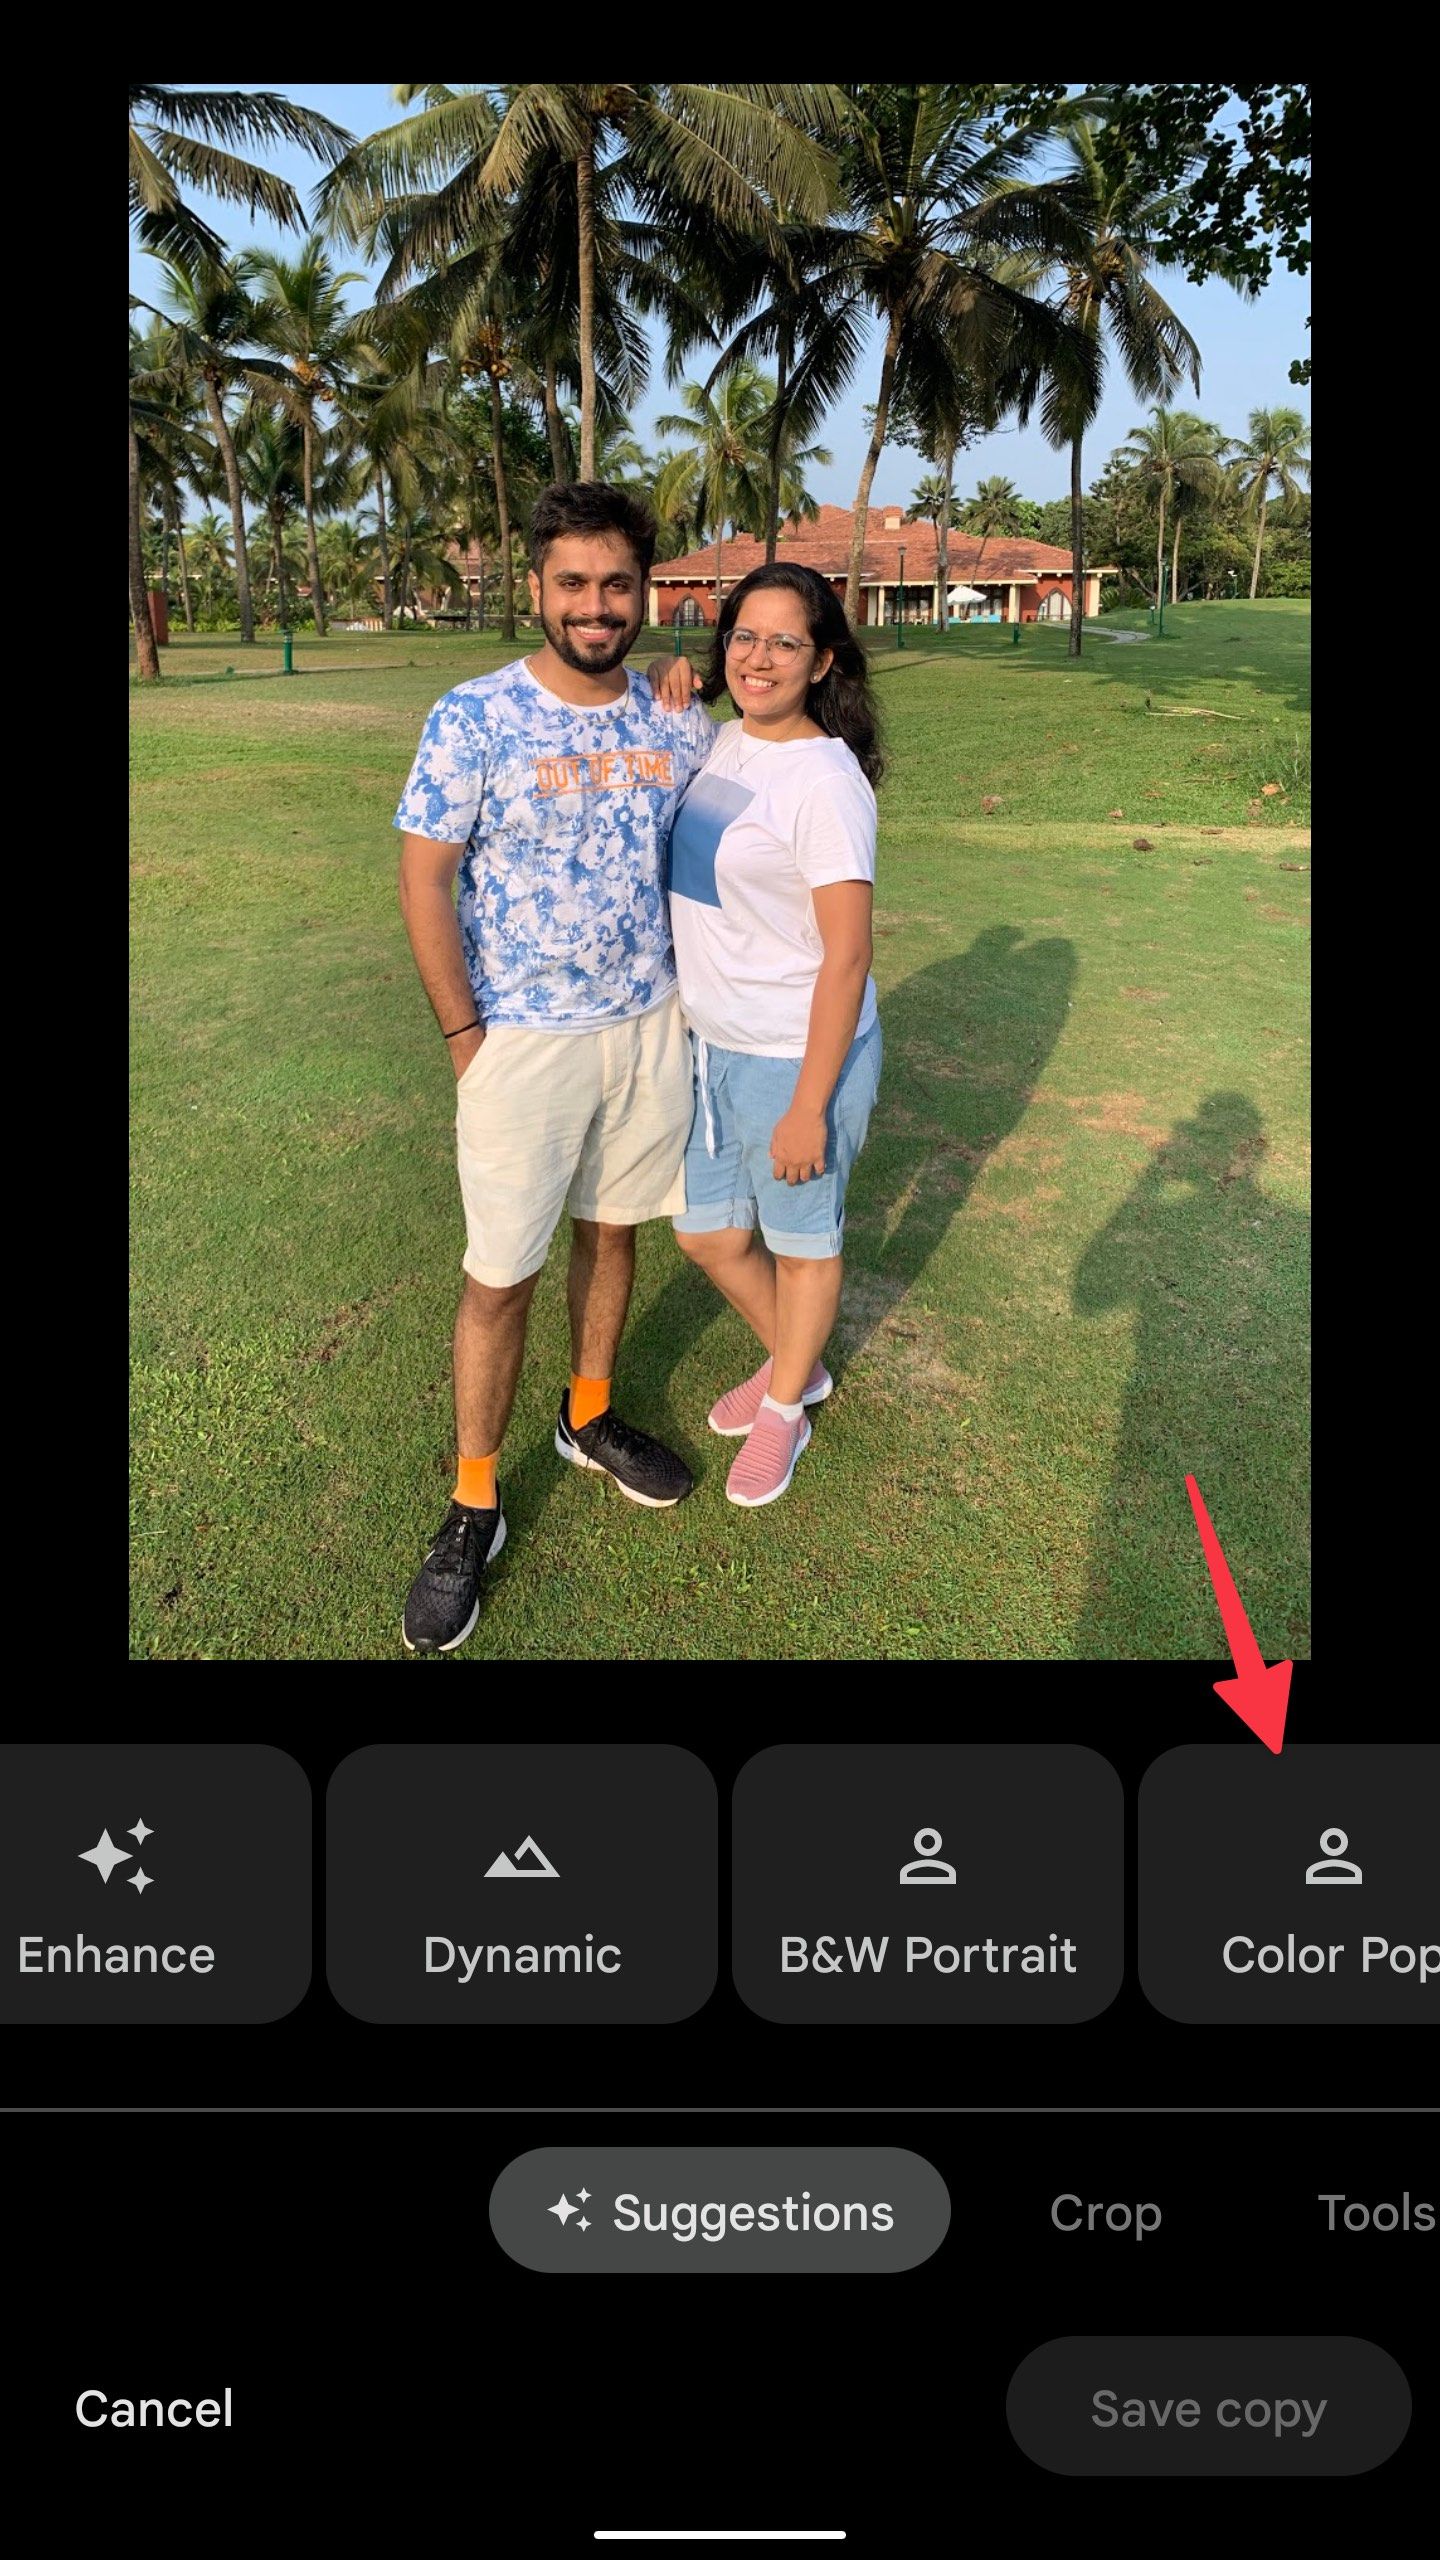
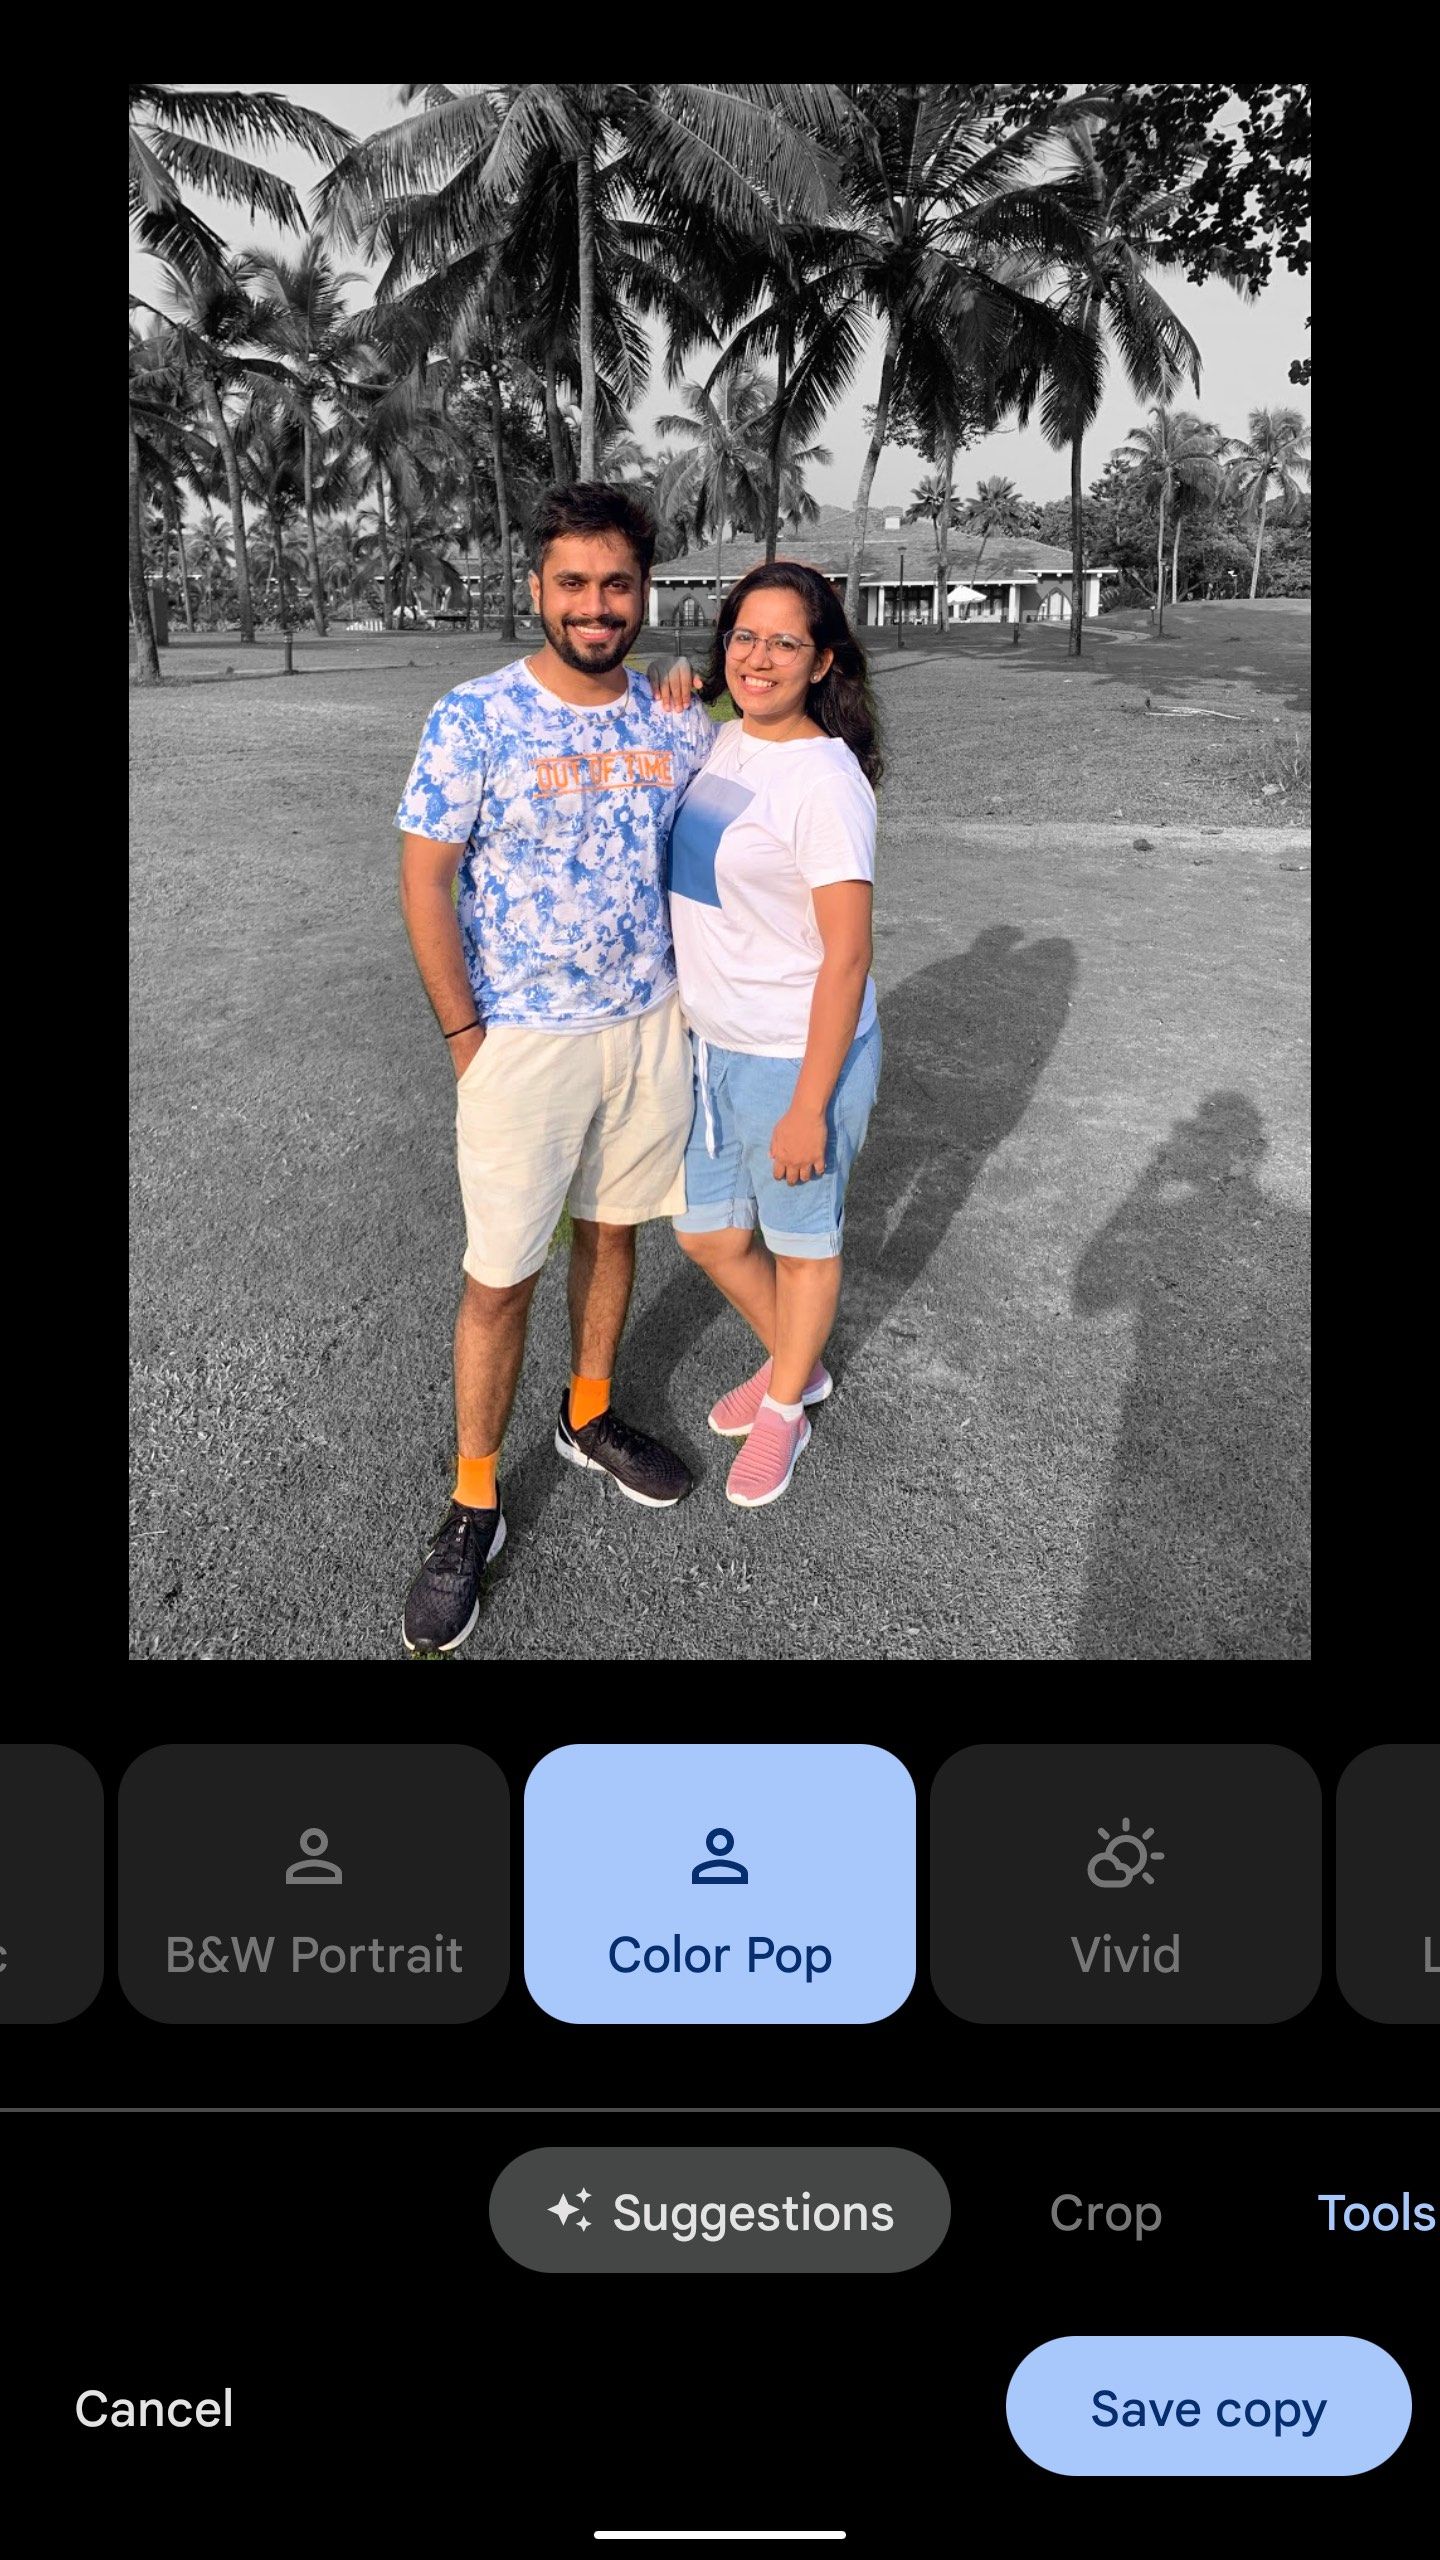
-
We used the
Color Pop
suggestion. Check the final image in the screenshot below.
Dozens of photo editing suggestions can overwhelm you. If you are unsure which option to use, tap the Enhance button and let Google Photos make relevant tweaks to improve an image.
Explore Magic Editor
Magic Editor debuted with the Pixel 8 series. It lets you perform several AI-based tweaks to your photos. Magic Editor is limited to the Pixel 8 series. We wouldn’t be surprised if Google opens up Magic Editor to other Android phones and iPhones. You can do the following tweaks with the Magic Editor on your compatible device:
- Move objects.
- Add sky effects to your photo.
- Reframe an image.
- Remove unwanted objects and people from a photo and more.
Let’s check Magic Editor in action. Before we start, back up your images to Google Photos. Magic Editor doesn’t work on your local images. Your Google account needs sufficient space to back your media files. Check our dedicated guide to free your Google Drive space.
-
Launch
Google Photos
on your phone and open an image. -
Look for the
Magic Editor
button in the lower-left corner. -
It shows the Magic Editor tools. We picked an image with the sky in the background and added the Golden hour effect.
It’s one of the Magic Editor features that works like a charm. Other features also work as advertised, but you may have problems with complex images, lighting effects, and objects. Check our dedicated guide to learn about Magic Editor in detail.
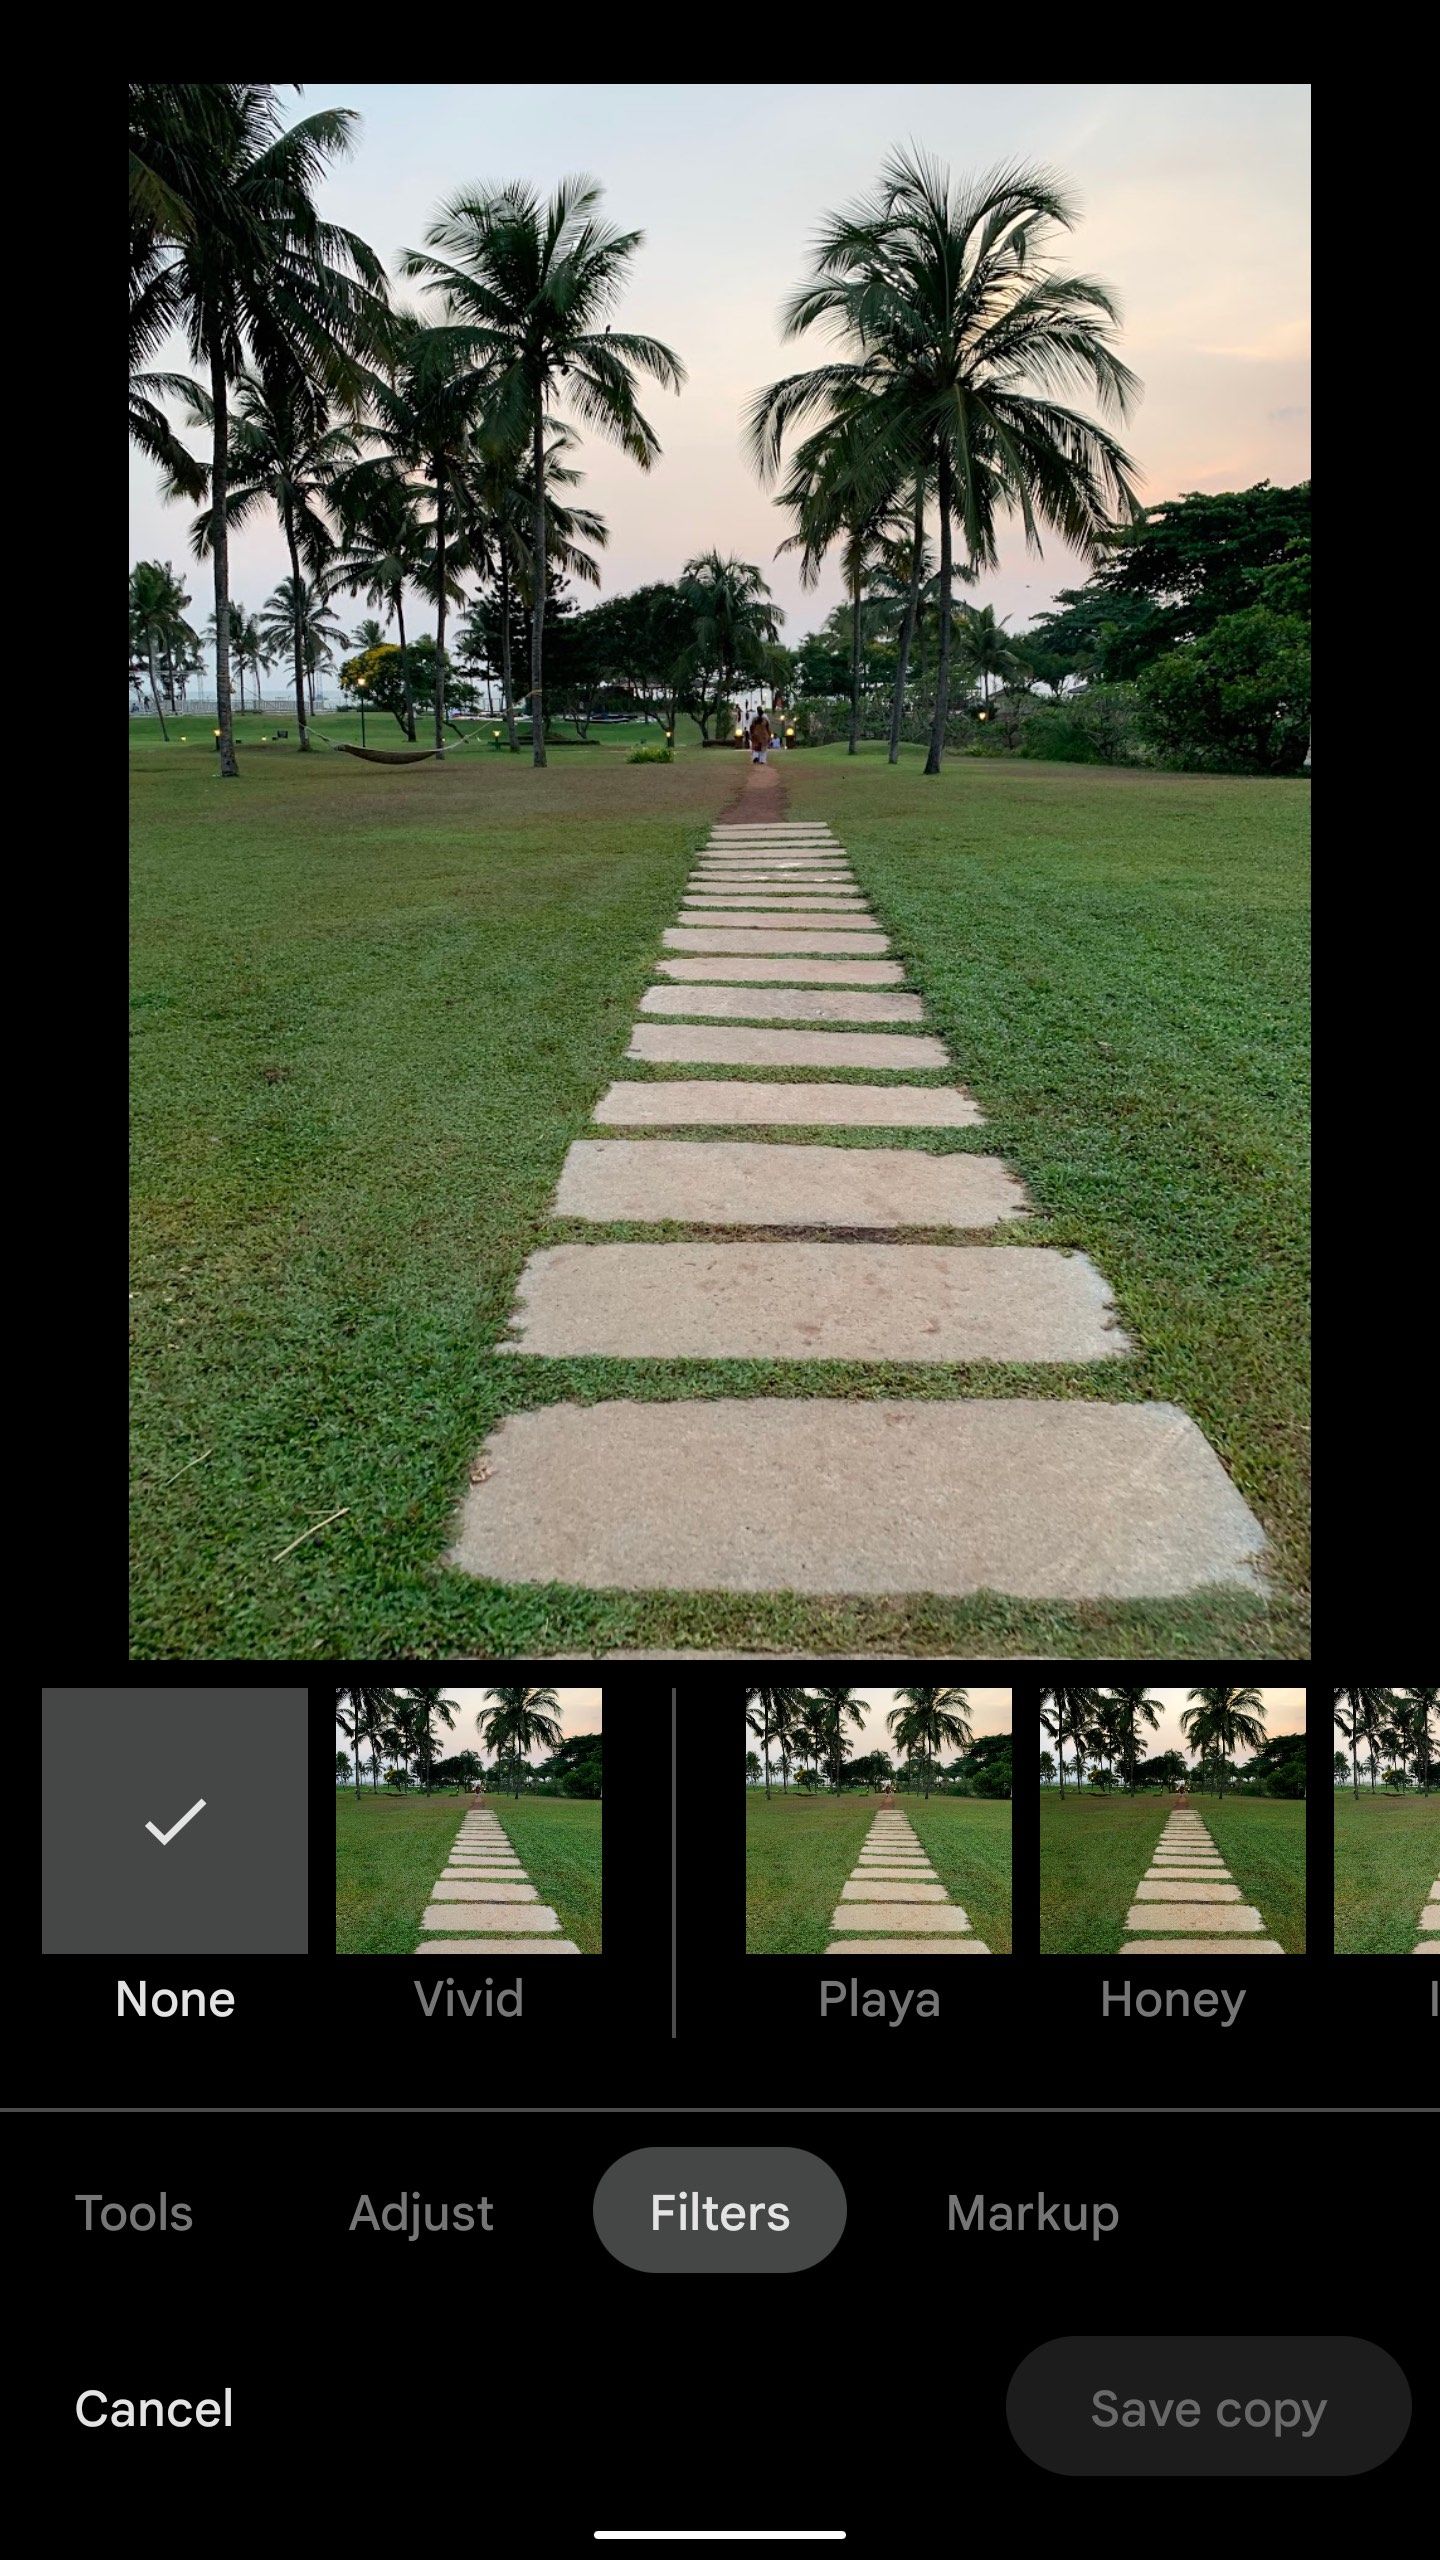
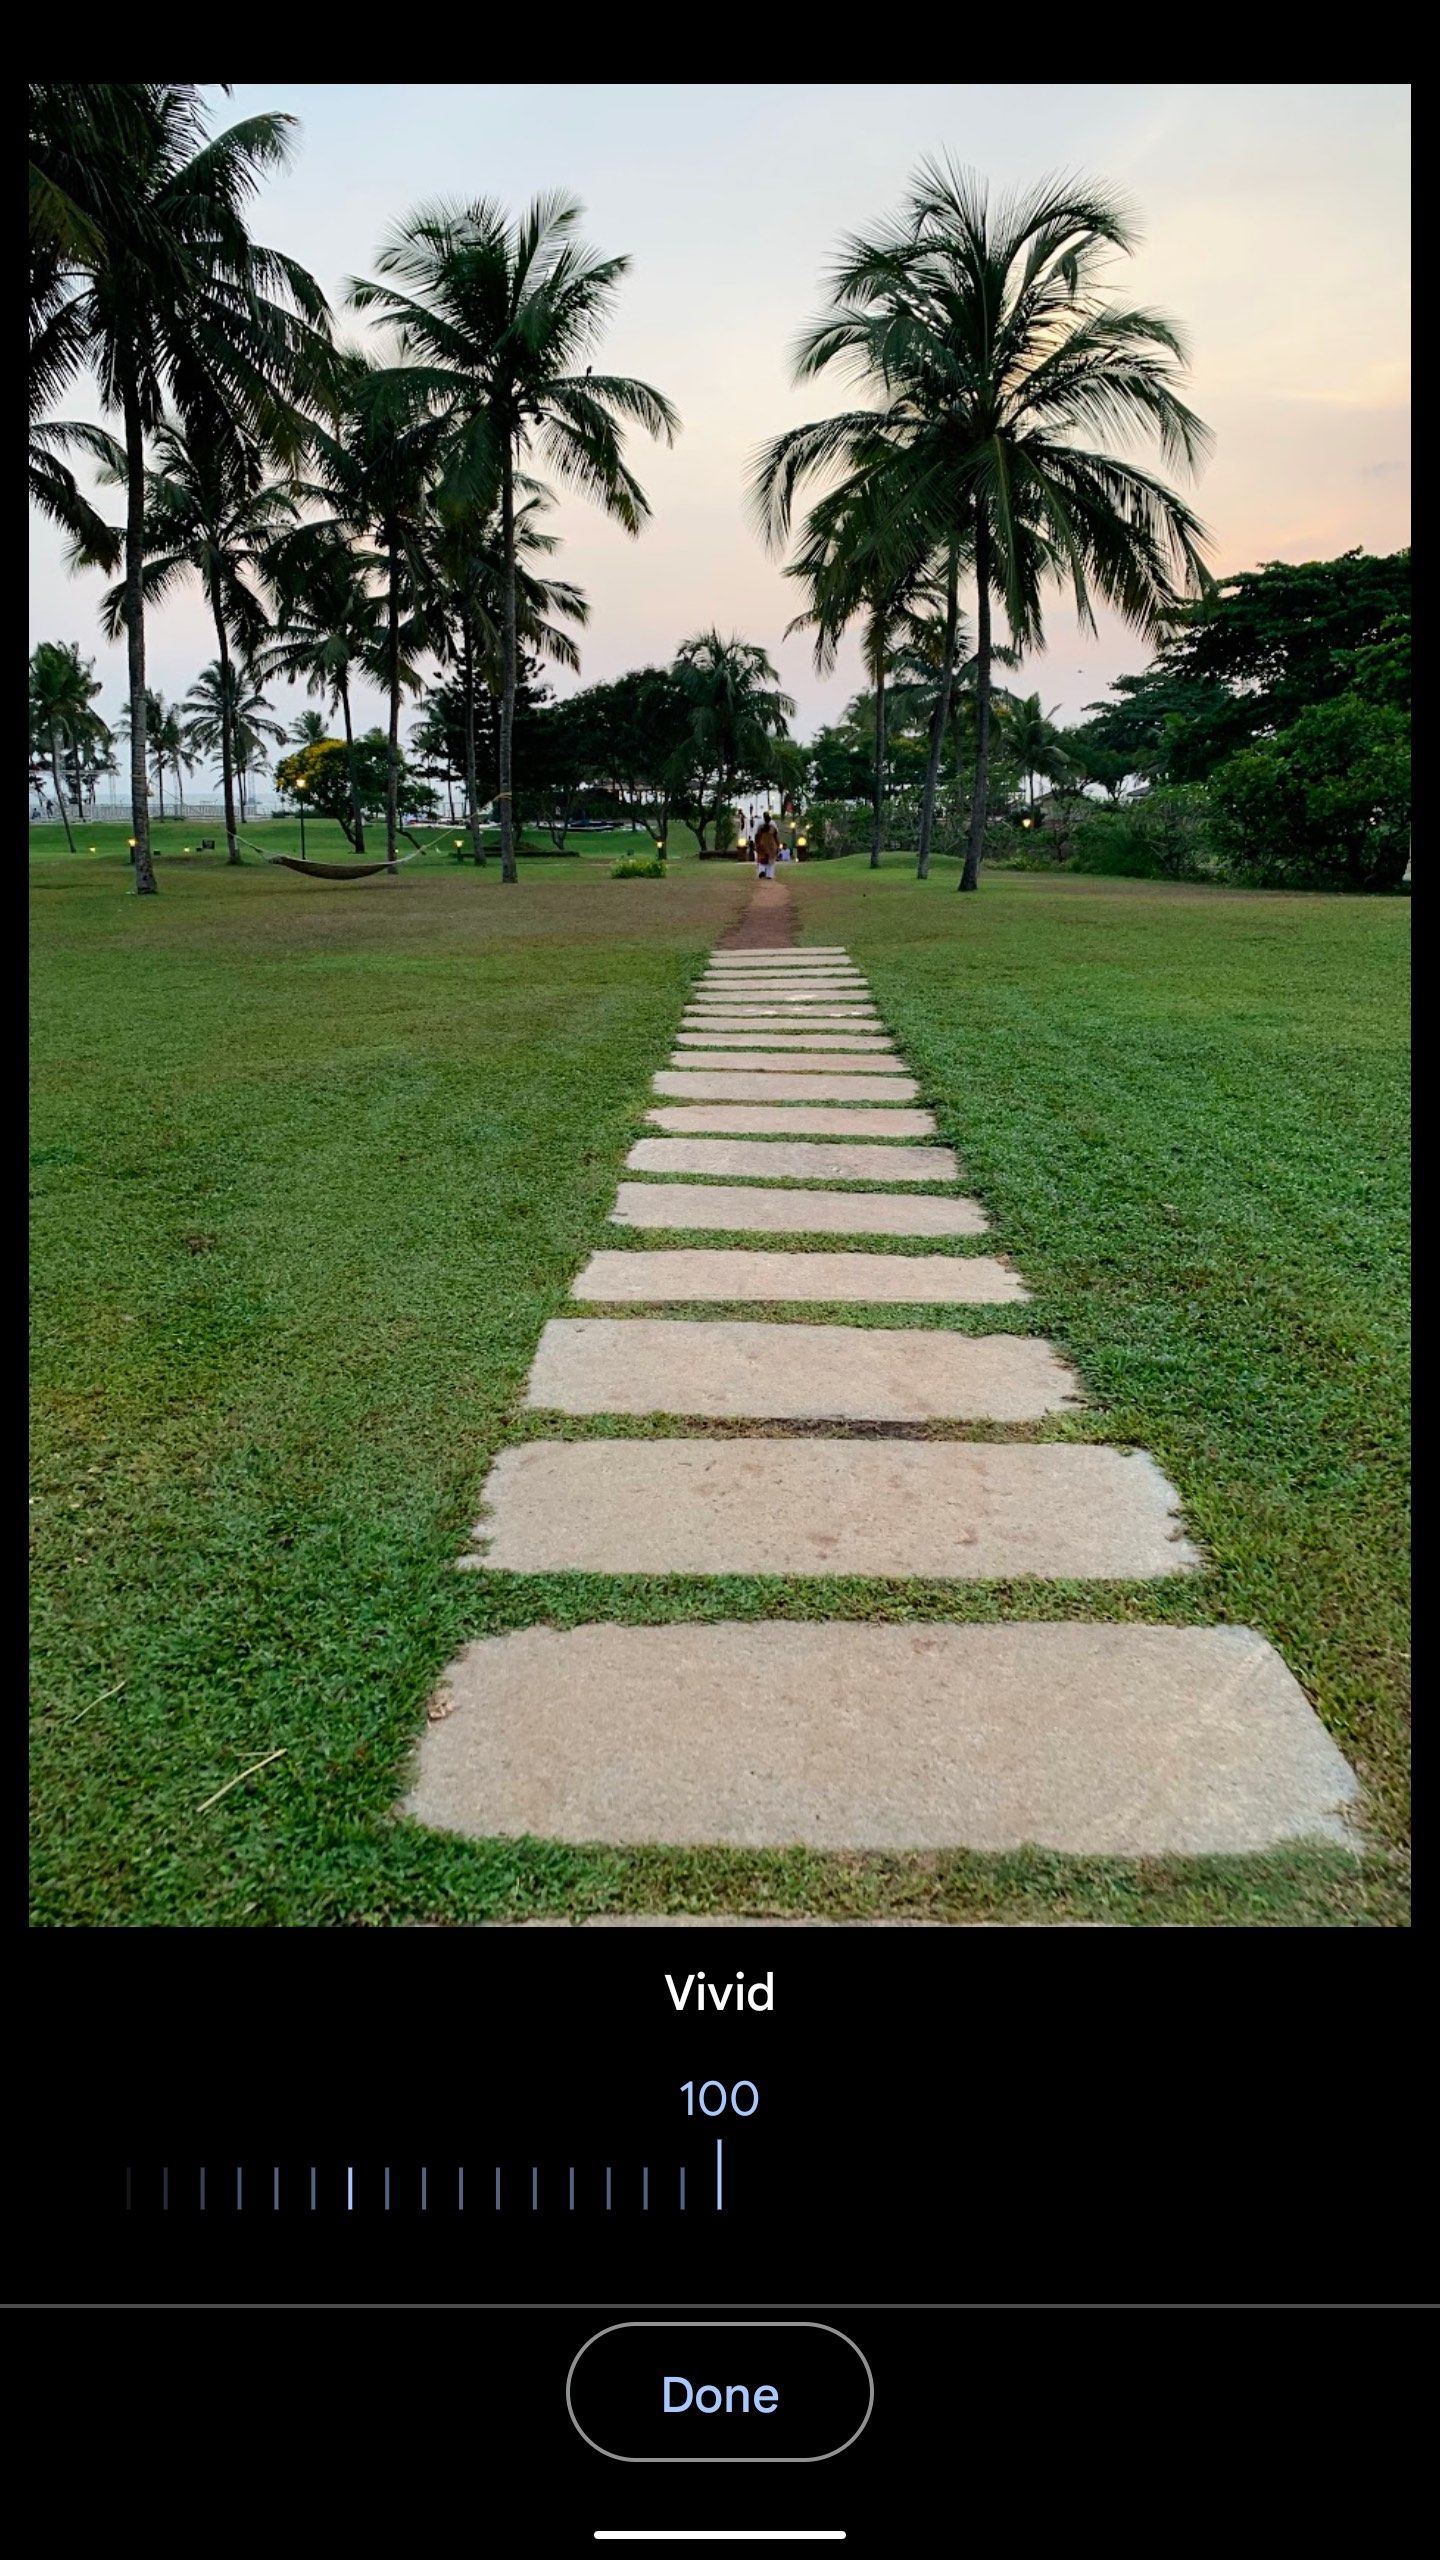
Try Google Photos filters
Filters have become a norm for gallery apps, and Google Photos is no exception.
- Open the Google Photos editing menu (refer to the steps above).
-
Scroll left to the
Filters
menu. -
Check the available filters to use. Tap a filter to check the live preview.
-
Filters are set to 100% intensity. Tap the
filter button
to adjust it using a slider.
Crop or rotate a photo
Do you want to remove that annoying friend who’s making a weird face in a photo? You can crop or rotate a photo in Google Photos.
-
Open an image in Google Photos and tap the
Edit
button. -
Select
Crop
and tap the first rectangle icon to check the available aspect ratios. -
Tap the third icon to crop an image manually to your preference.
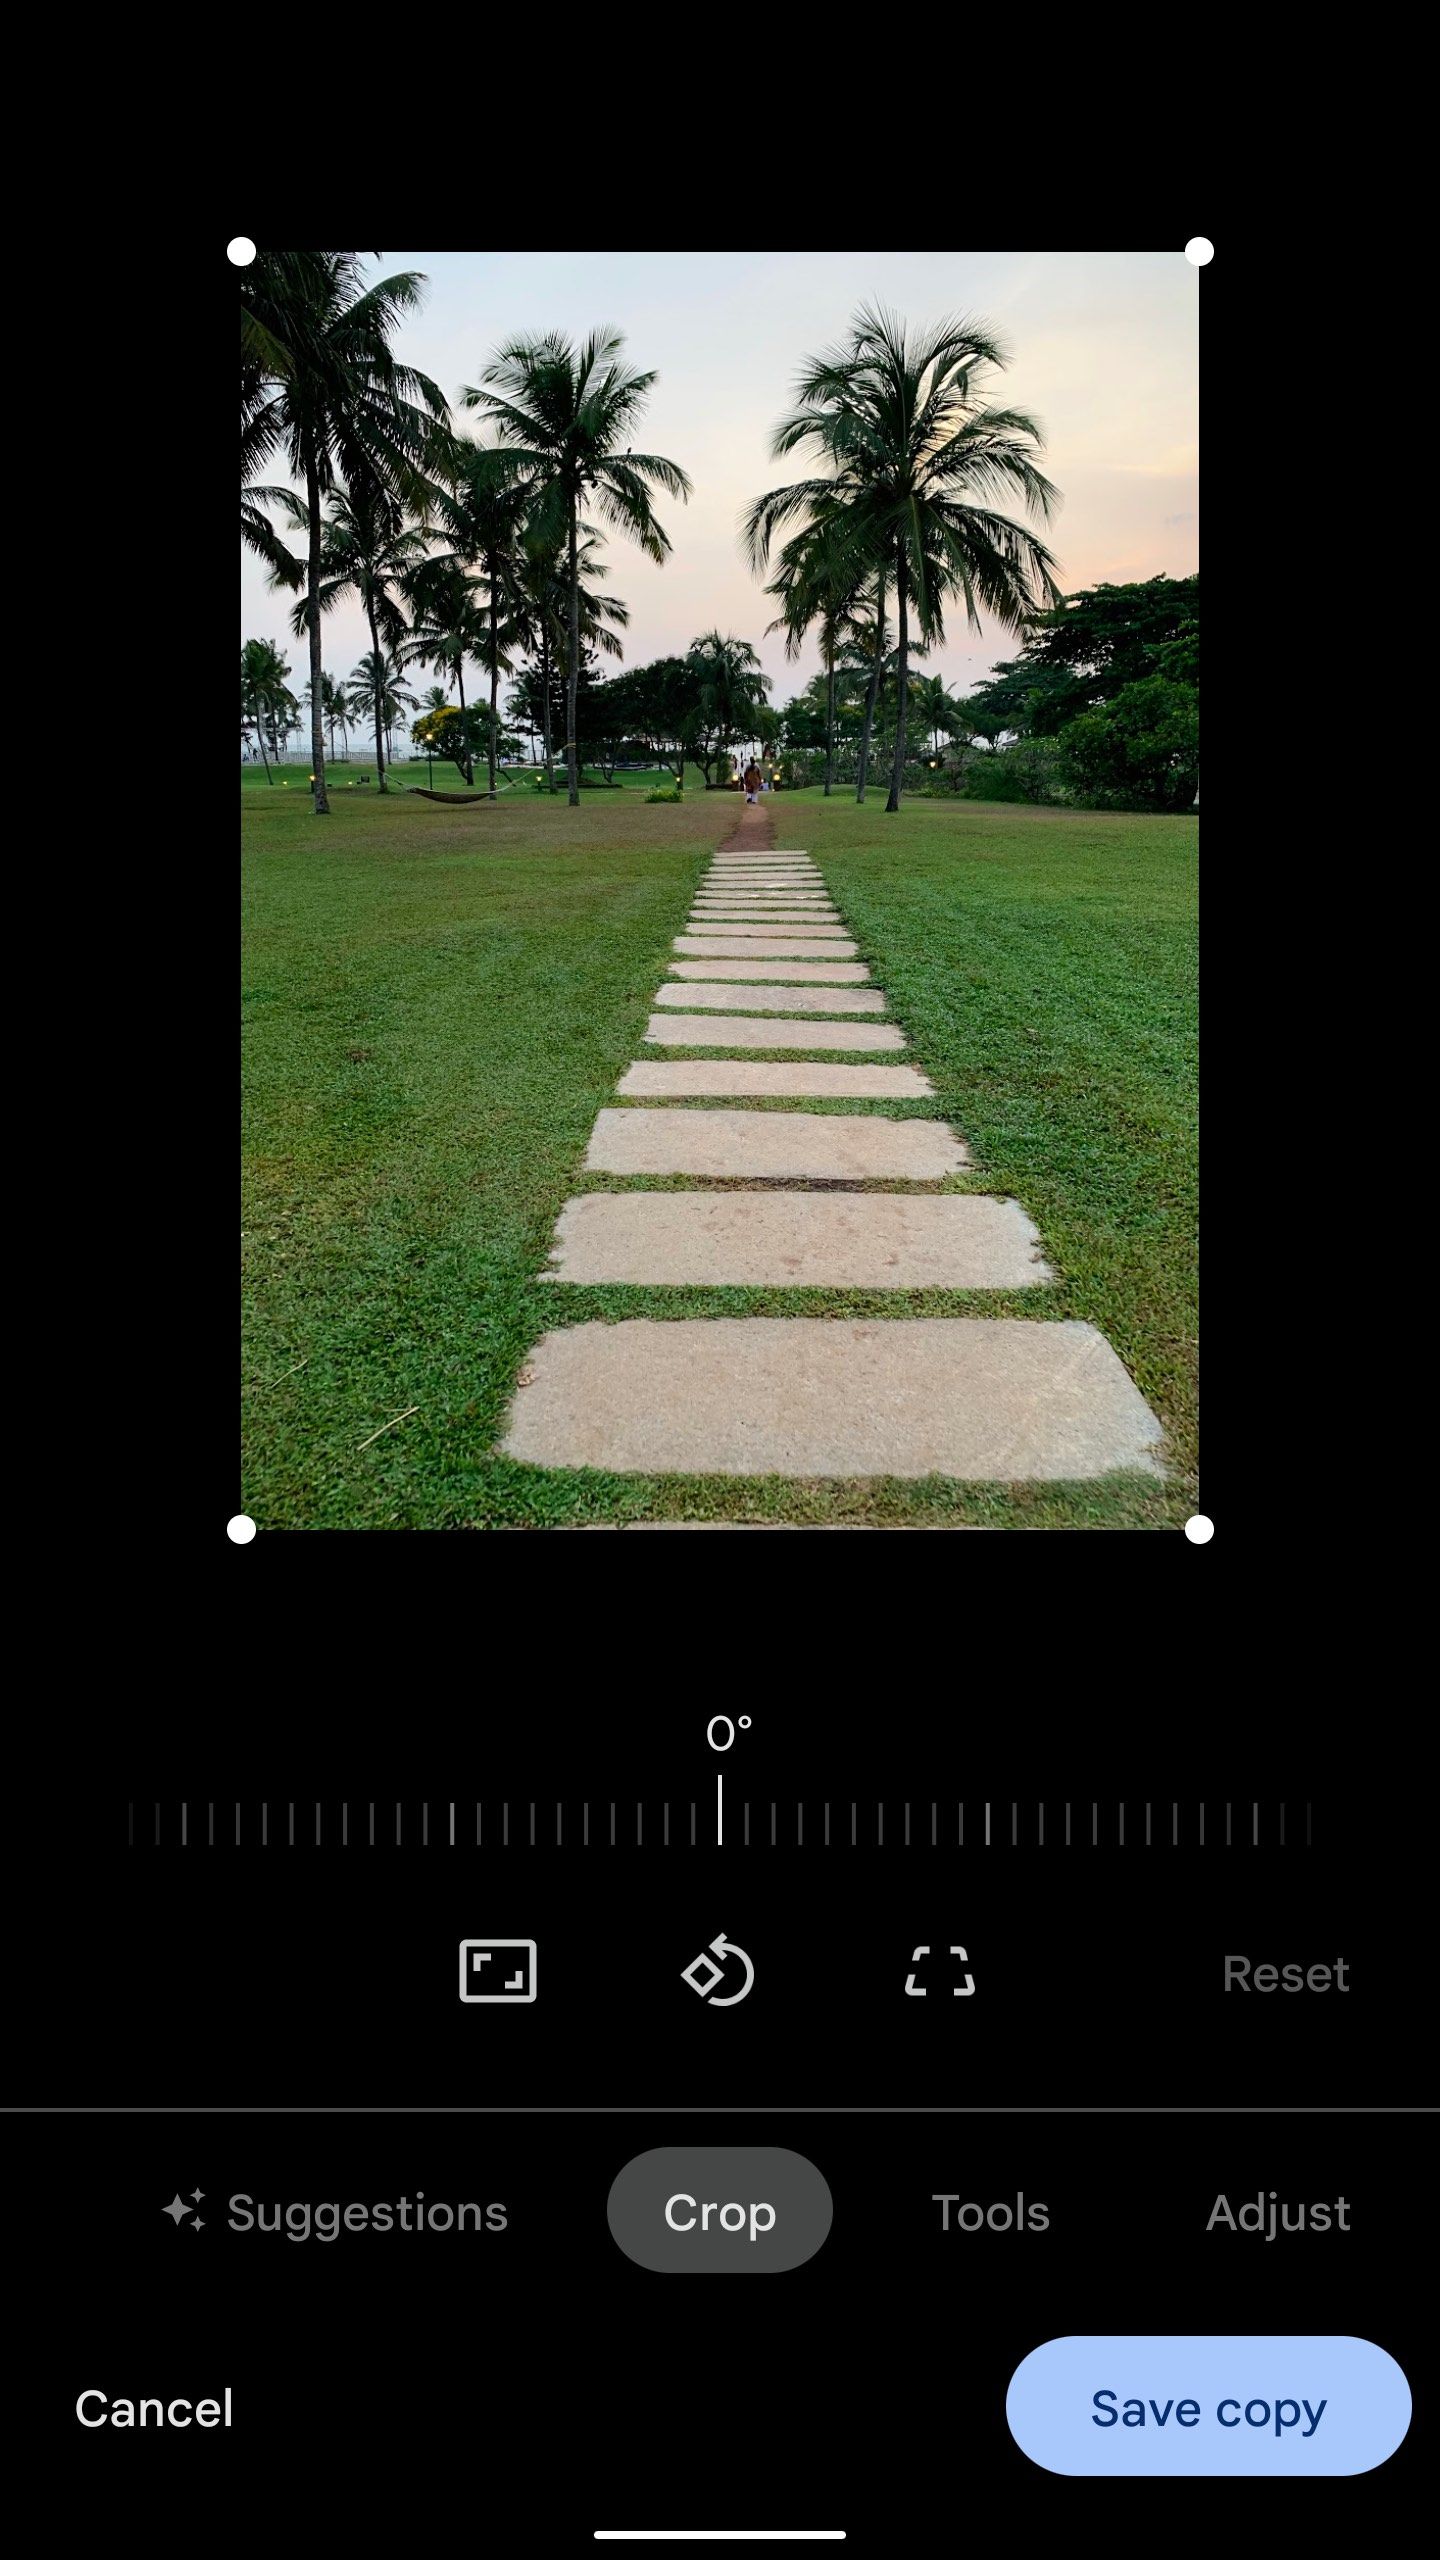
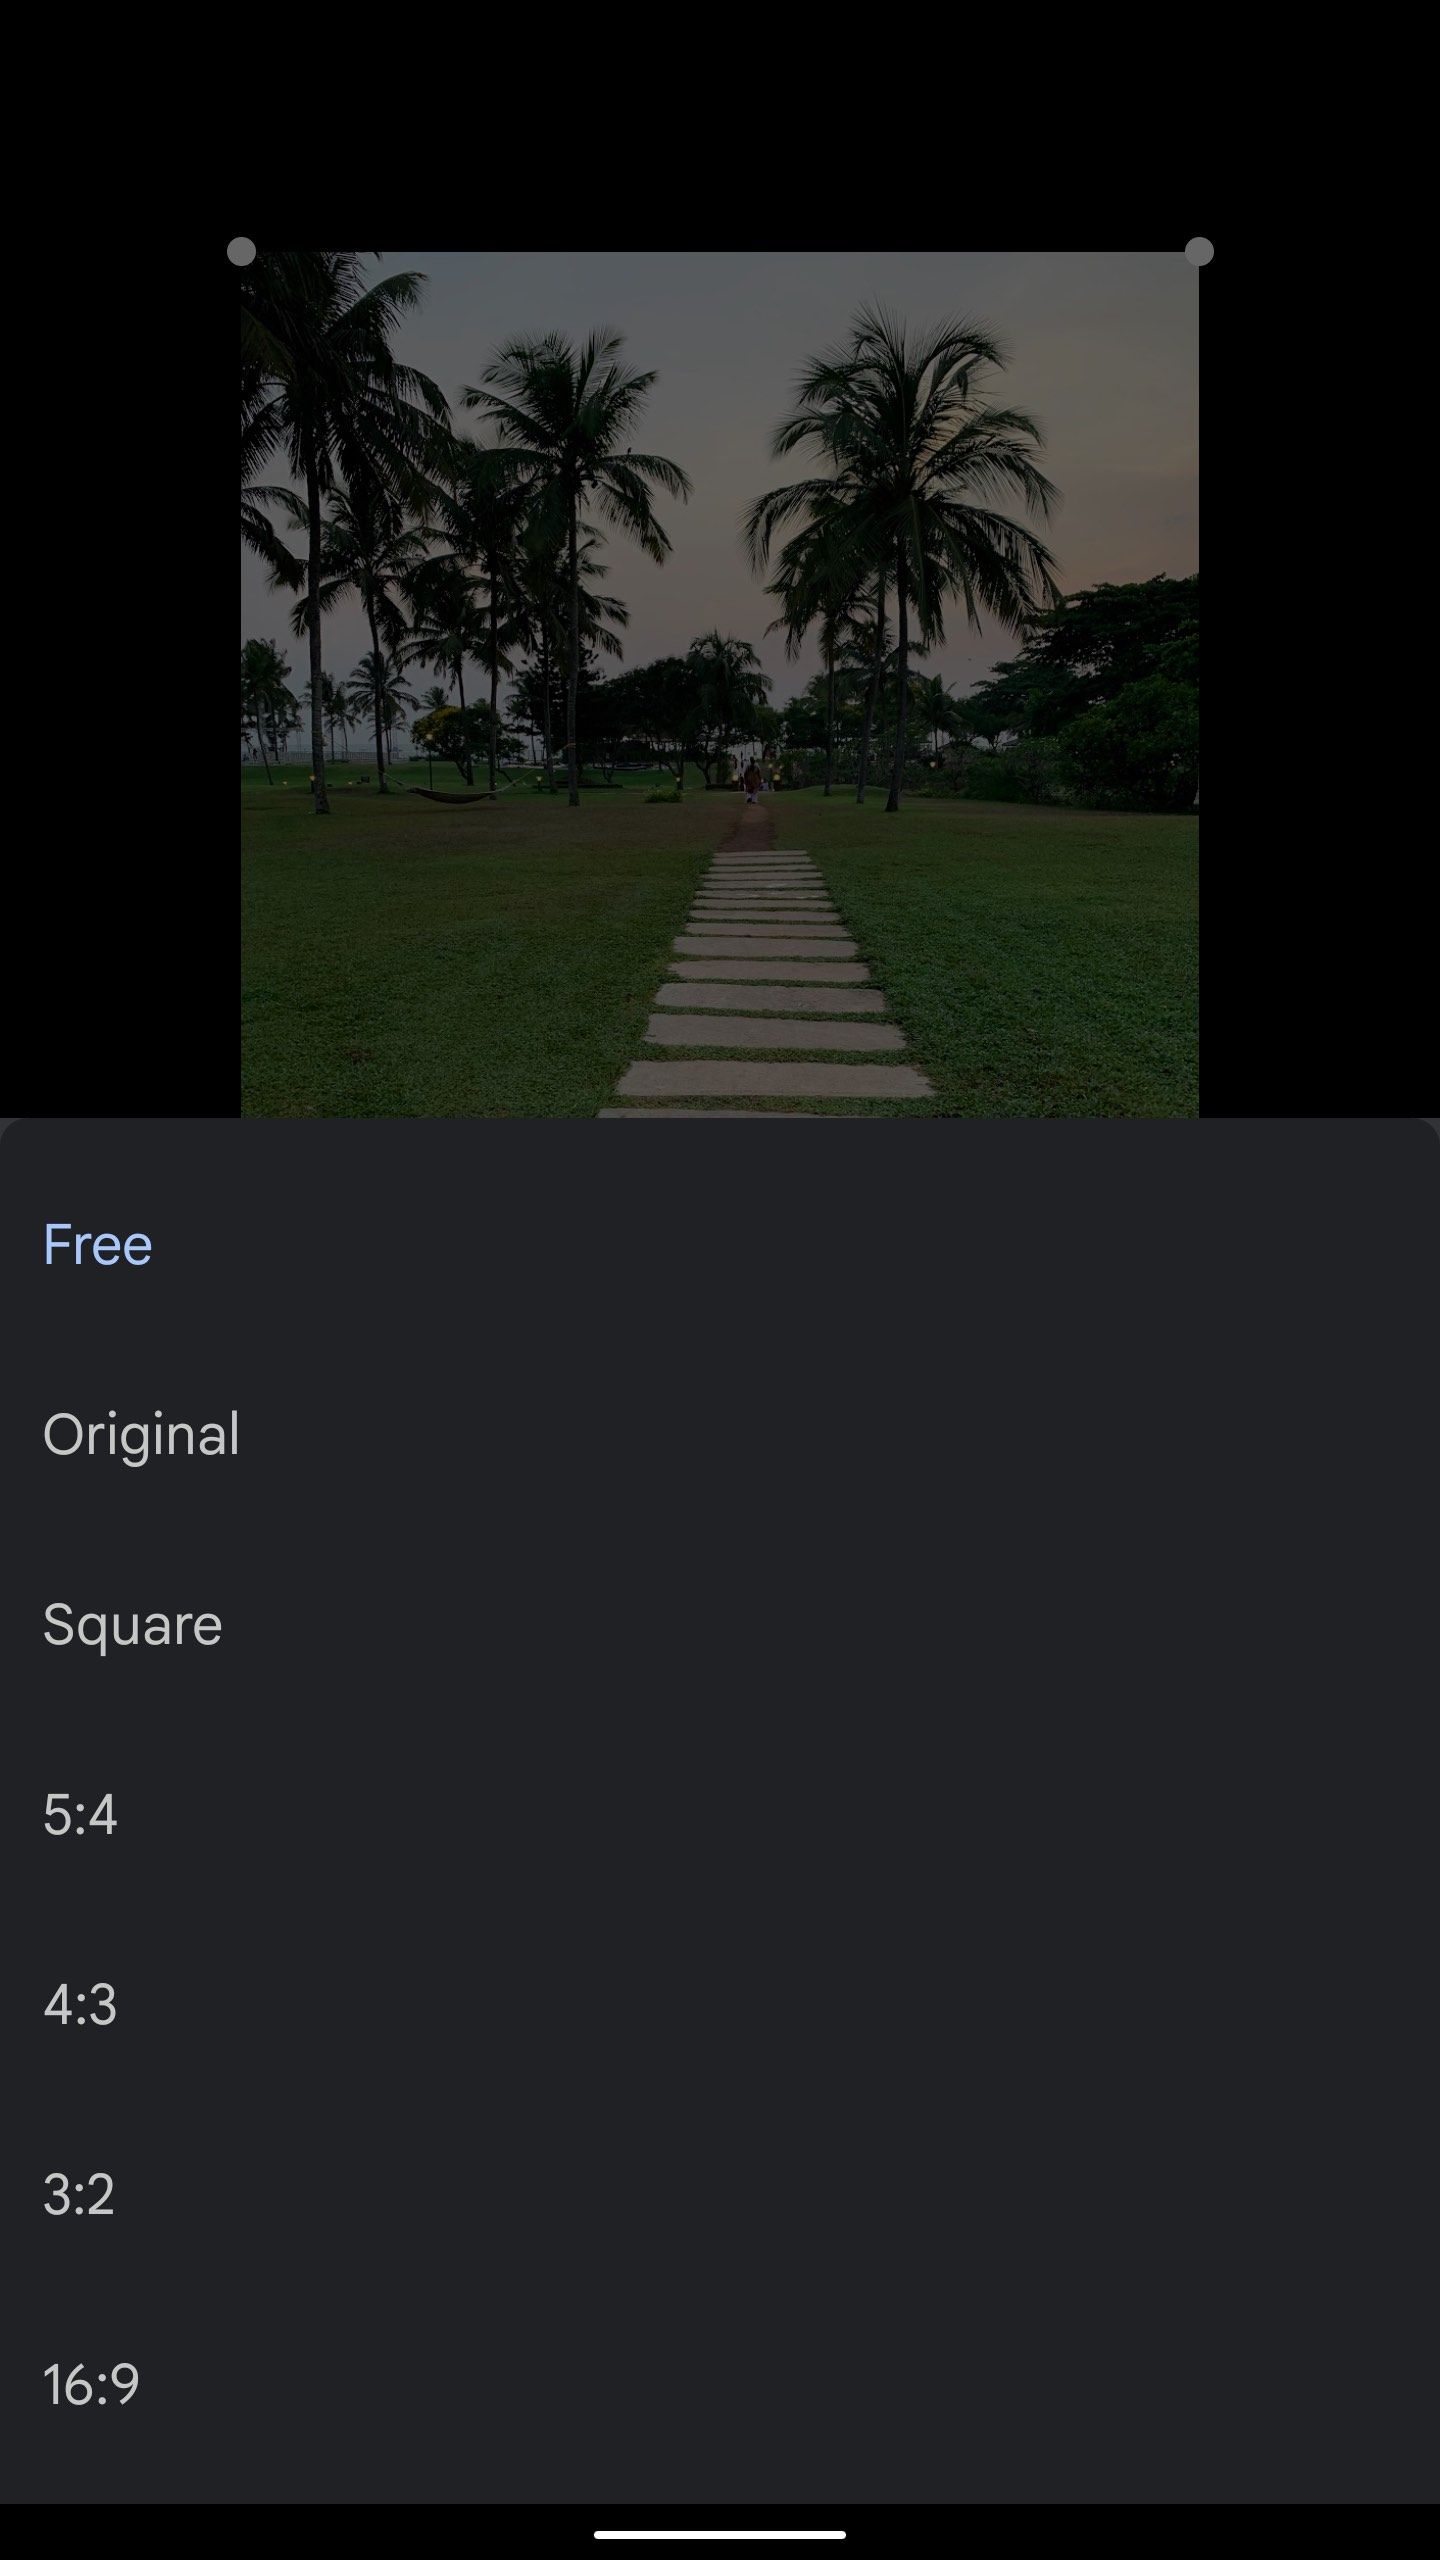
You can’t resize an image in Google Photos. The company should add the function in a future update.
Google Photos has several tools to change the sky look, apply a blur effect, remove unnecessary objects from an image, and improve portraits.
- Open the Google Photos editing menu (check the steps in the first section).
-
Scroll to the
Tools
menu. - Choose a tool.
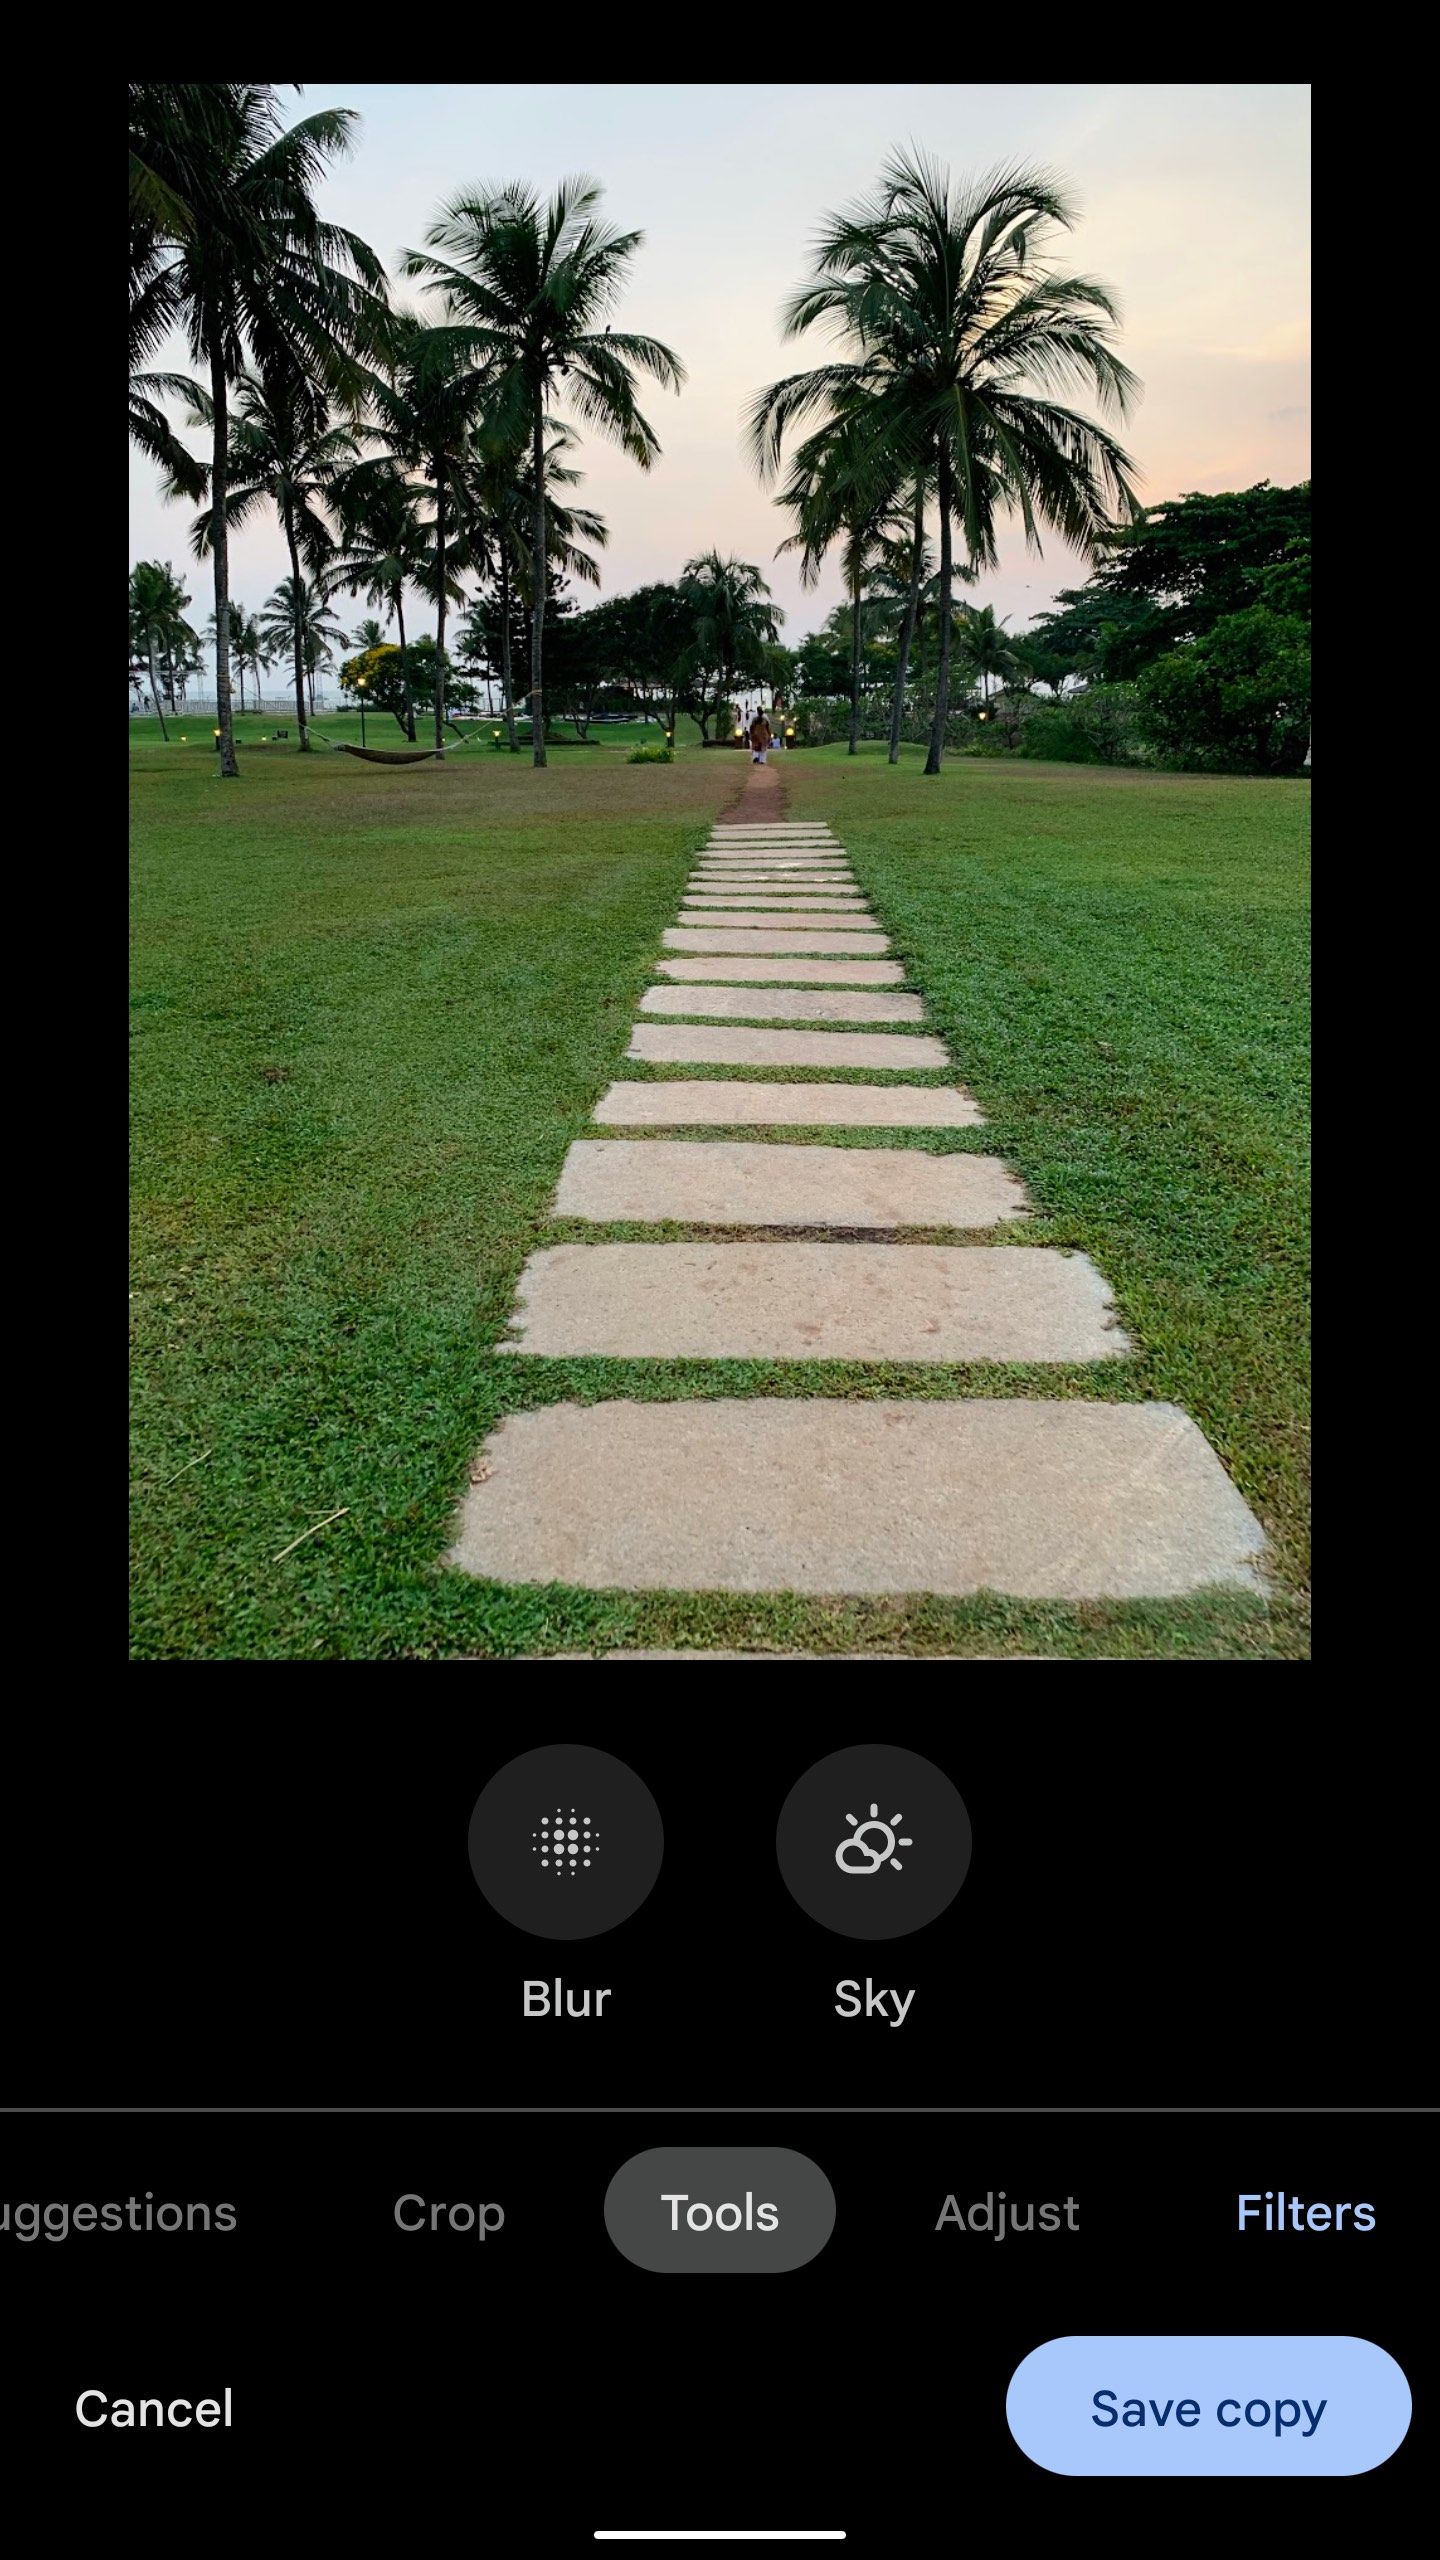
The available tools are:
-
Portrait light
: Adjusts the position and light brightness of portraits. -
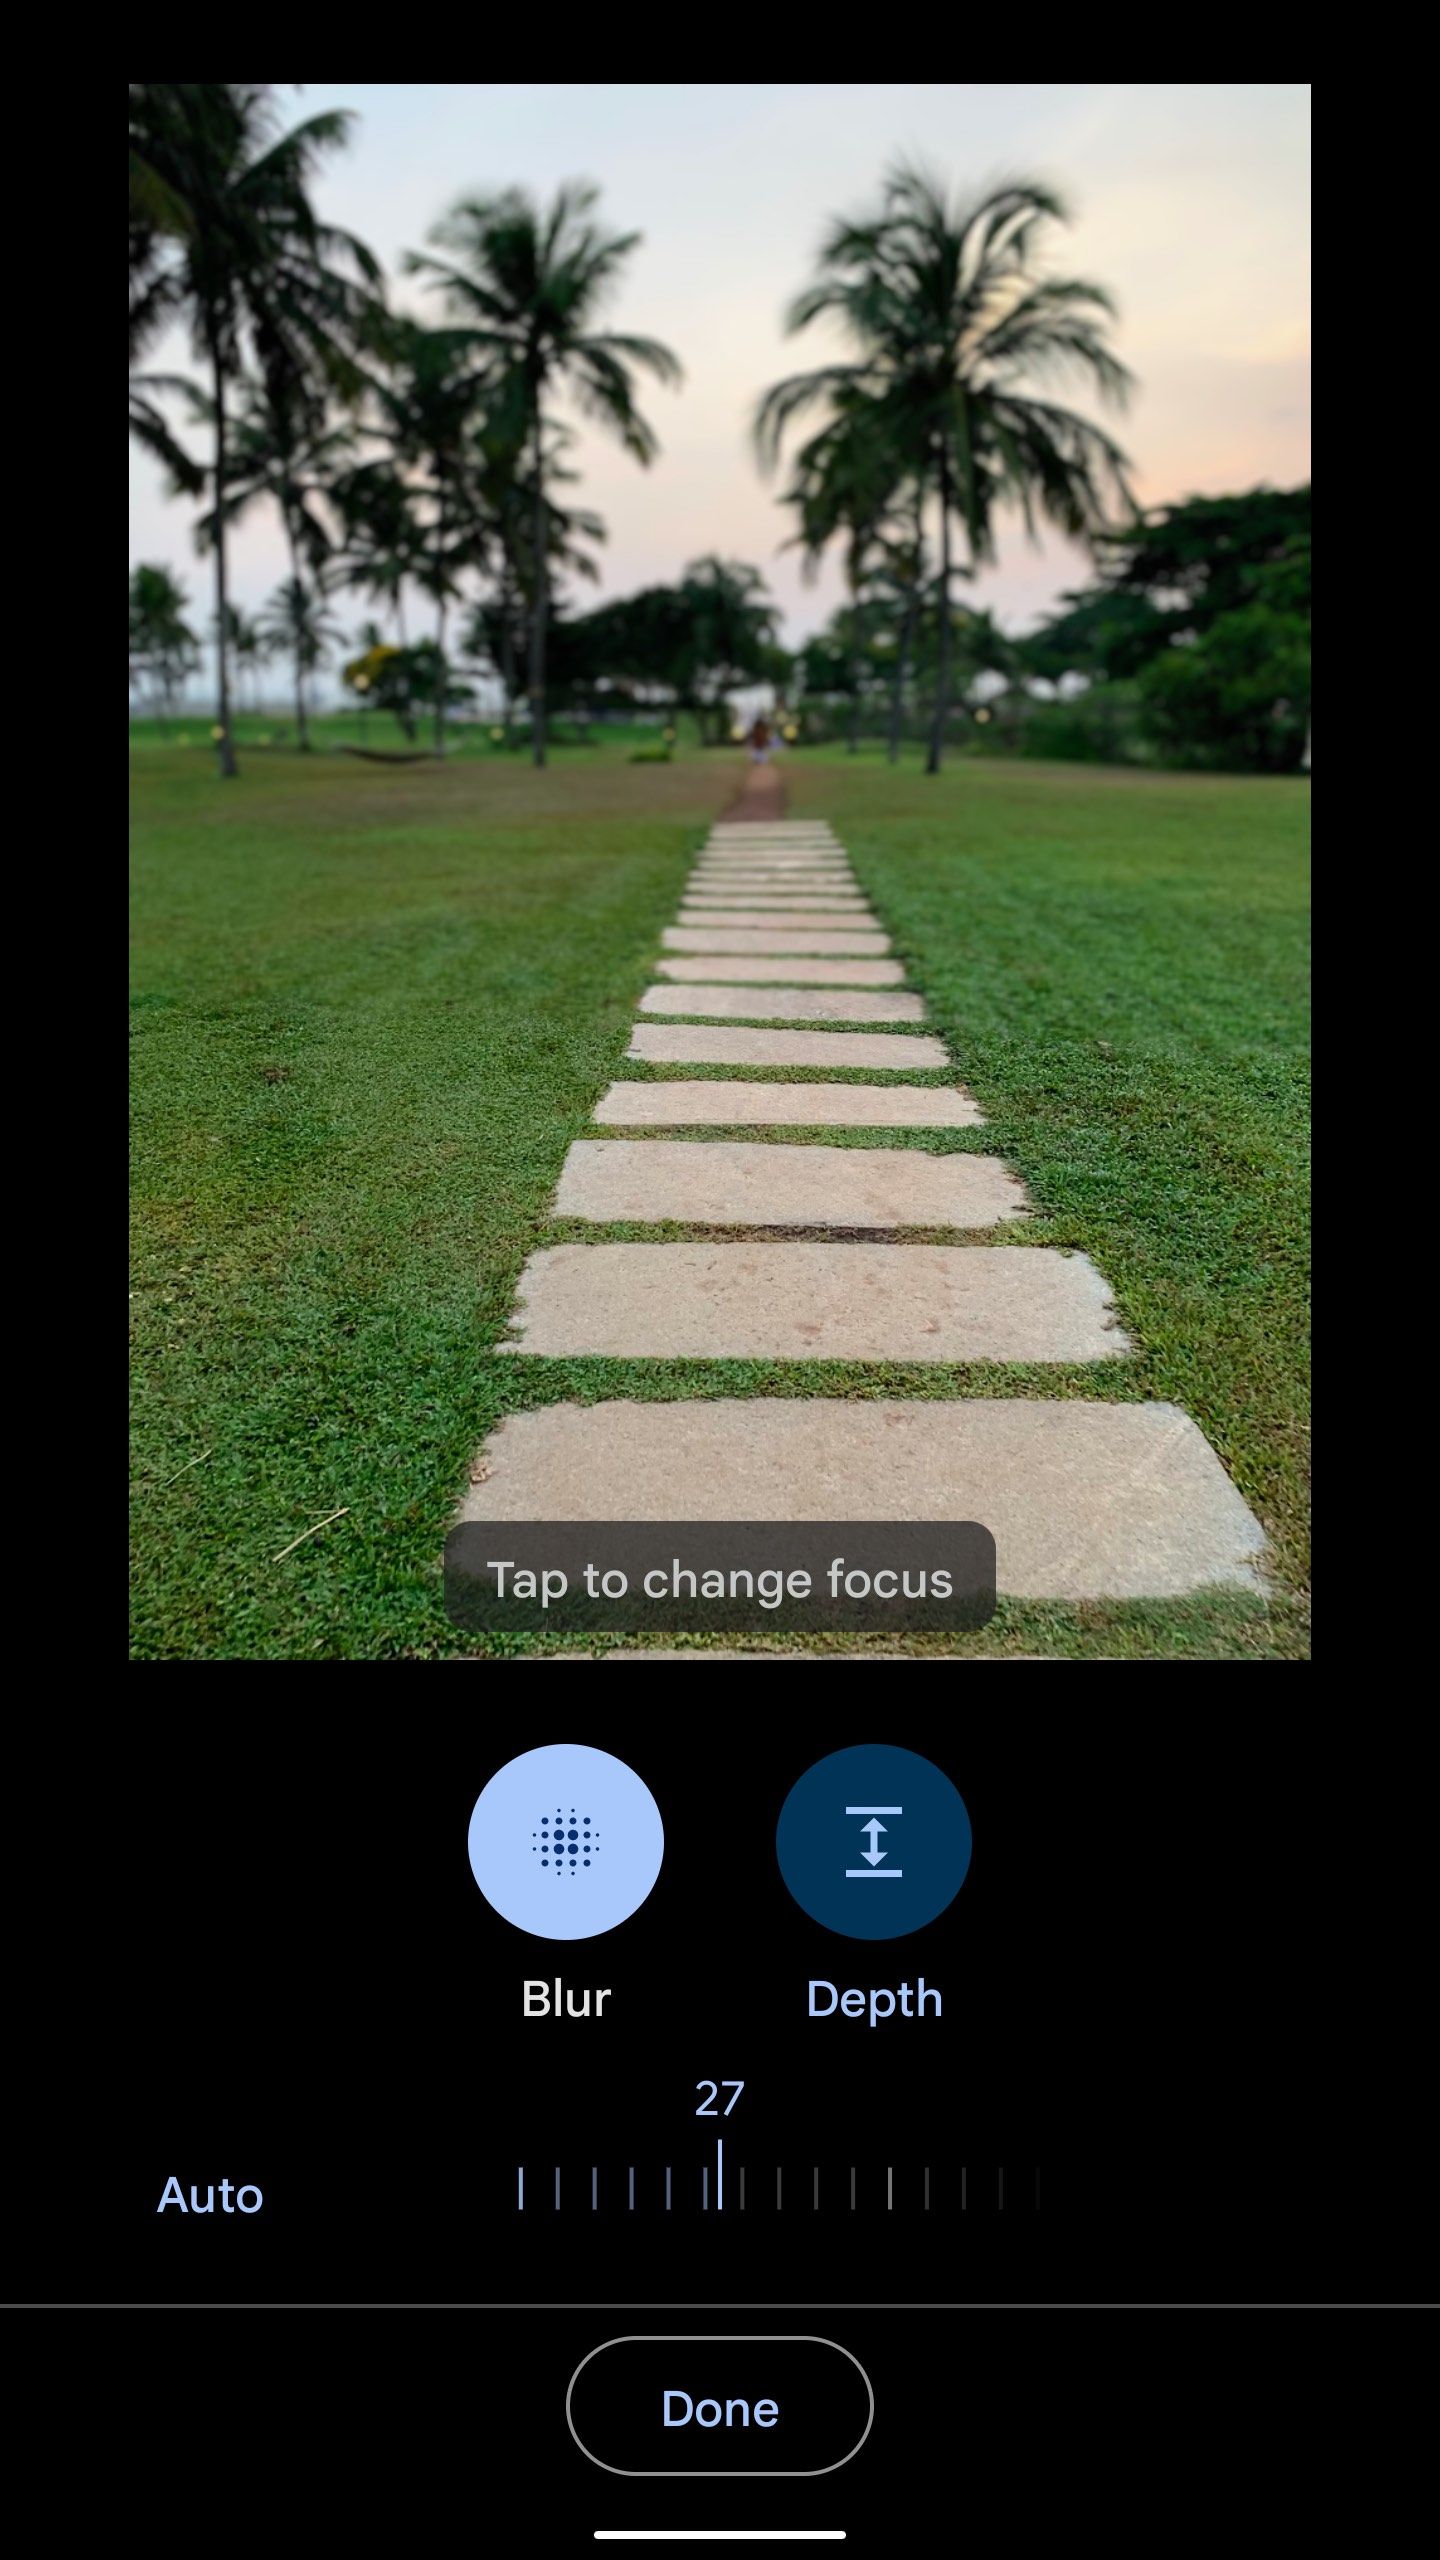
Blur
: Adds a background blur to your images. You can adjust the depth and blur intensity. -
Magic eraser
: Removes photobombs from images. This is limited to a few devices. -
Color focus
: Desaturates the background and keeps the foreground in color. -
Sky
: Select several palettes to adjust the color and contrast of the sky.
Adjust photos
Google Photos lets you adjust saturation, shadows, skin tone, white point, HDR, contrast, and more.
-
Select an image in Google Photos and tap the
Edit
button. -
Scroll horizontally to
Adjust
. -
Select the option you want to adjust. Use the slider to adjust the intensity.
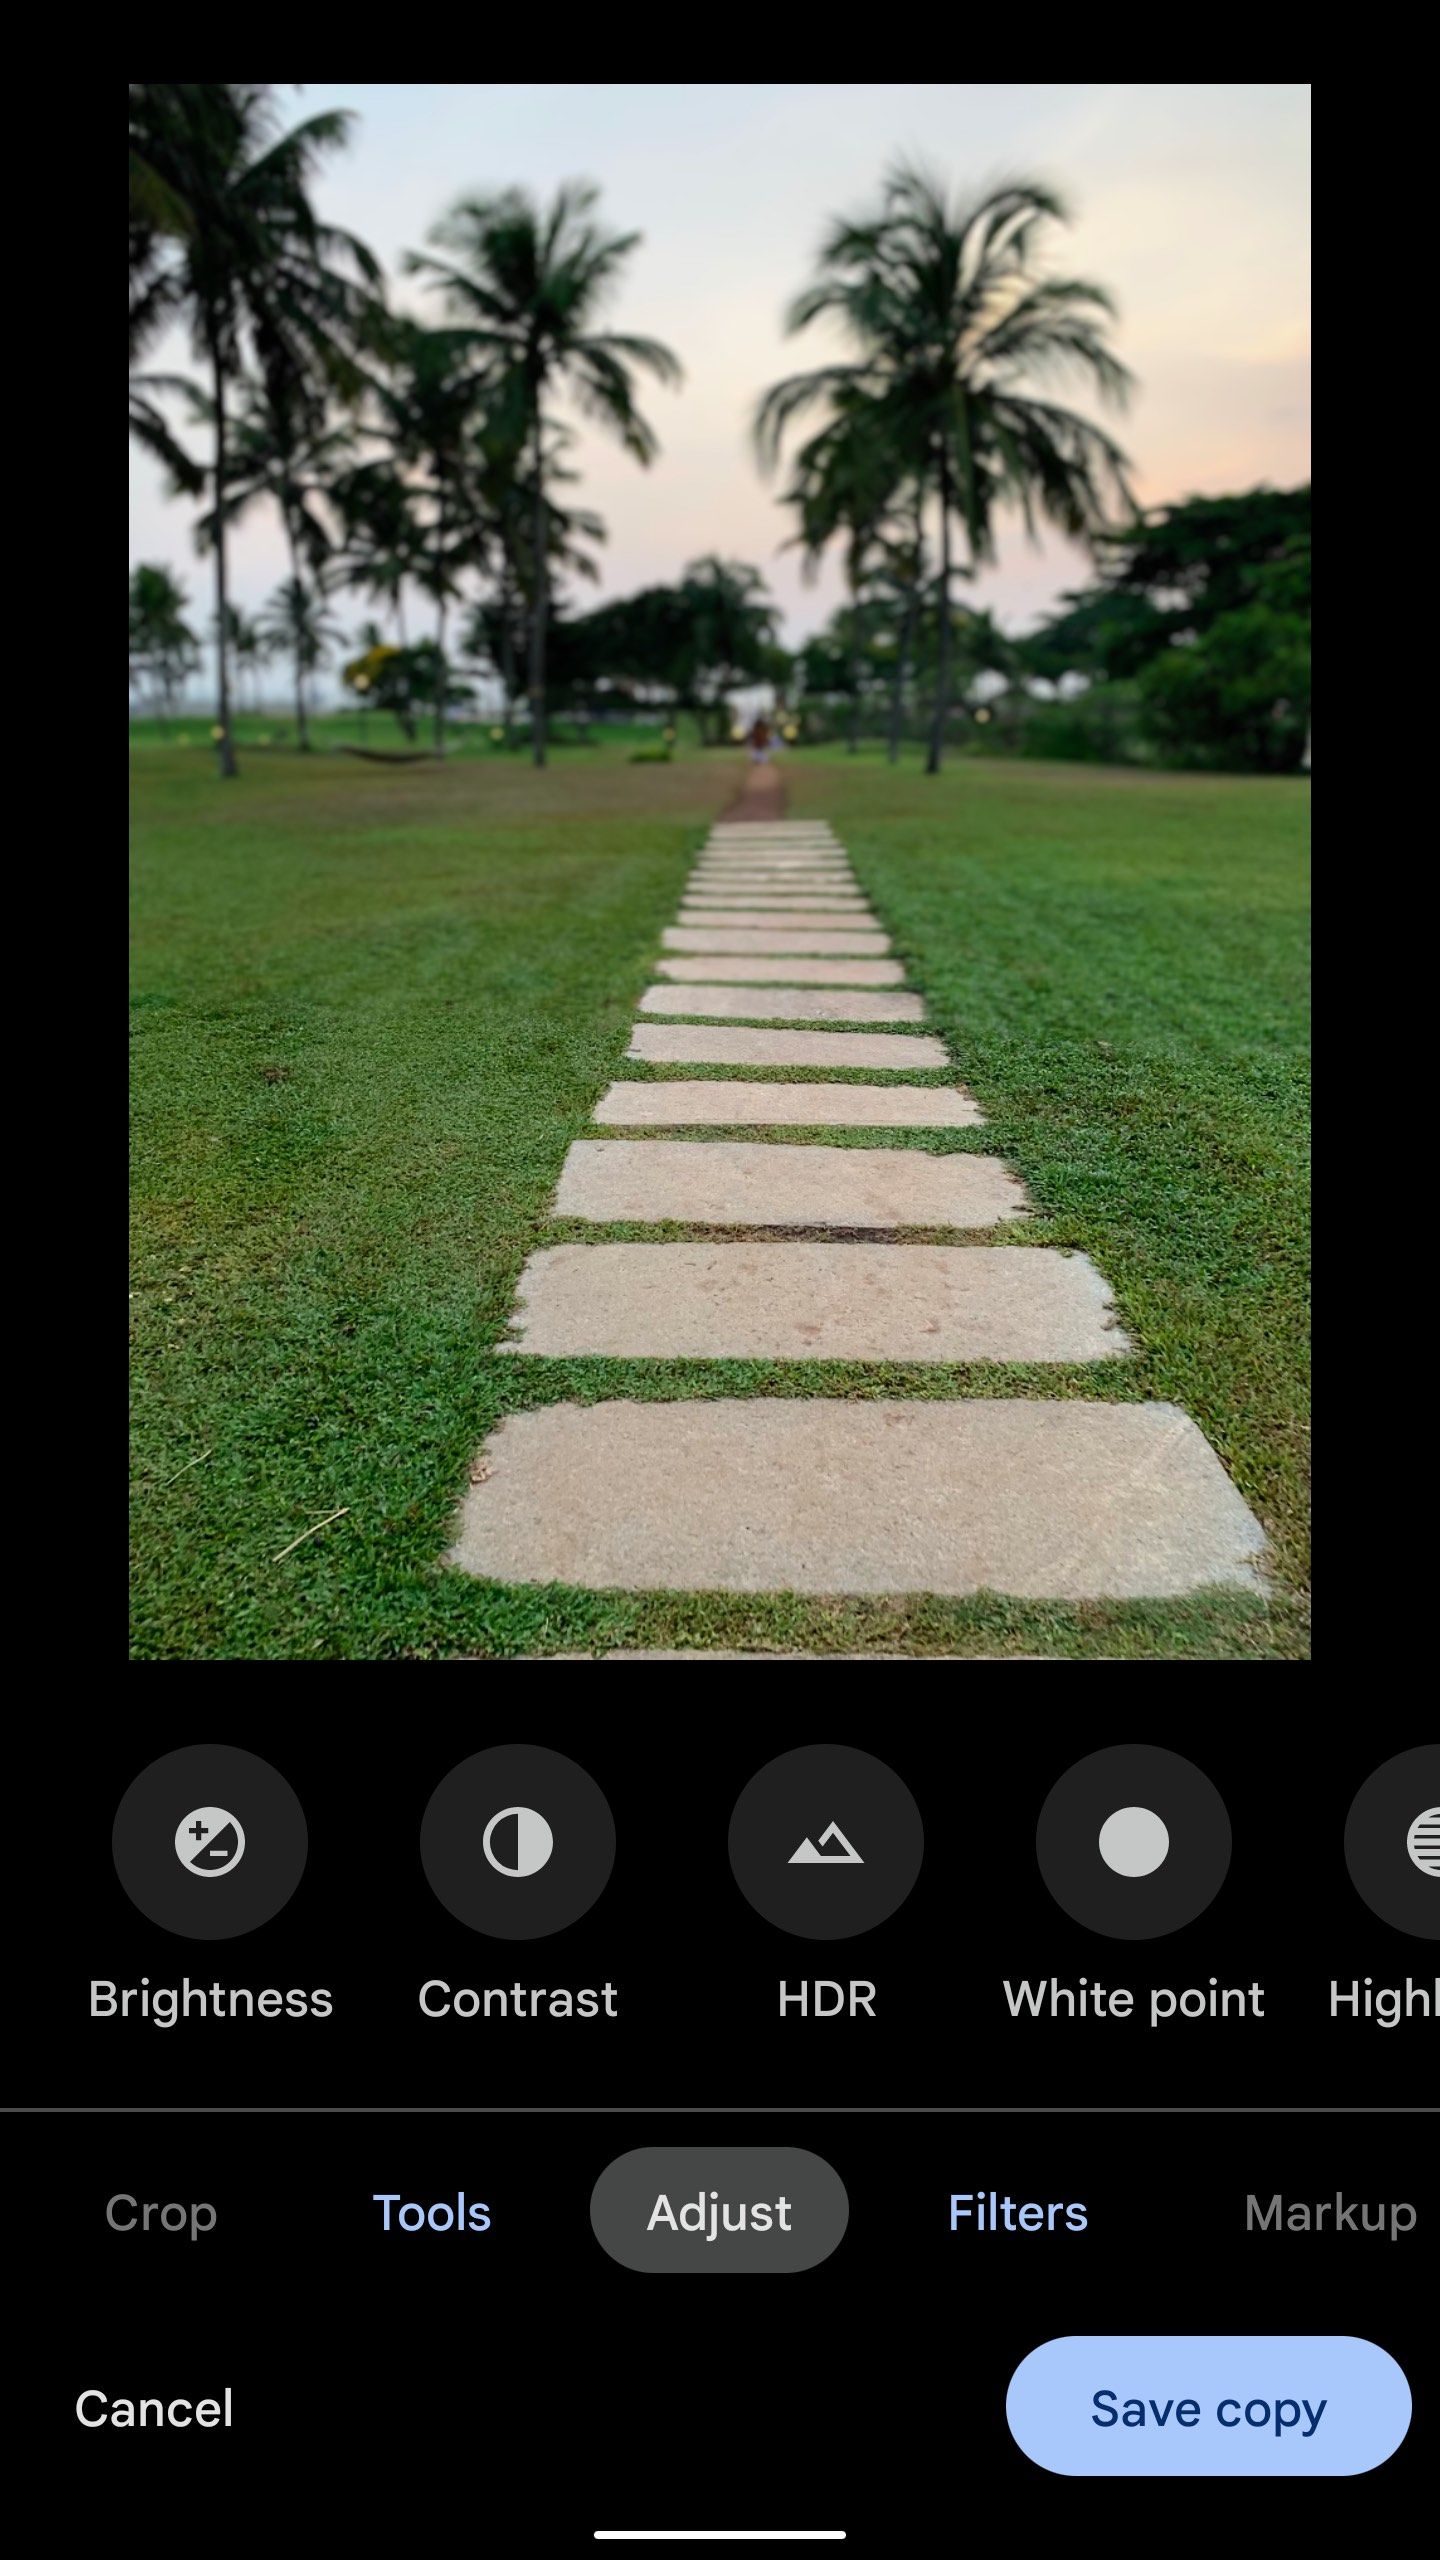

Here are the available tools to adjust your photos.
- Brightness
- Contrast
- HDR effect
- White point
- Highlights
- Shadows
- Black point
- Saturation
- Warmth
- Tint
- Skin tone
- Blue tone
- Pop
- Sharpen
- Denoise
- Vignette
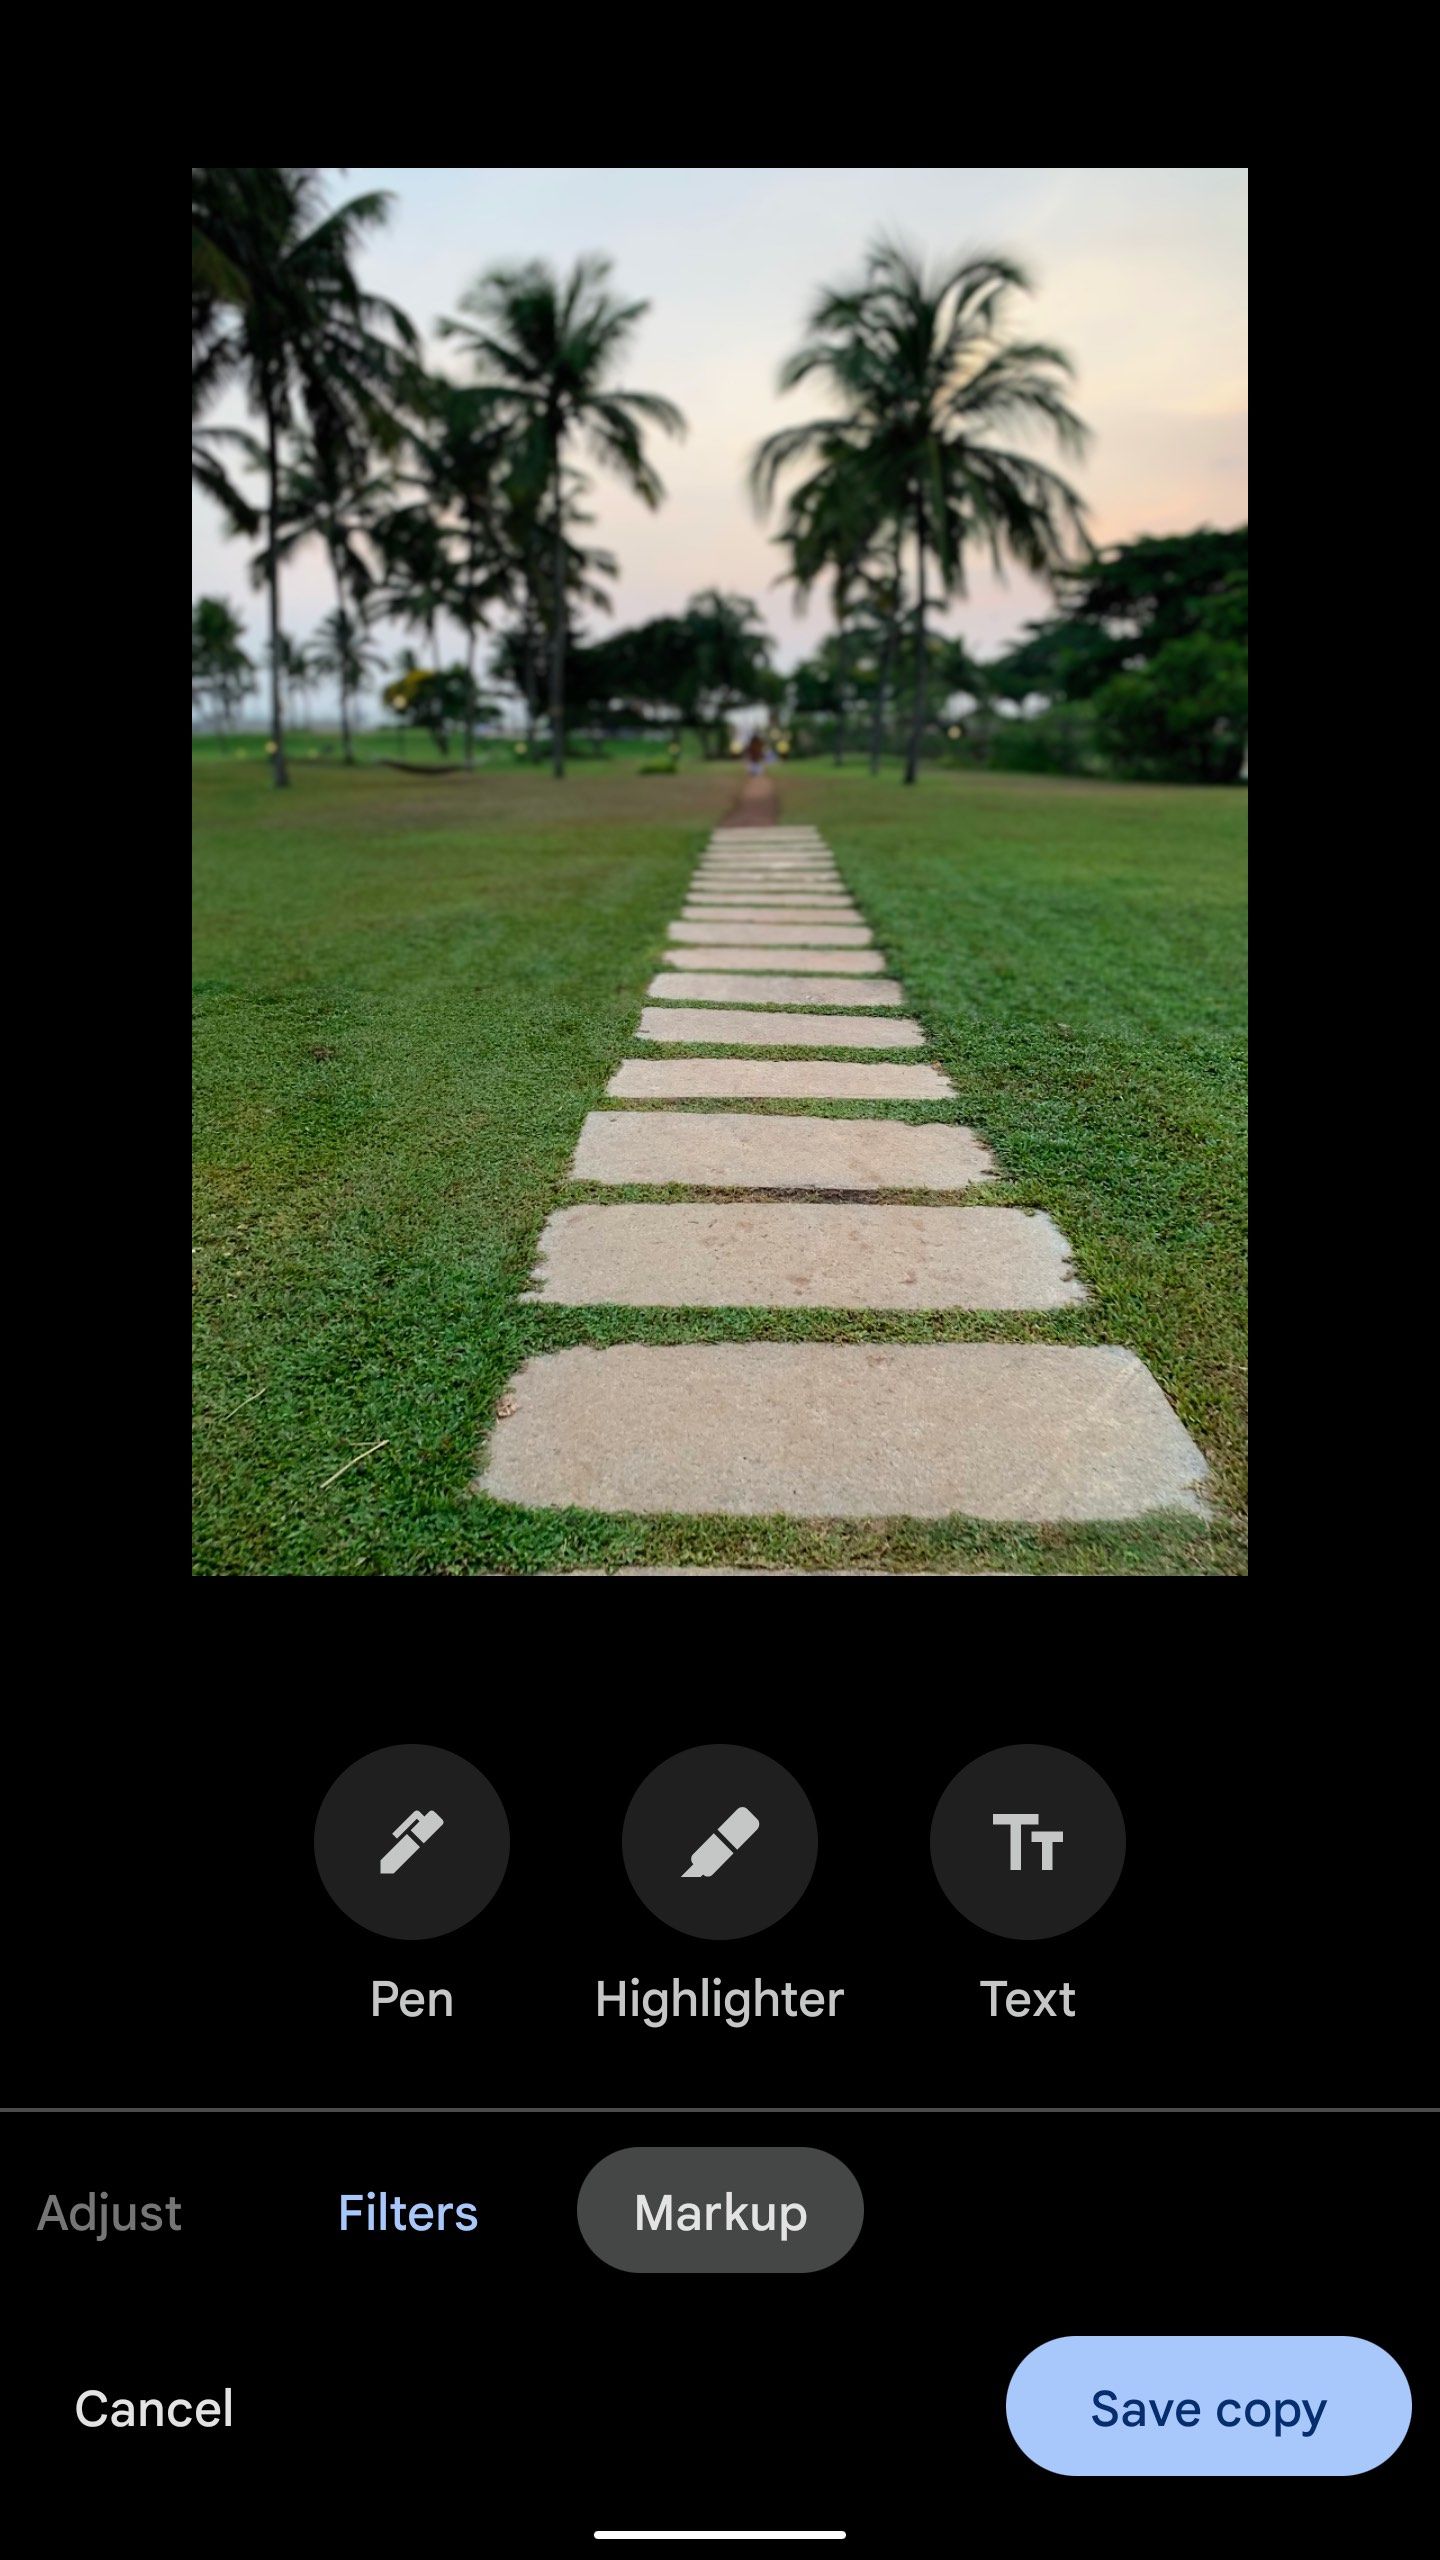
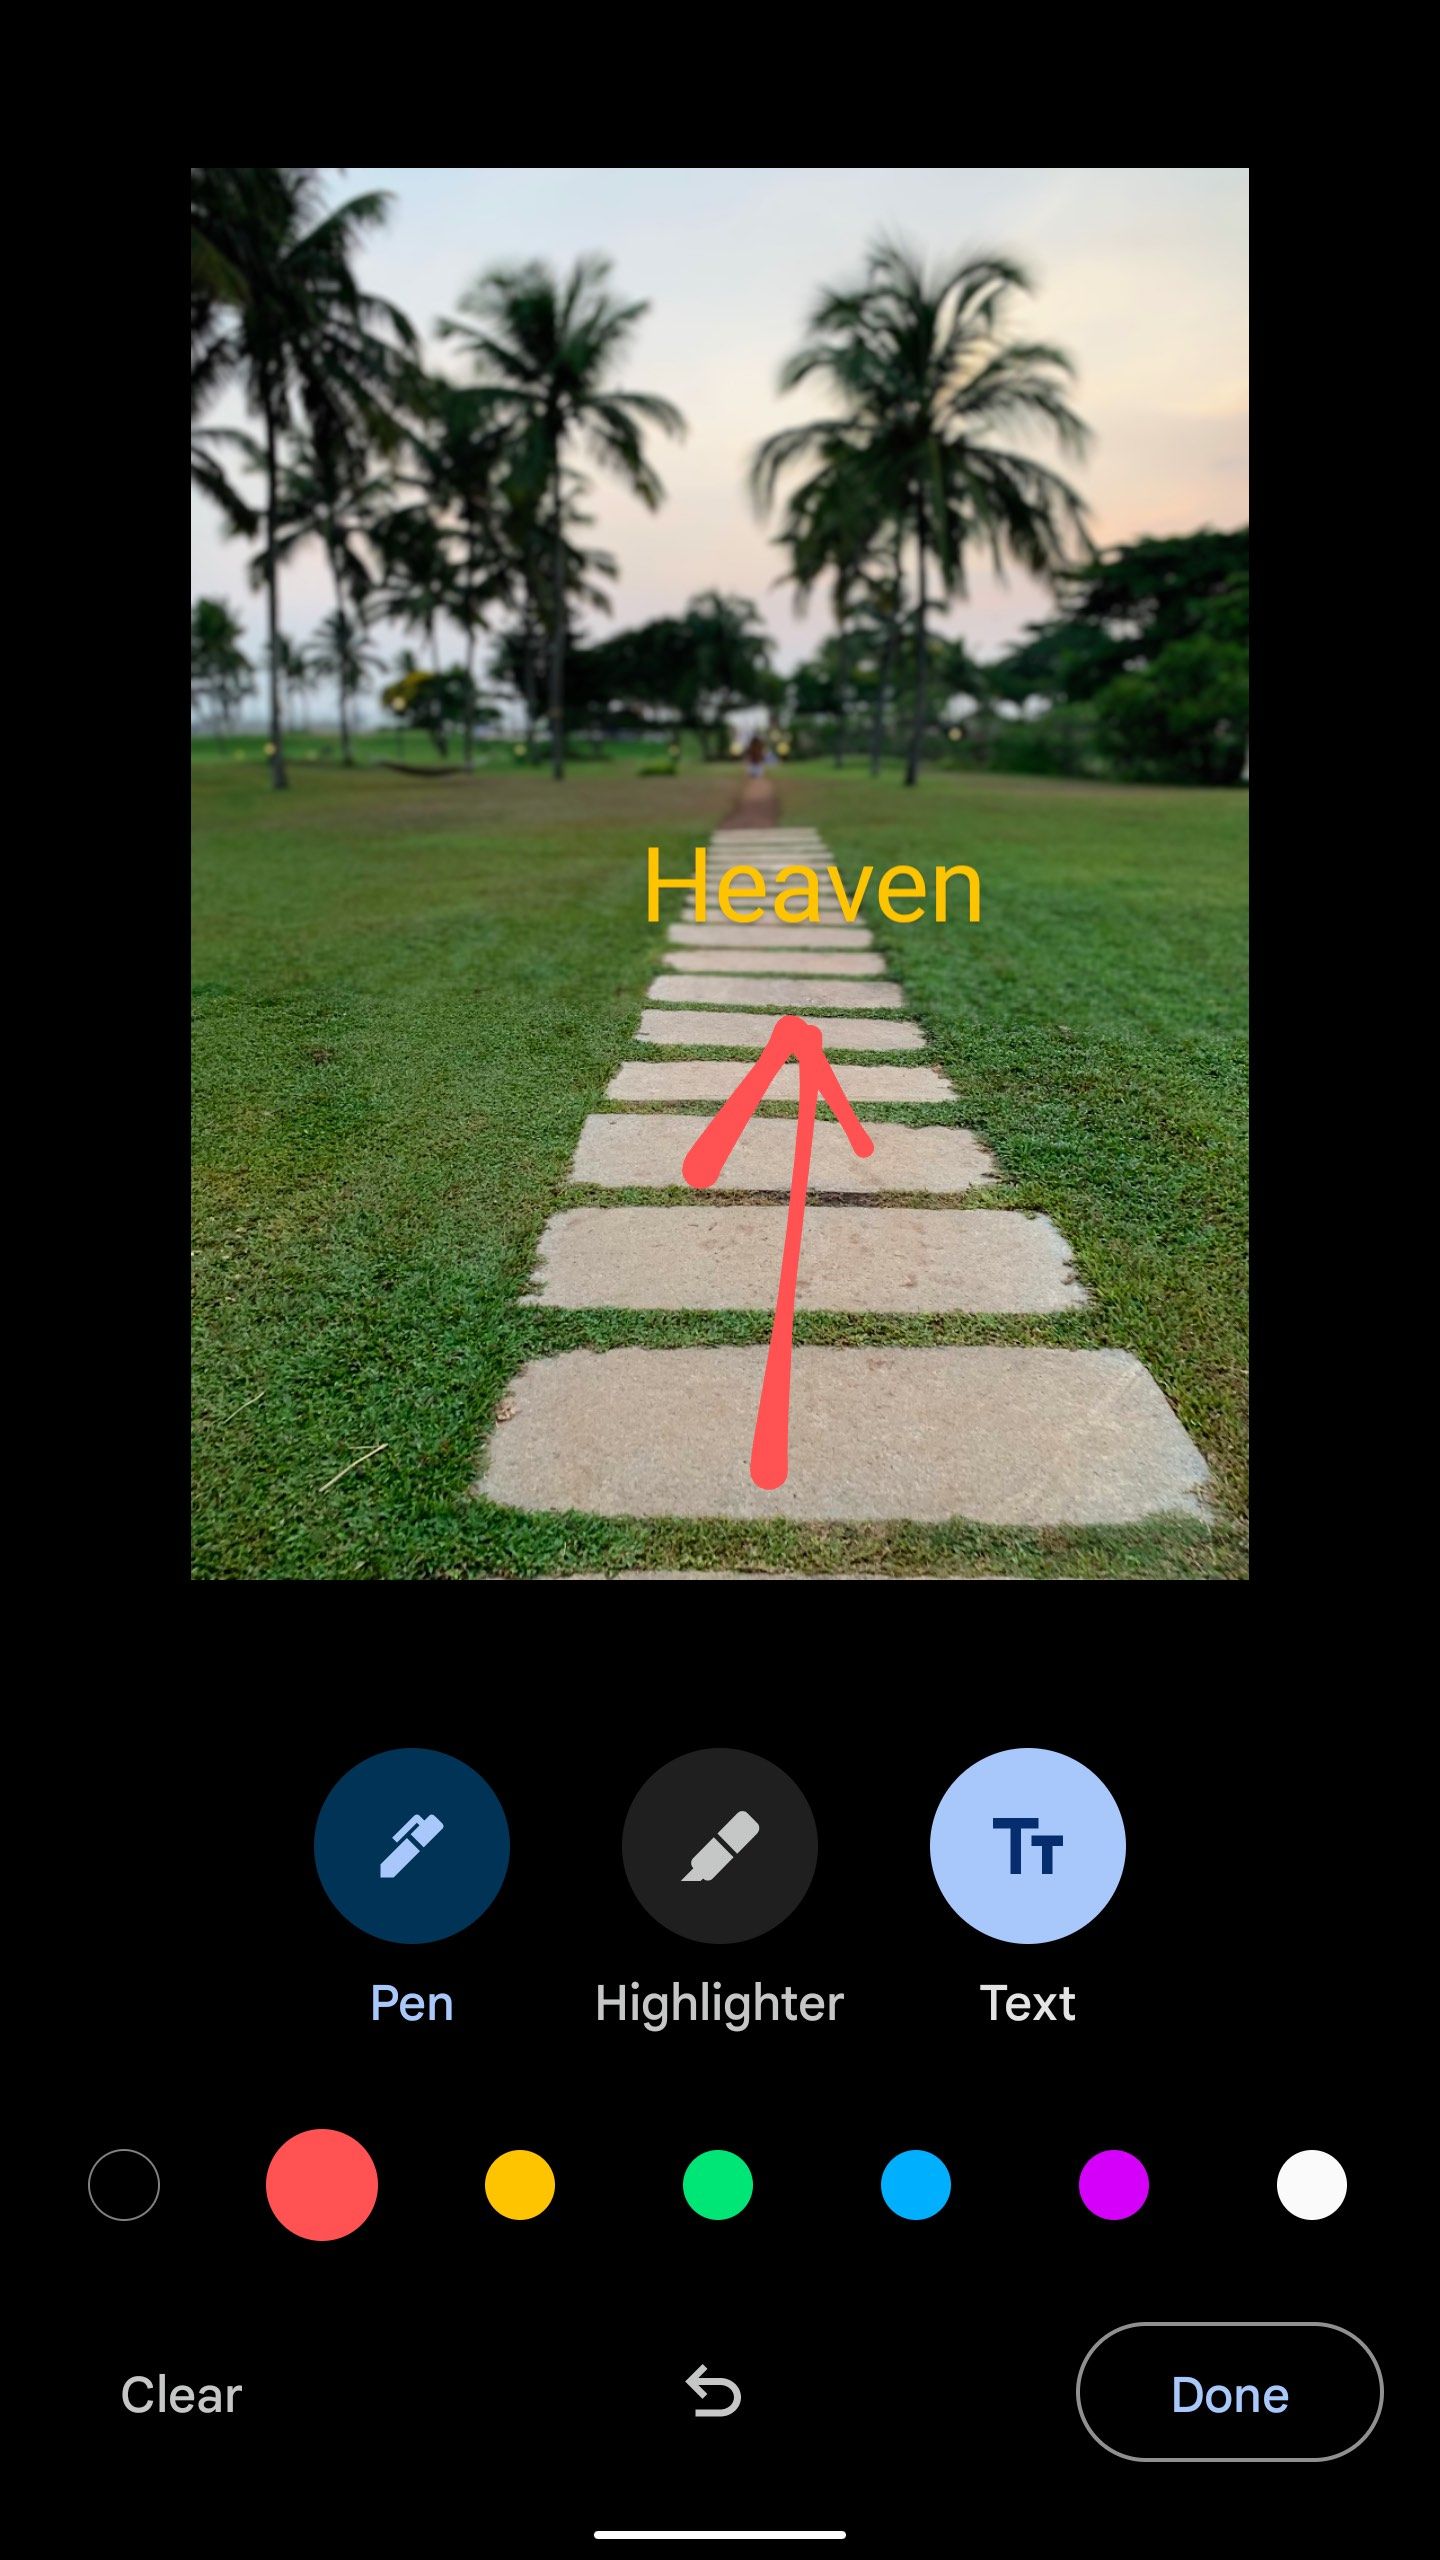
Annotate or add text on photos
Google Photos has a dedicated markup tool to add annotation and text to images. You can also use a highlighter to point out important details in a picture.
- Head to the editing interface in Google Photos (refer to the steps above).
-
Select
Markup
and then choose
Pen
,
Highlighter
, or
Text
. -
You have seven color options to choose from. You can’t modify the pen and highlighter thickness.
-
Tap the
Save copy
button after making changes.
Create a Cinematic photo
This is another neat photo editing trick in Google Photos. You can pick any photo and create a cinematic clip out of it. Let’s check it out.
-
Launch
Google Photos
and swipe up from the bottom. -
Tap
Create
and select
Cinematic photo
. -
It may take a while for Google Photos to create a cinematic video. The app adds a smooth zoom-in effect to make it a realistic clip. Tap
Save
.


Explore video effects in Google Photos
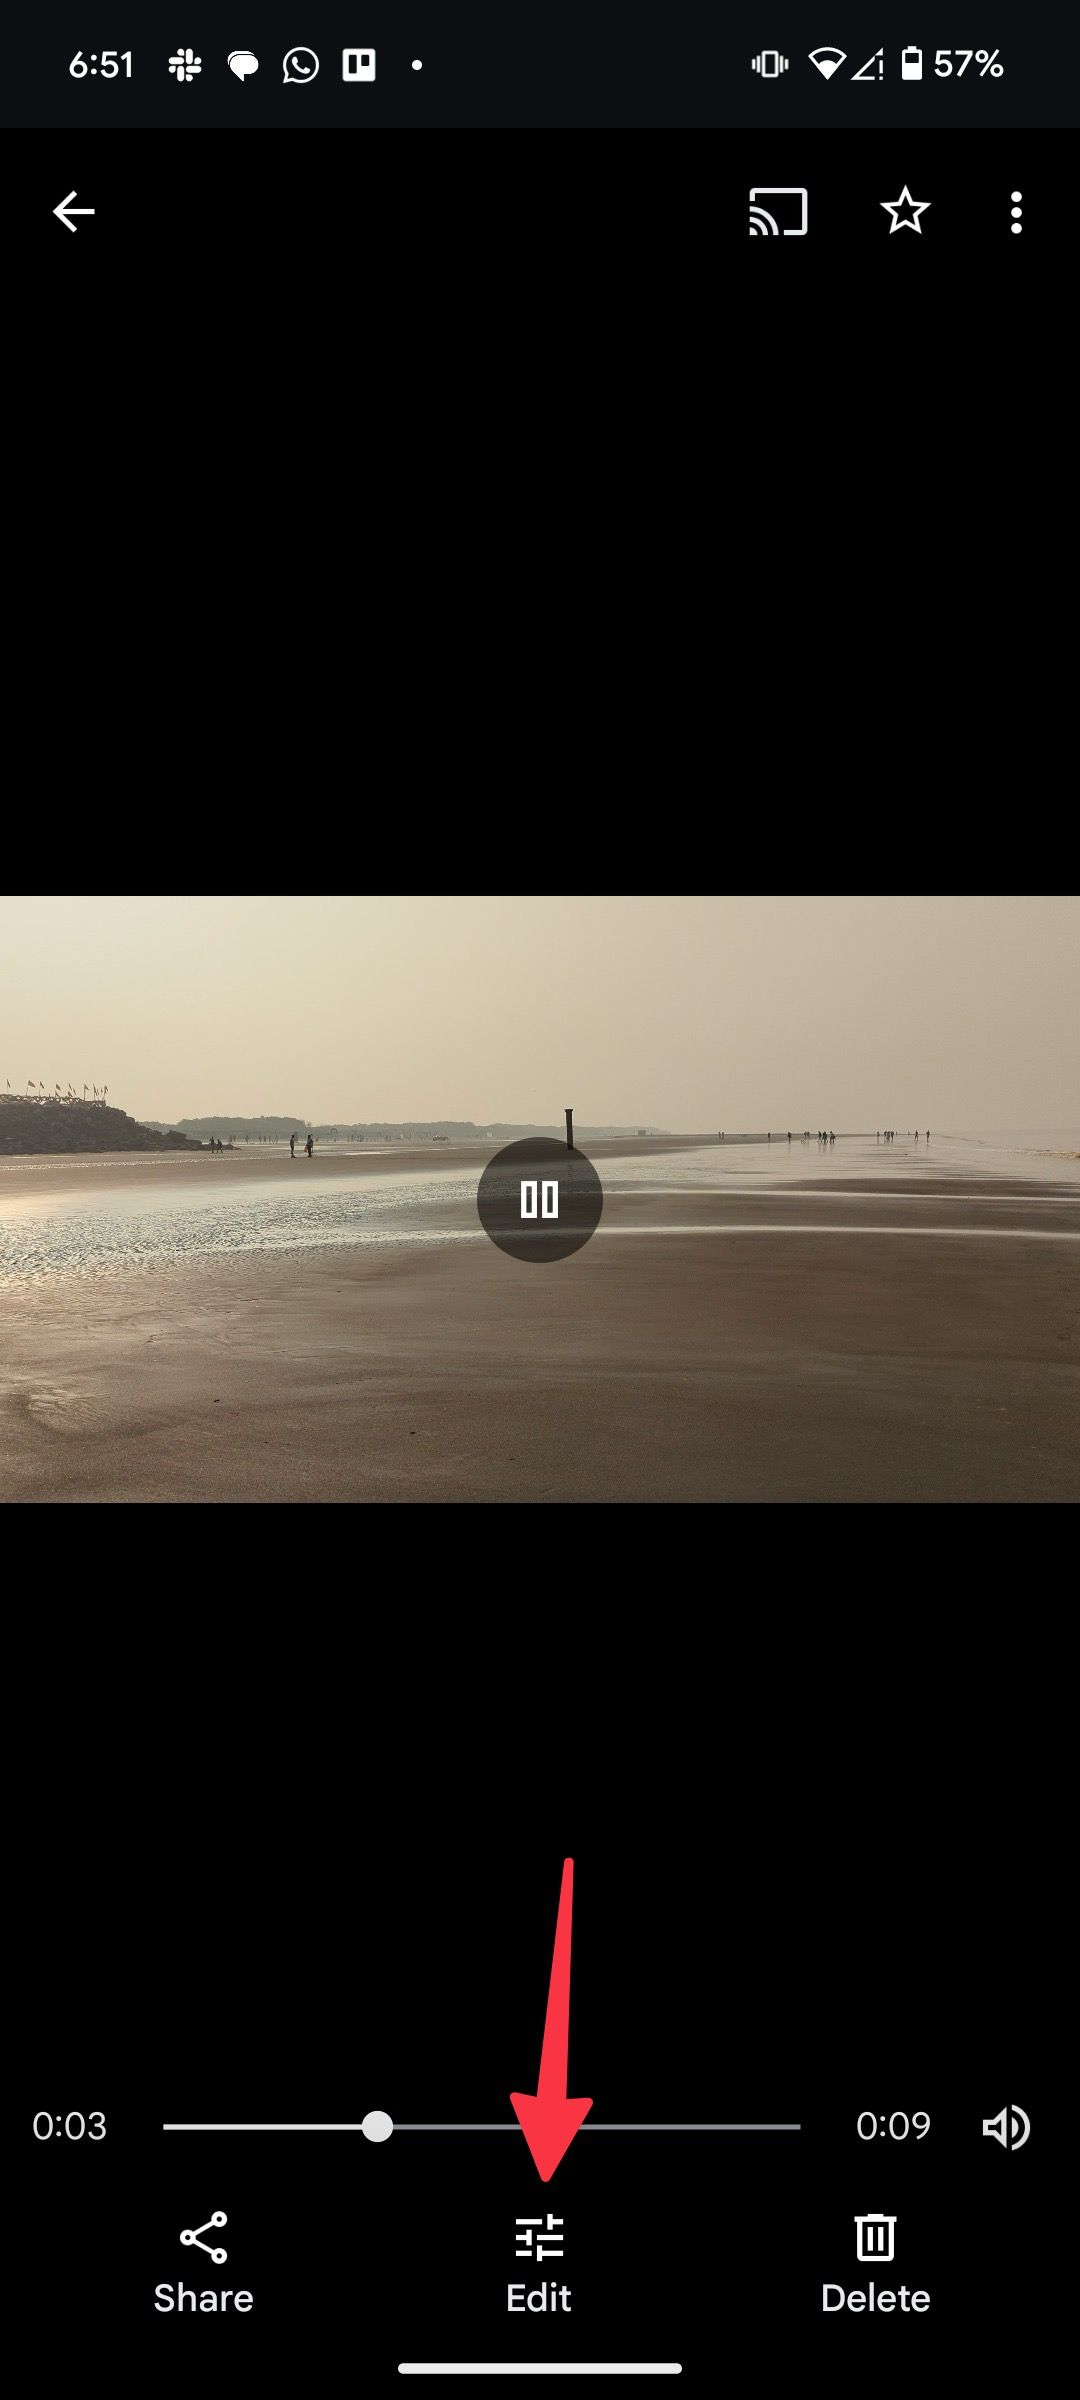
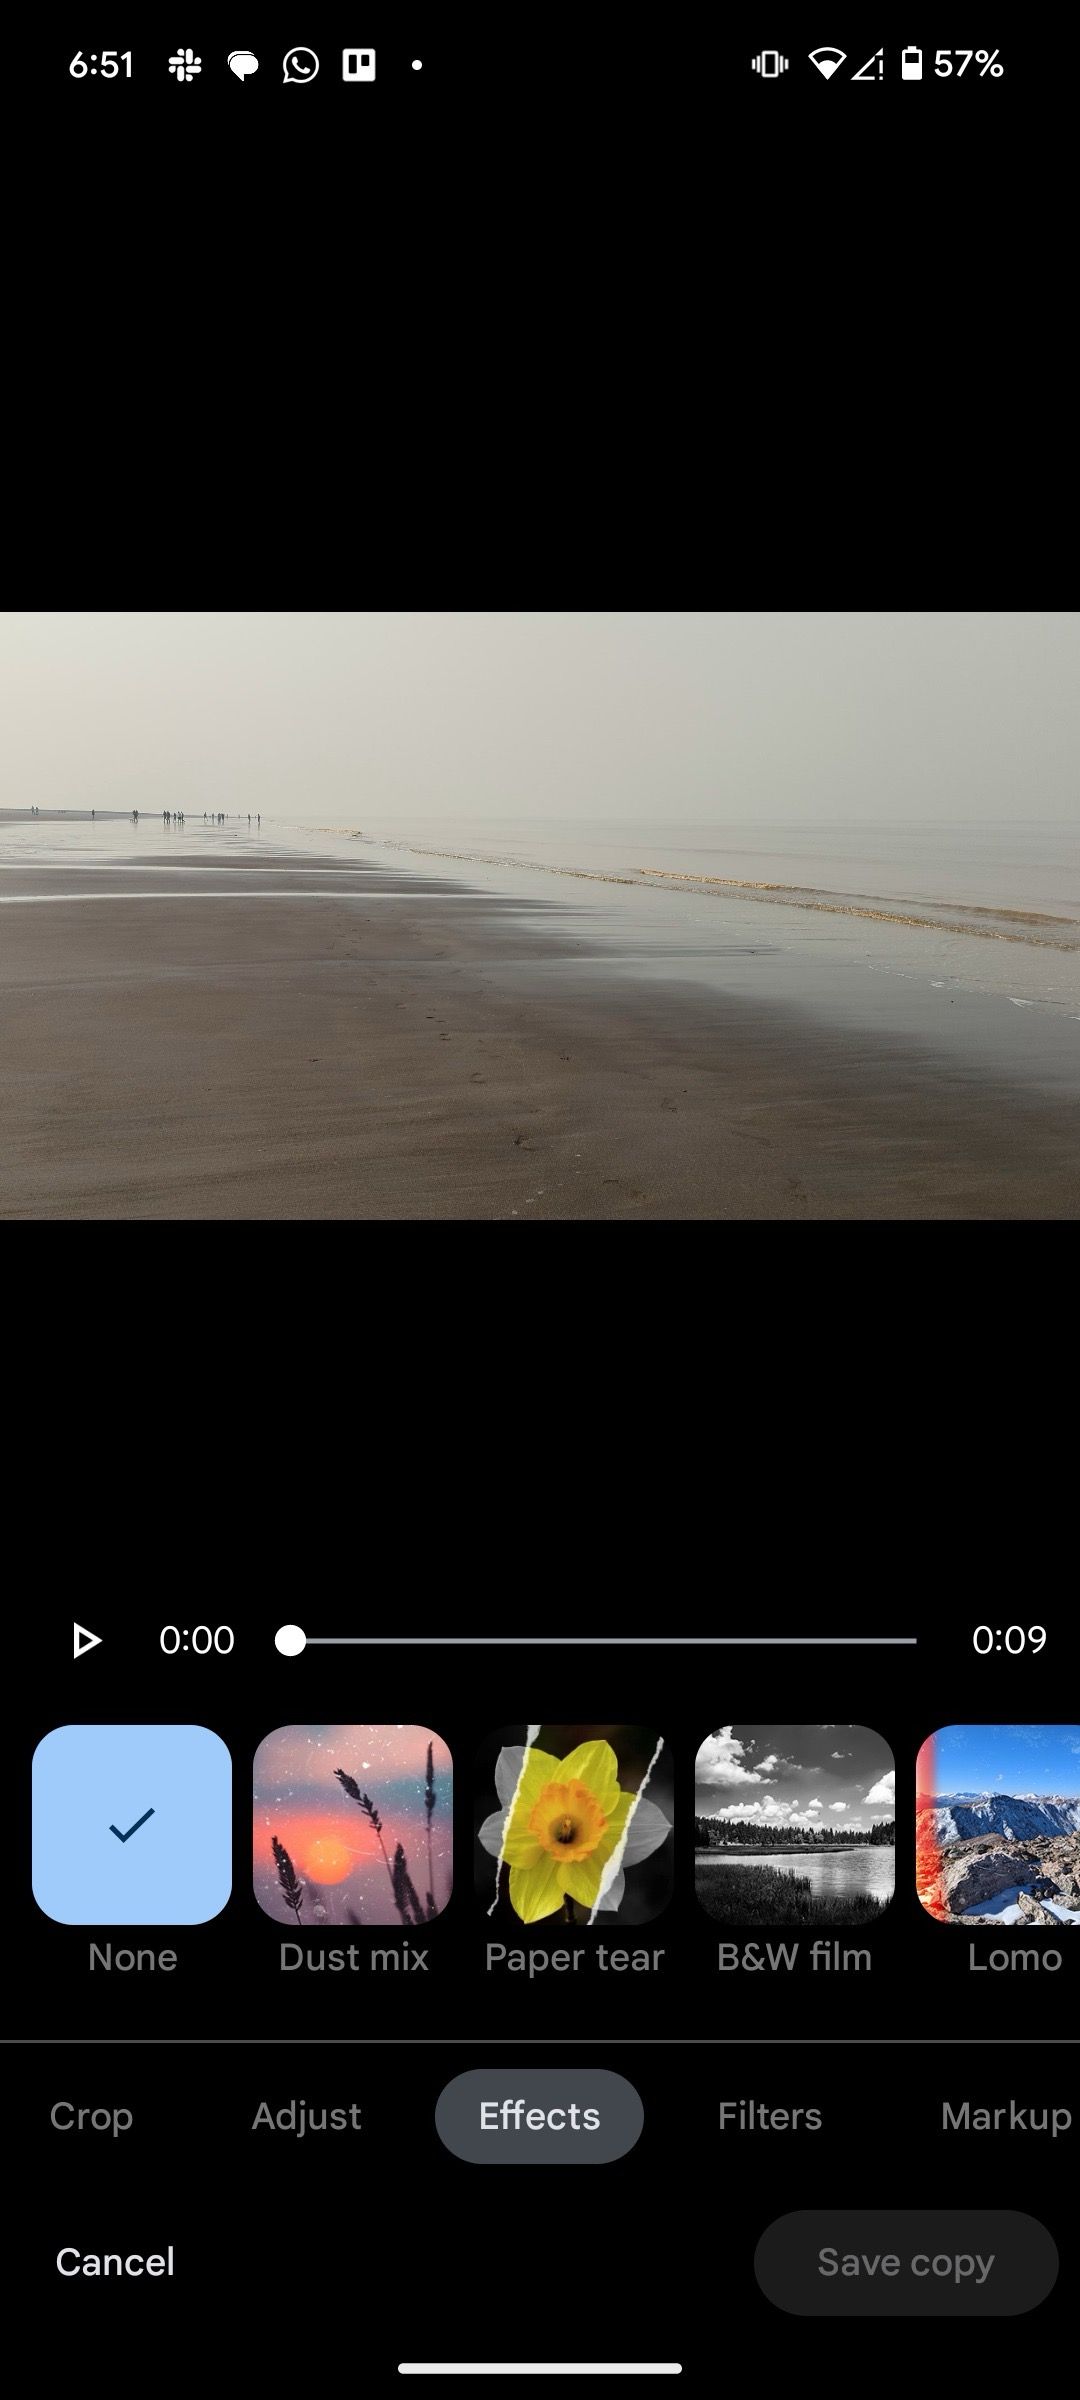
When you edit a video in Google Photos, the app offers several effects to create a trendy clip.
- Open a video on Google Photos.
-
Tap
Edit
and select
Effects
. - Add effects like Dust mix, Paper tear, B&W film, Lomo, Light leak, Film mood, Chromatic, FIsheye, Vintage, and more.
-
Tap
Save copy
.
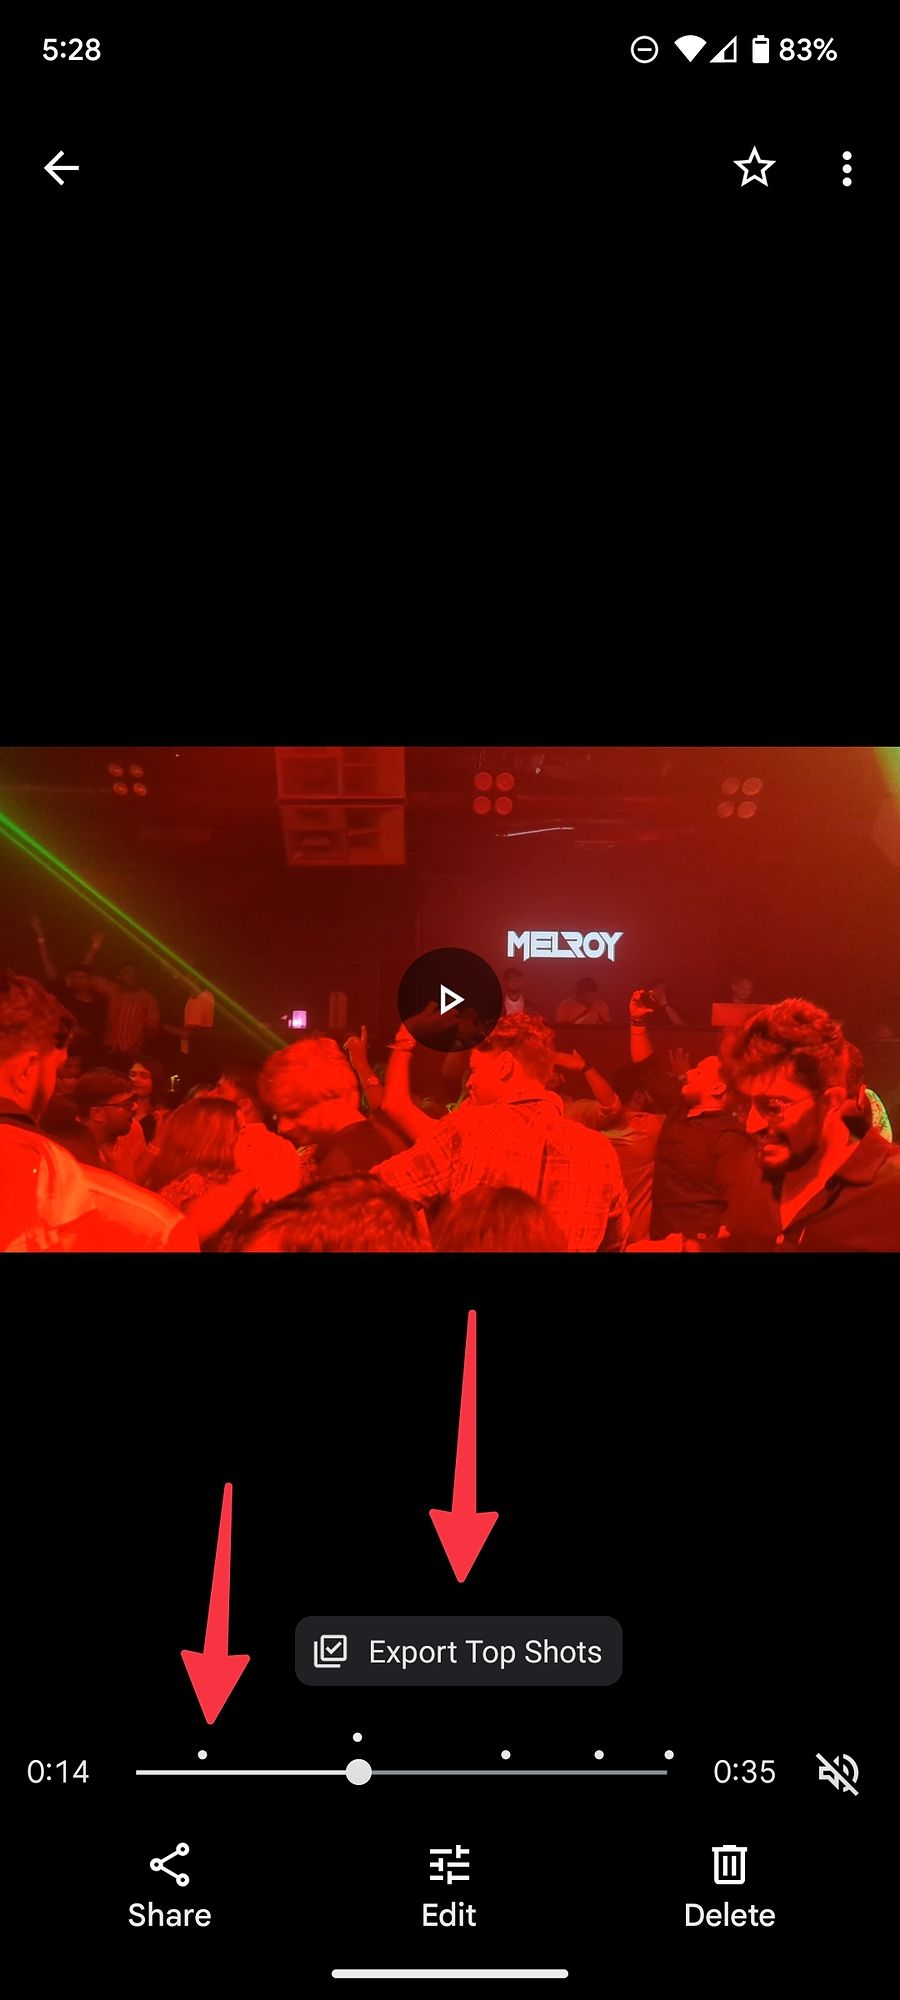
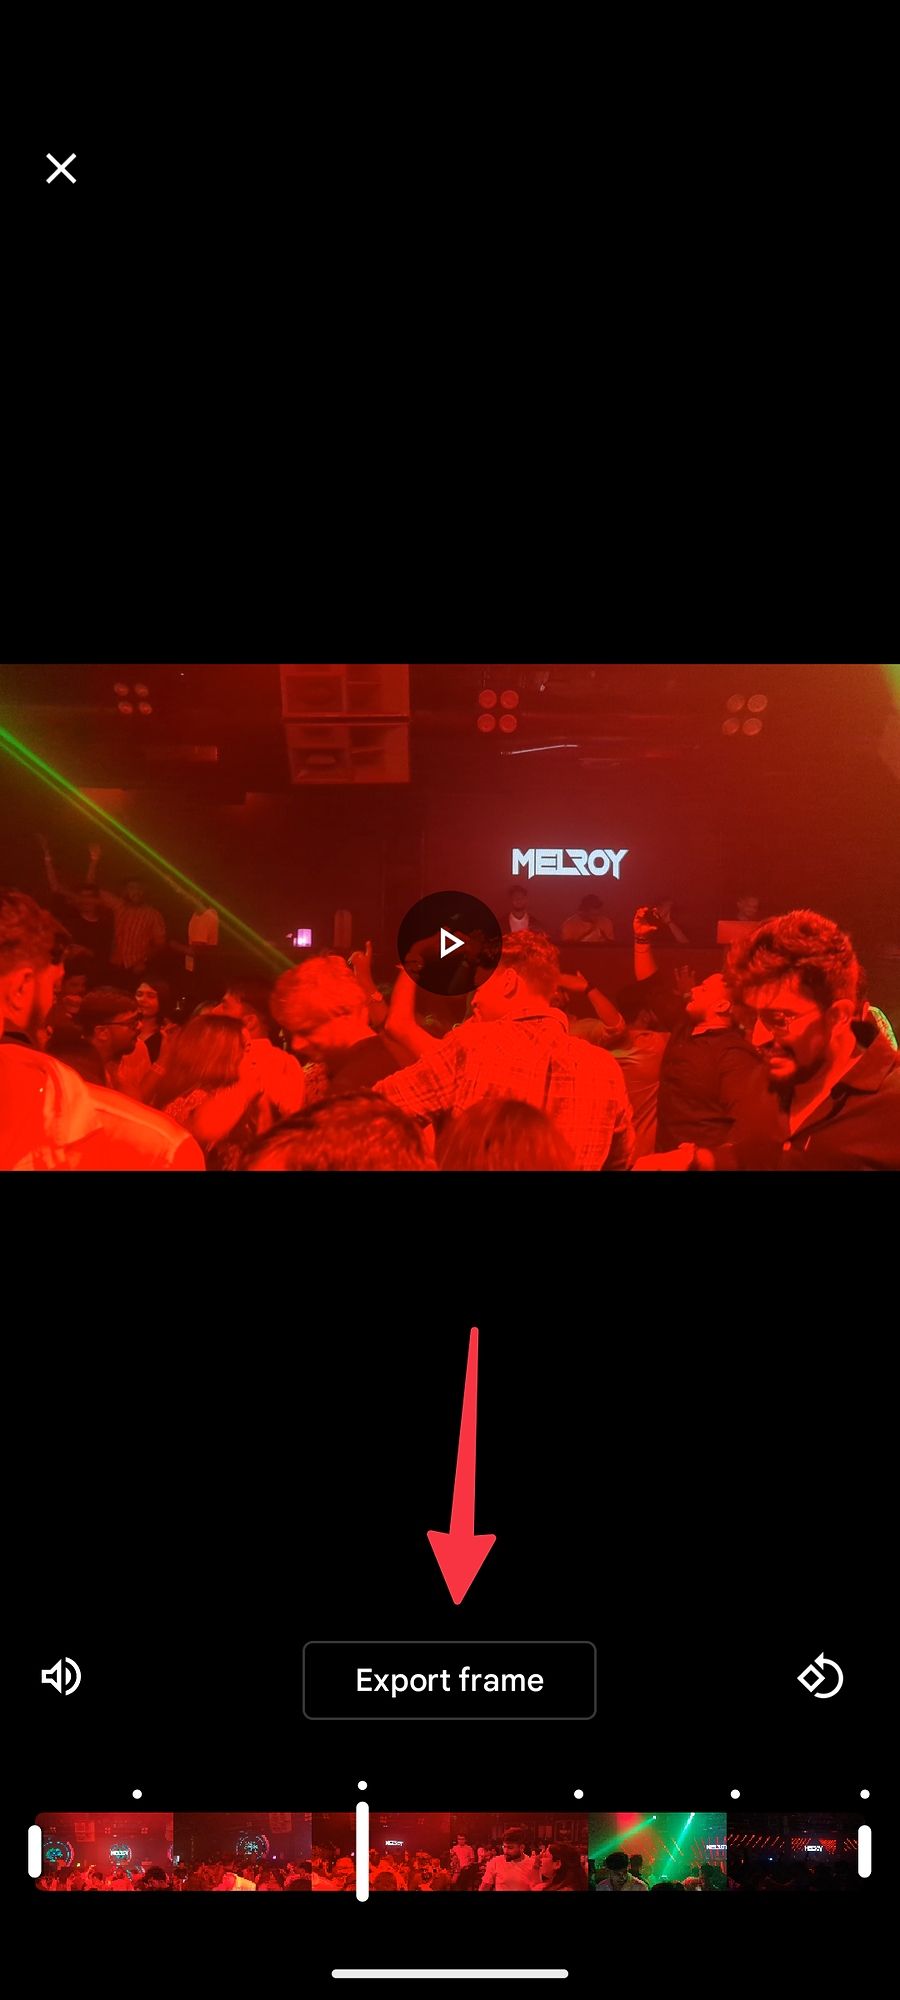
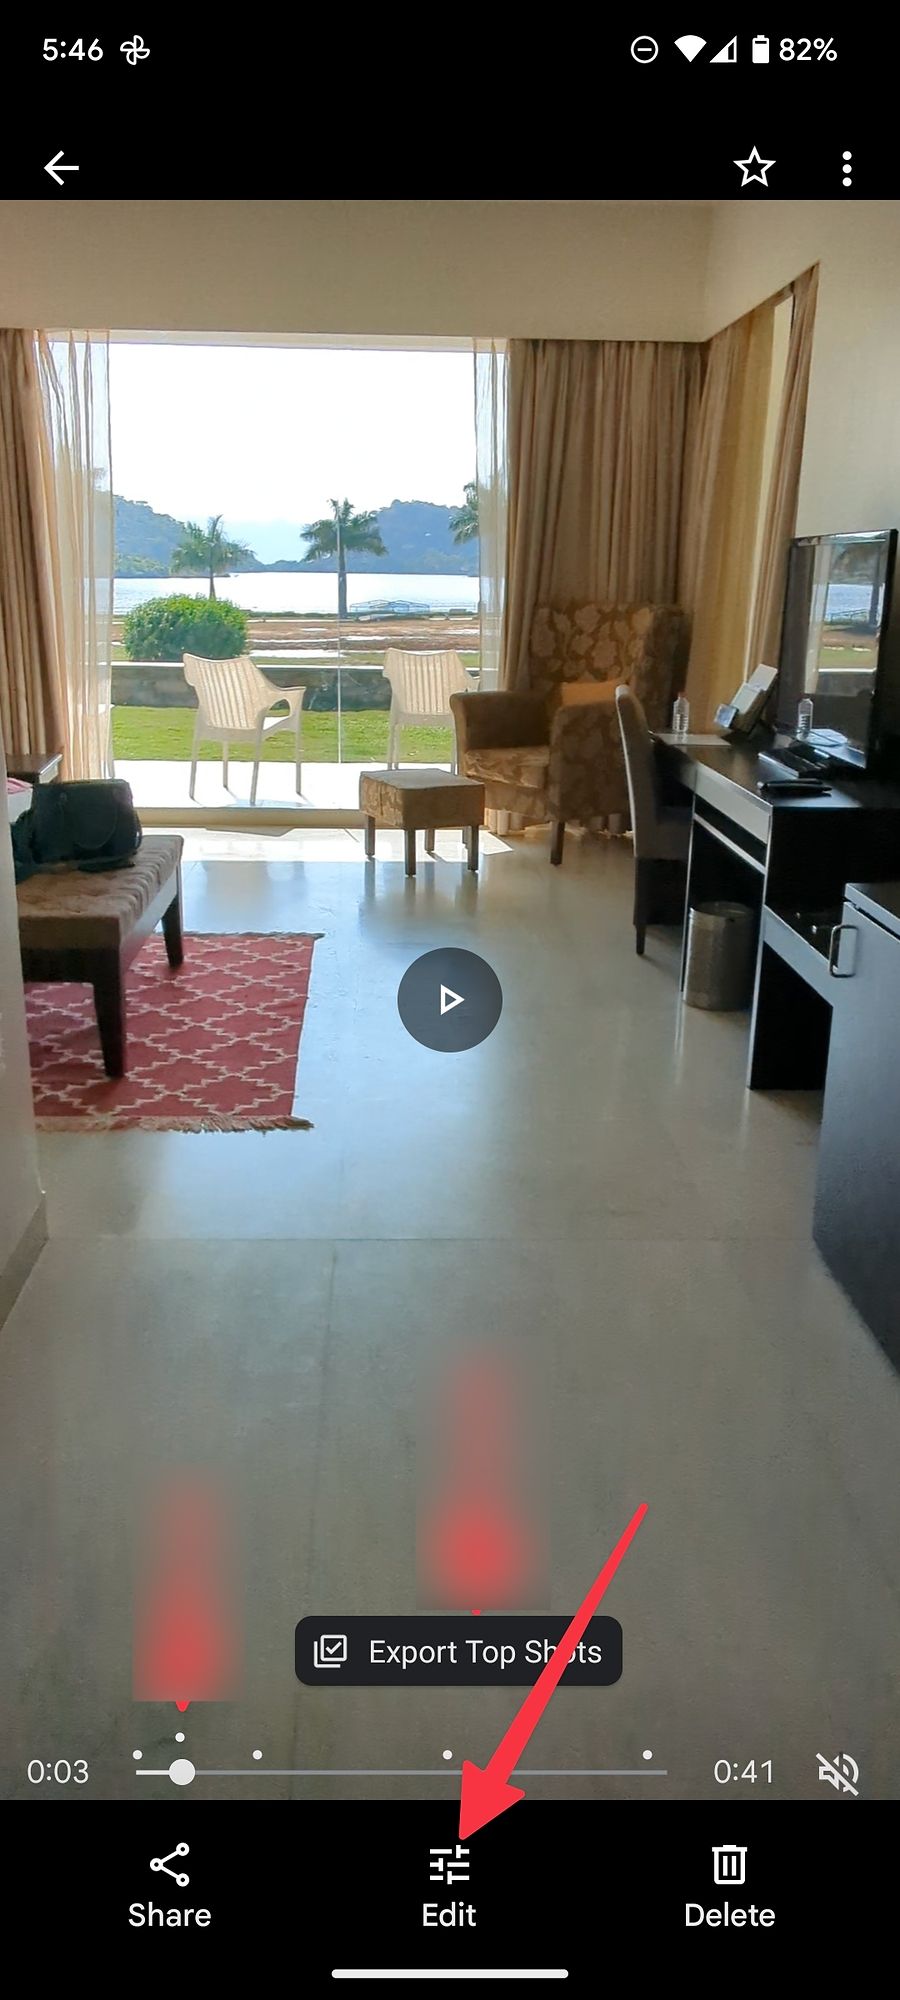
Export a frame from a video
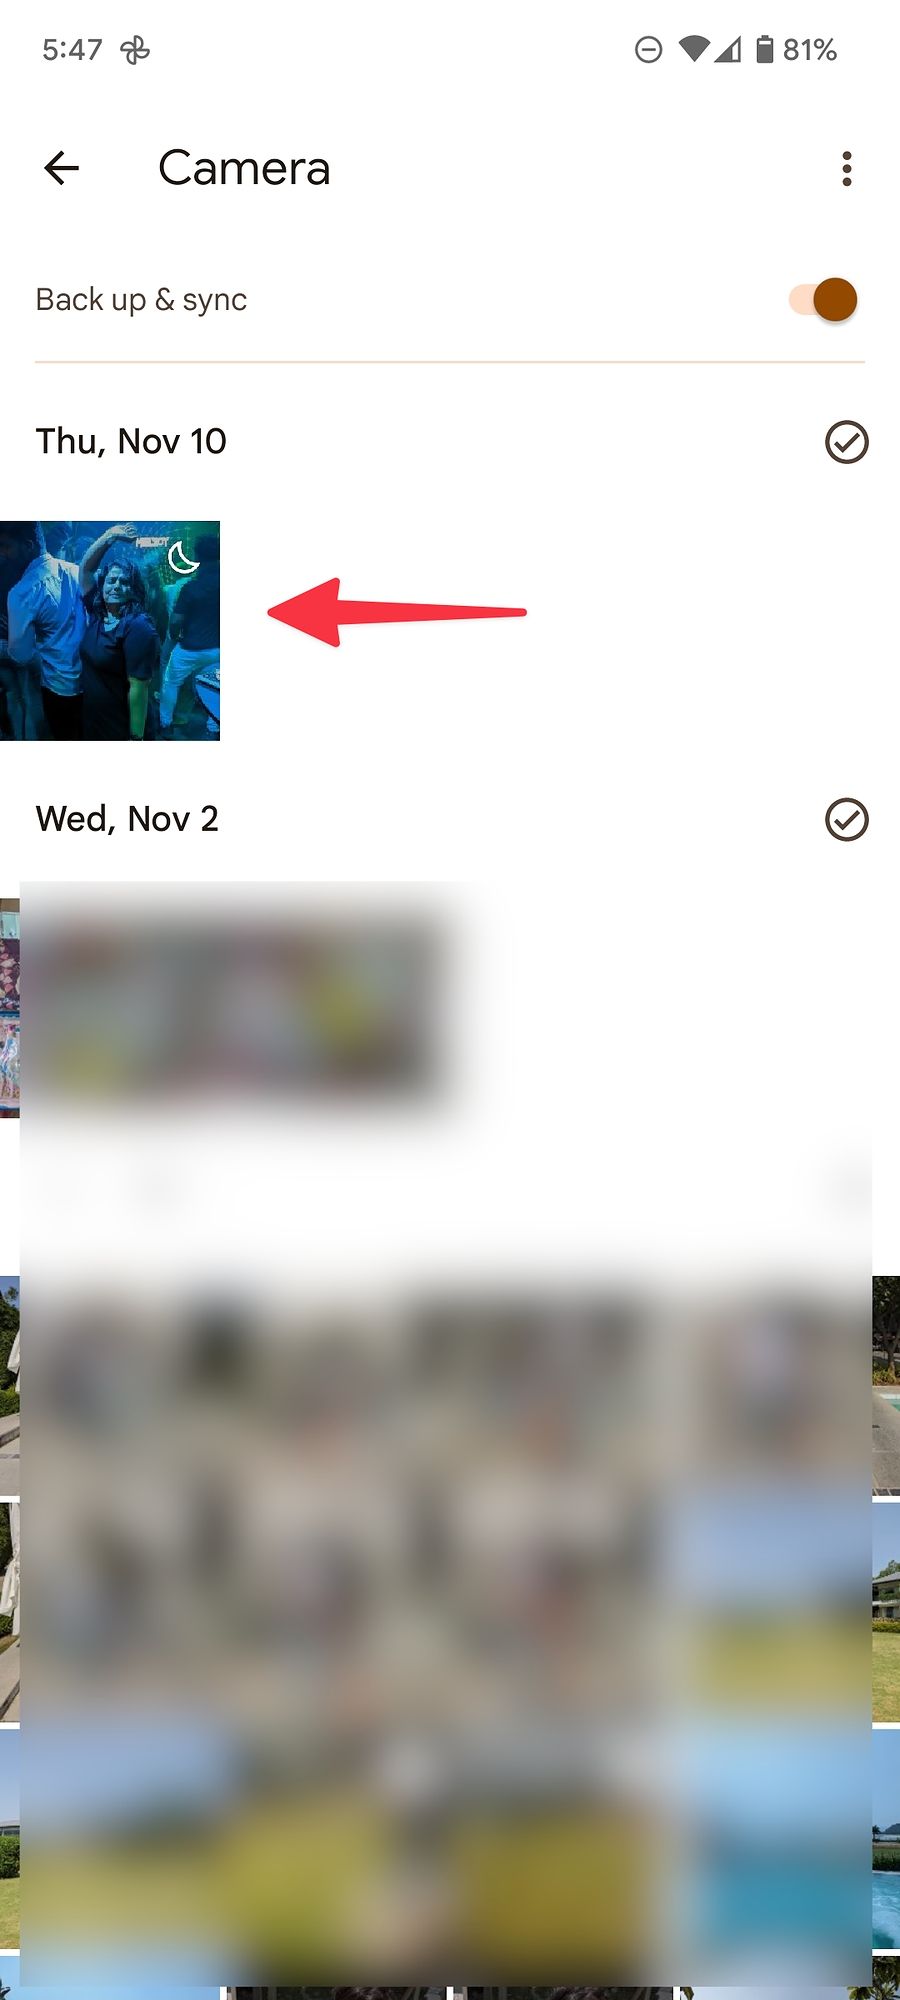
Google Photos’ video editing features are similar to those of photos. With the Google Photos export frame feature, you don’t press the shutter button while taking videos. The app suggests top shots in a video to spot and export a frame. Follow the steps below to check it in action.
- Open any video in Google Photos.
- Play the video or jump to a specific part using the timeline slider. The white dots above the video slider suggest top shots in a video.
-
Tap a white dot and select
Export Top Shots
. -
Select
Export frame
and save the image to the Camera folder. - To export any video frame to your phone gallery, use the video timeline below.
-
Go to the
Library
menu and open the
Camera
folder to check your exported frame.
Google Photos also shows editing suggestions based on the photo or video. You must upload media to the Google Photos servers to let it scan the image and show suggestions.
Stabilize your shaky video
You may have shaky videos if your phone doesn’t have OIS (Optical Image Stabilization). Shooting videos in dark scenarios is challenging without OIS or gimble stabilization. You also get blurry videos due to shaky hands. Google Photos has a neat add-on to stabilize videos on the go.
- Open any video in Google Photos.
-
Tap the
Edit
button at the bottom. -
Tap the
rectangle icon
and let Google Photos stabilize the video.
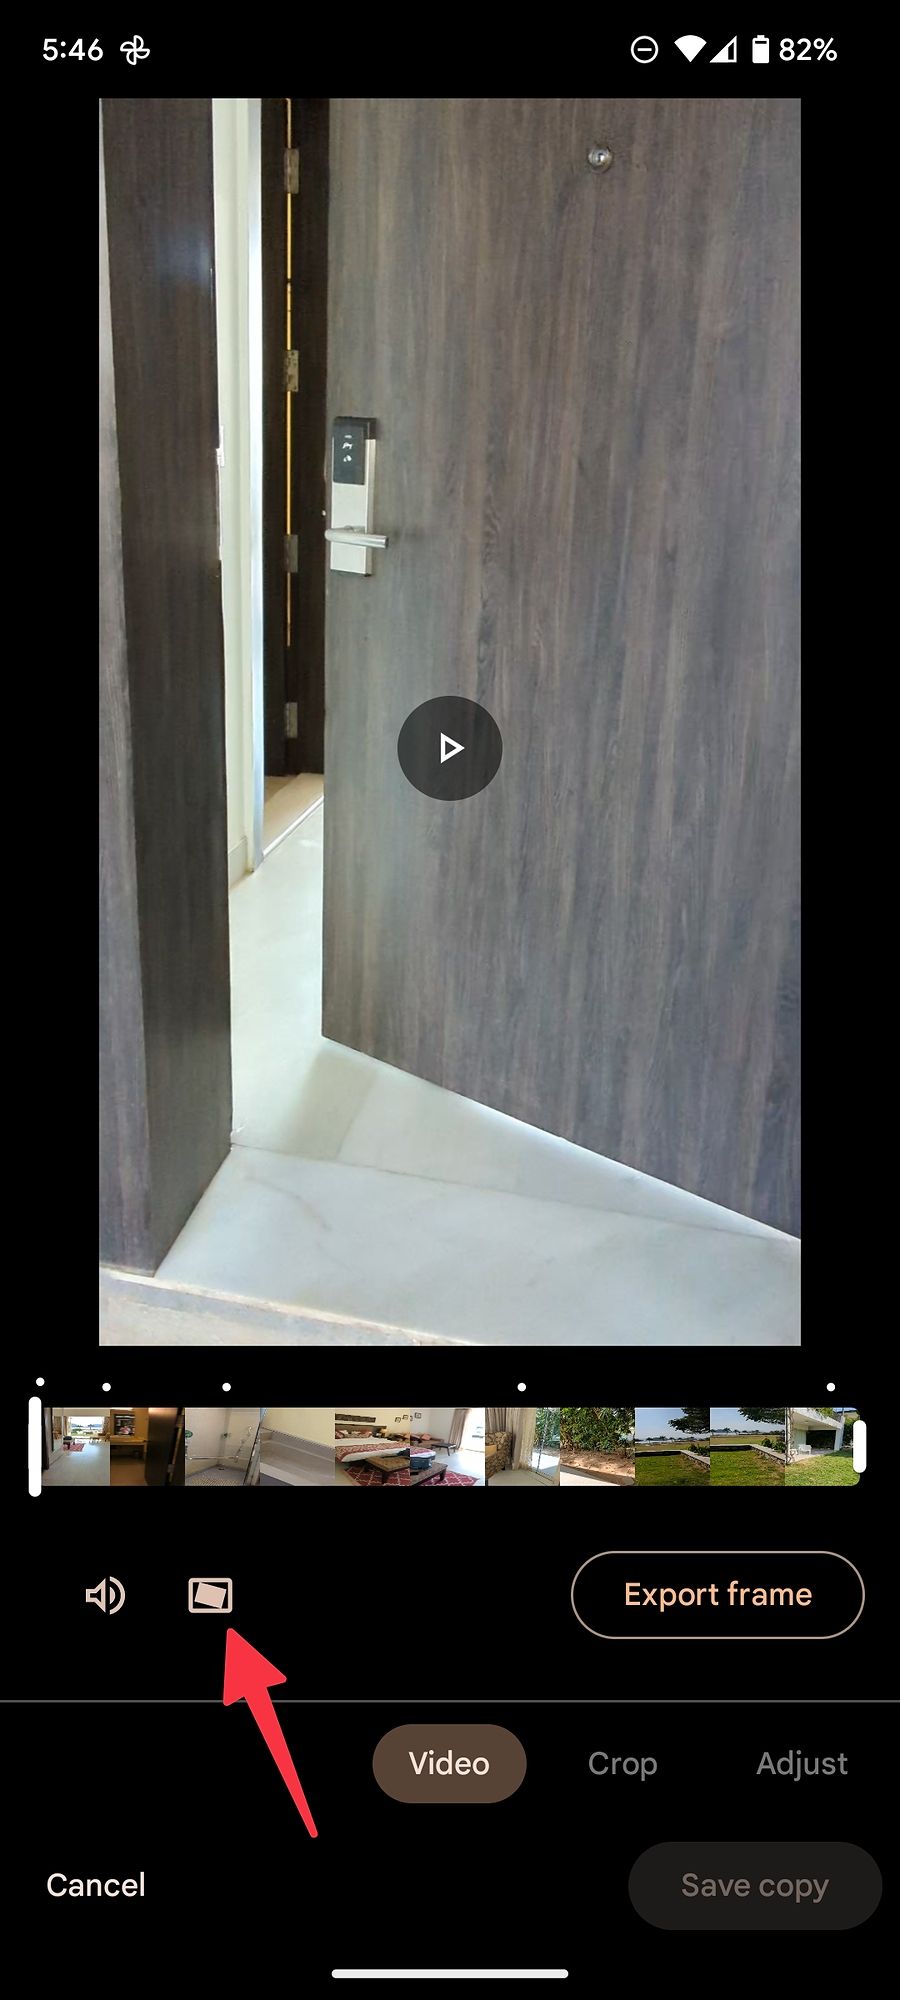
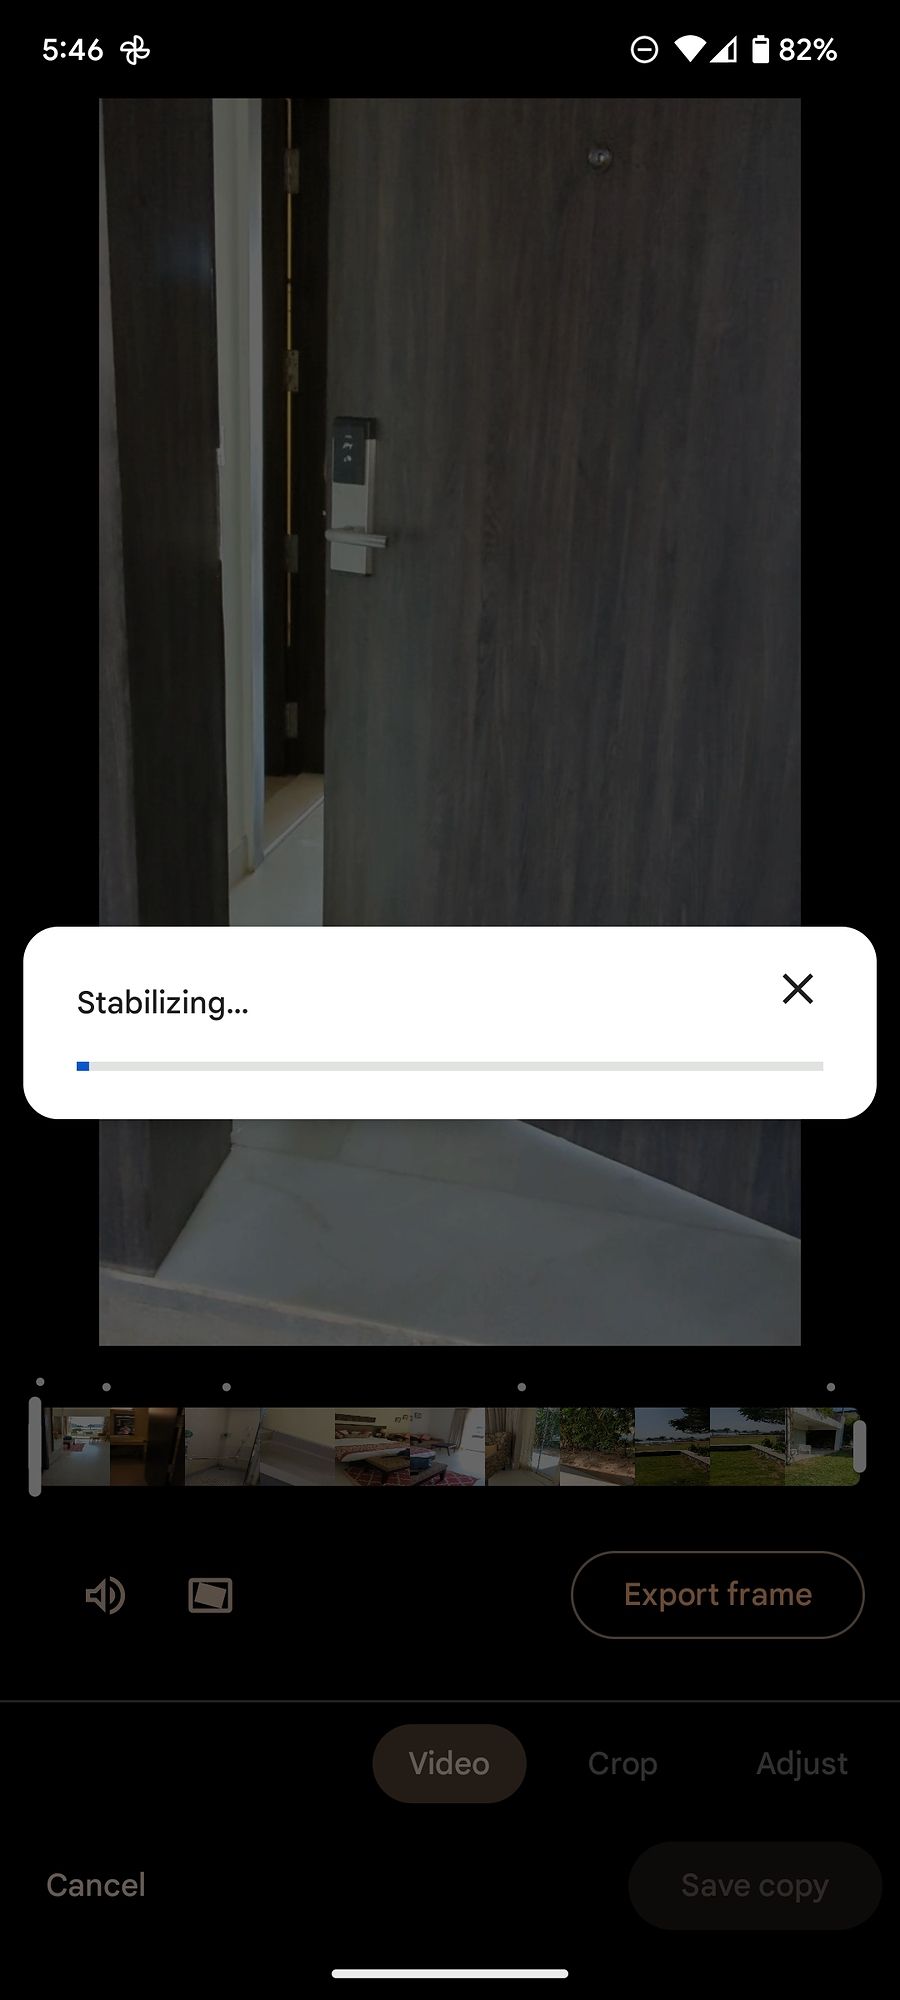
It may take some time to complete the stabilization process. The estimated time depends on your phone’s CPU power. When the video stabilization is complete, tap the Save copy button in the lower-right corner.

Edit the date and time
If you want to change the date and time of a photo or video, do it in Google Photos.
- Open any photo or video in Google Photos.
-
Tap the
overflow icon
(the three dots) in the upper-right corner. -
Tap the
pencil
icon
beside the date and time. -
Select the date or time from the bottom menu and make tweaks.
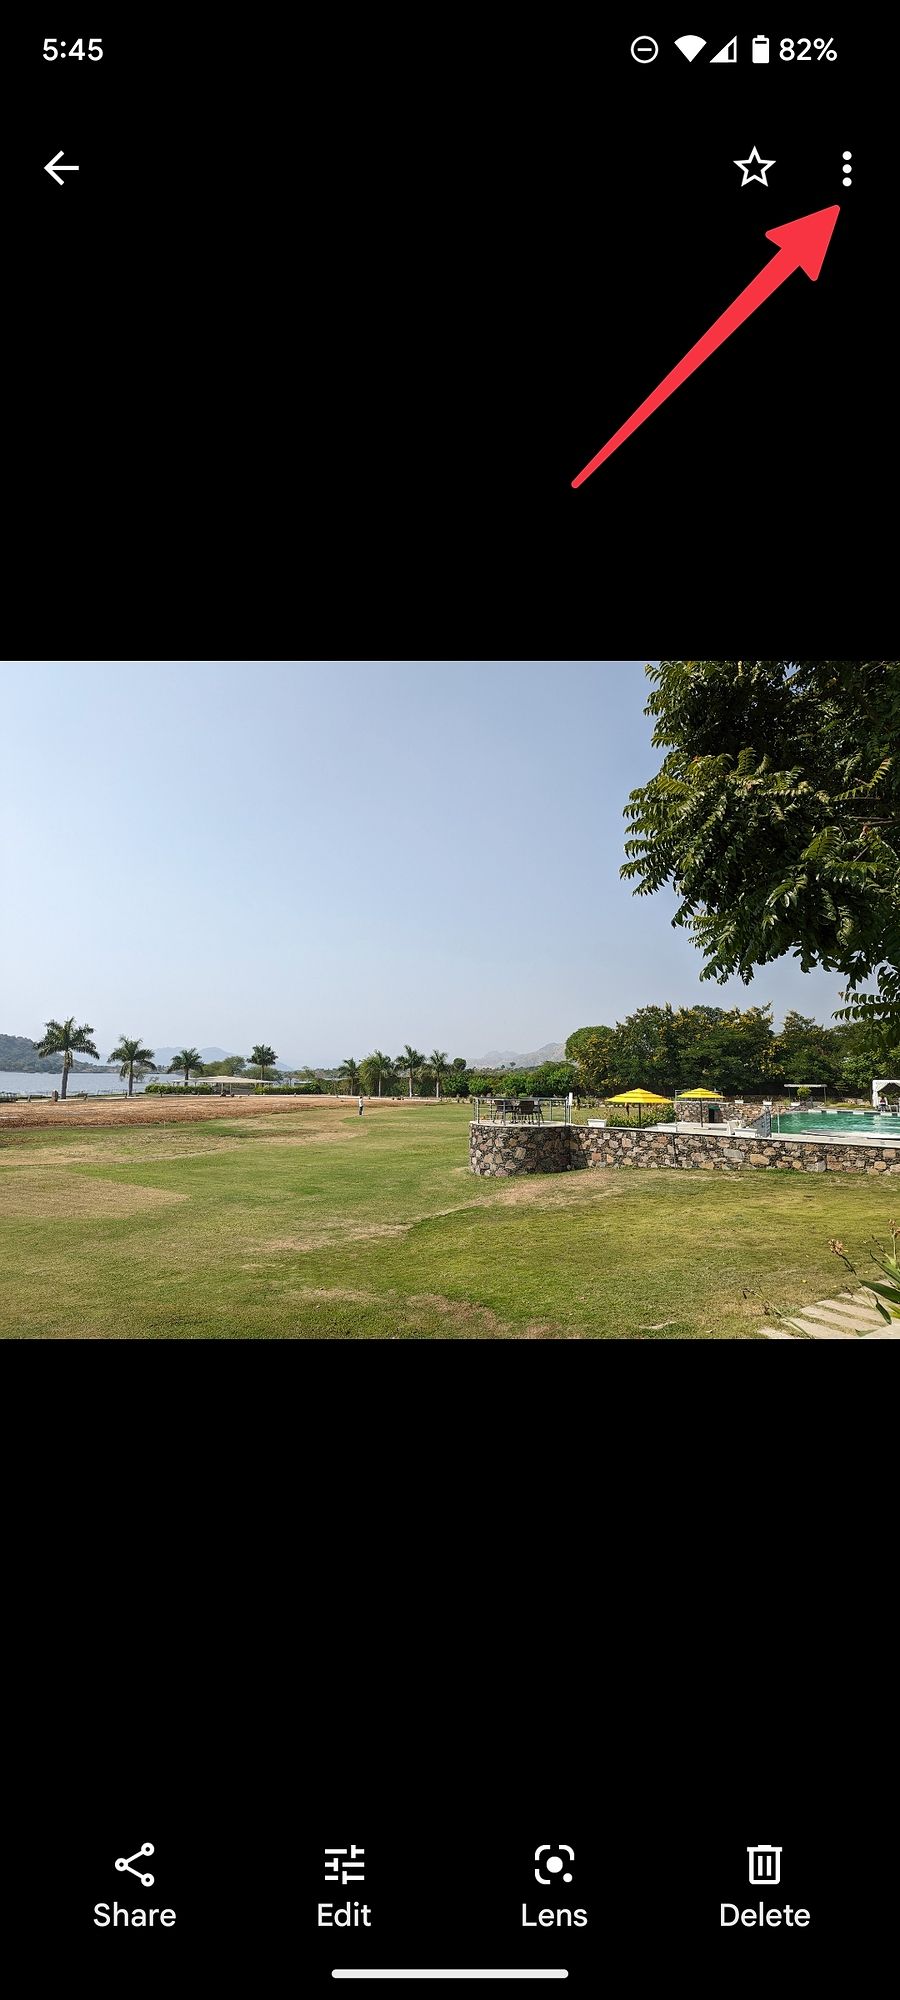
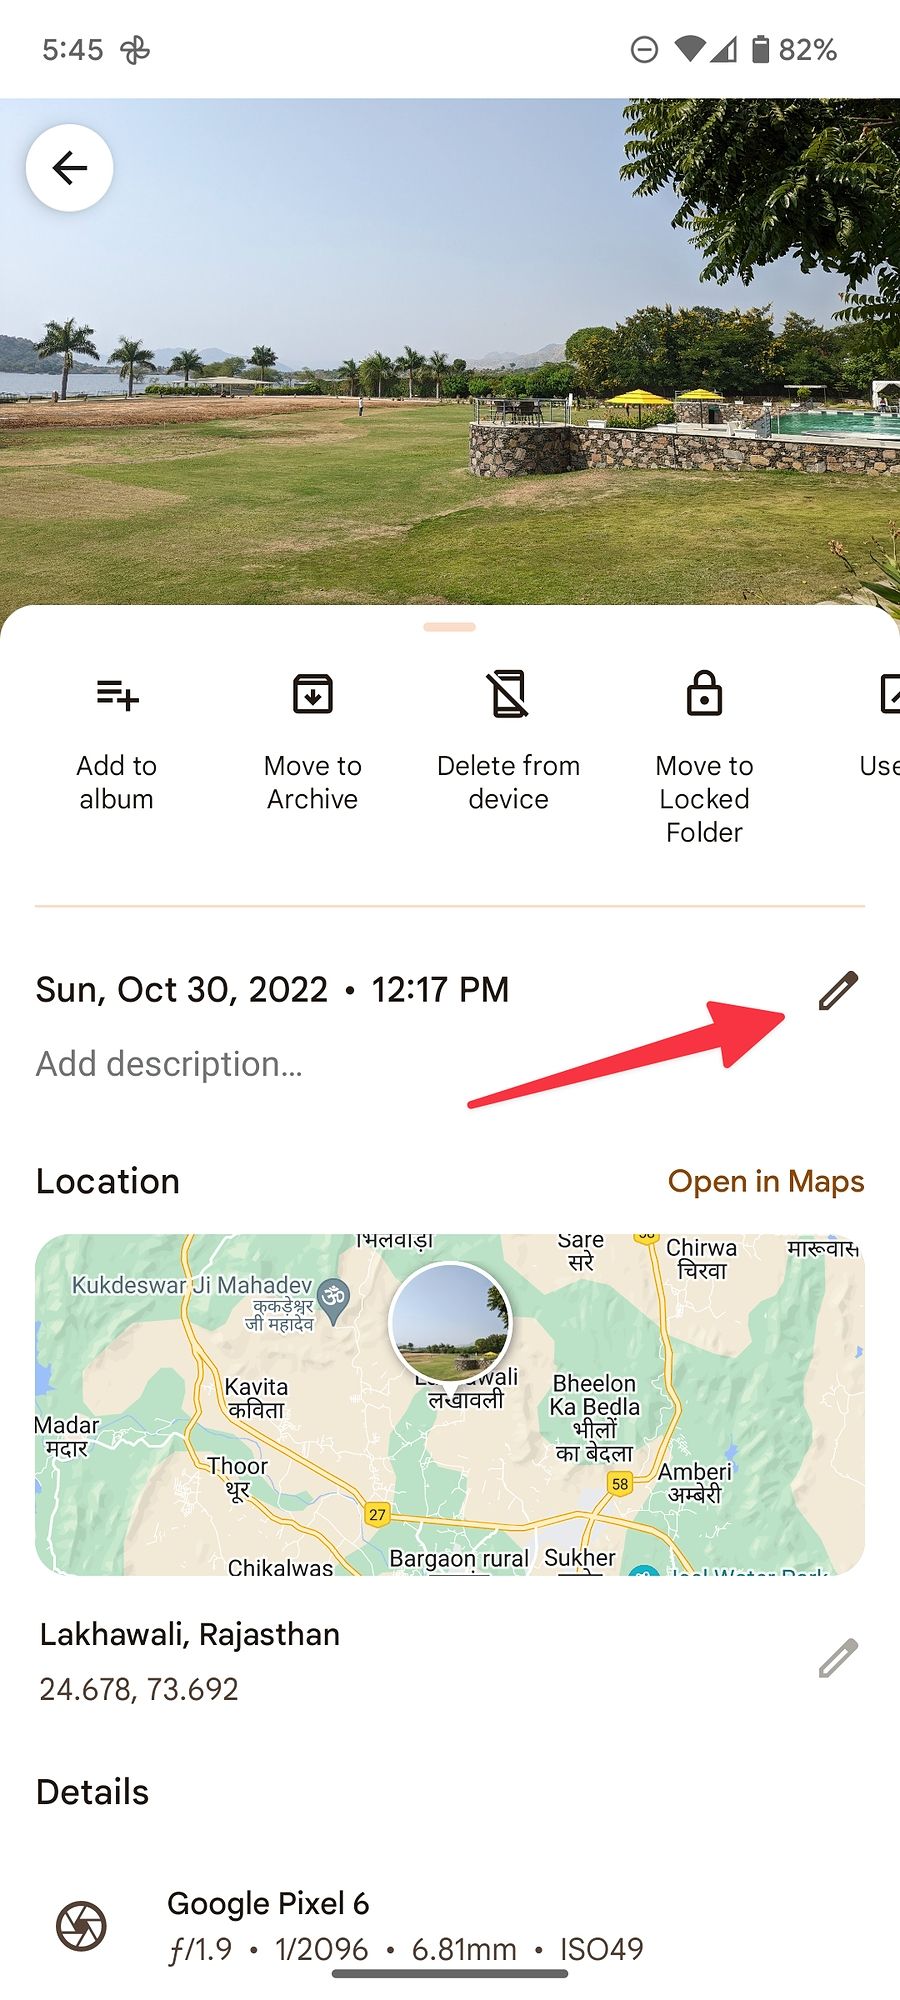

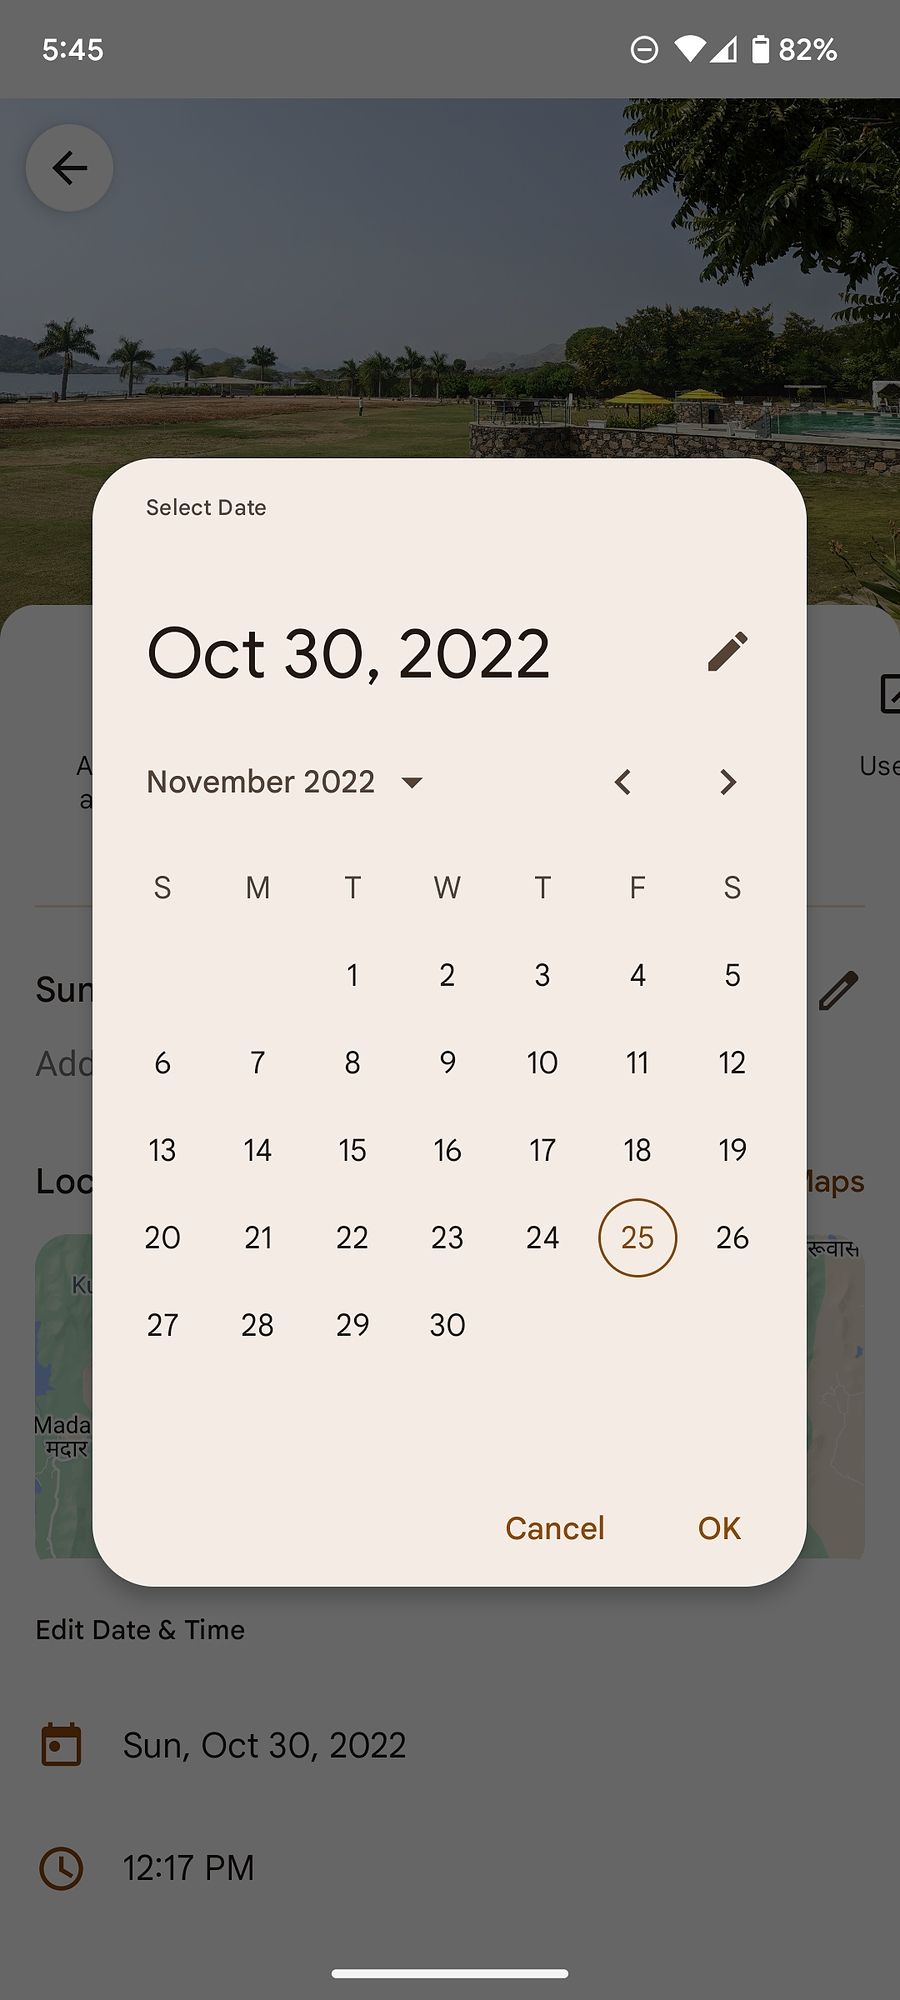
When you change the date, the app adjusts the day accordingly.
Fix blurry photos in Google Photos
Even with the best Samsung phones, capturing moving subjects can be challenging. If you often end up with blurry photos of your pets and little ones, use the Motion Mode in Google Photos. Let’s check it in action.
-
Open
Google Photos
on your phone. - Find a blurry photo.
-
Google Photos automatically turns on
Motion Mode
and gives you another frame at the bottom. - Tap the photo preview and check for a clear image without any blur.
-
Tap
Burst
at the bottom and select
Keep this photo only
.
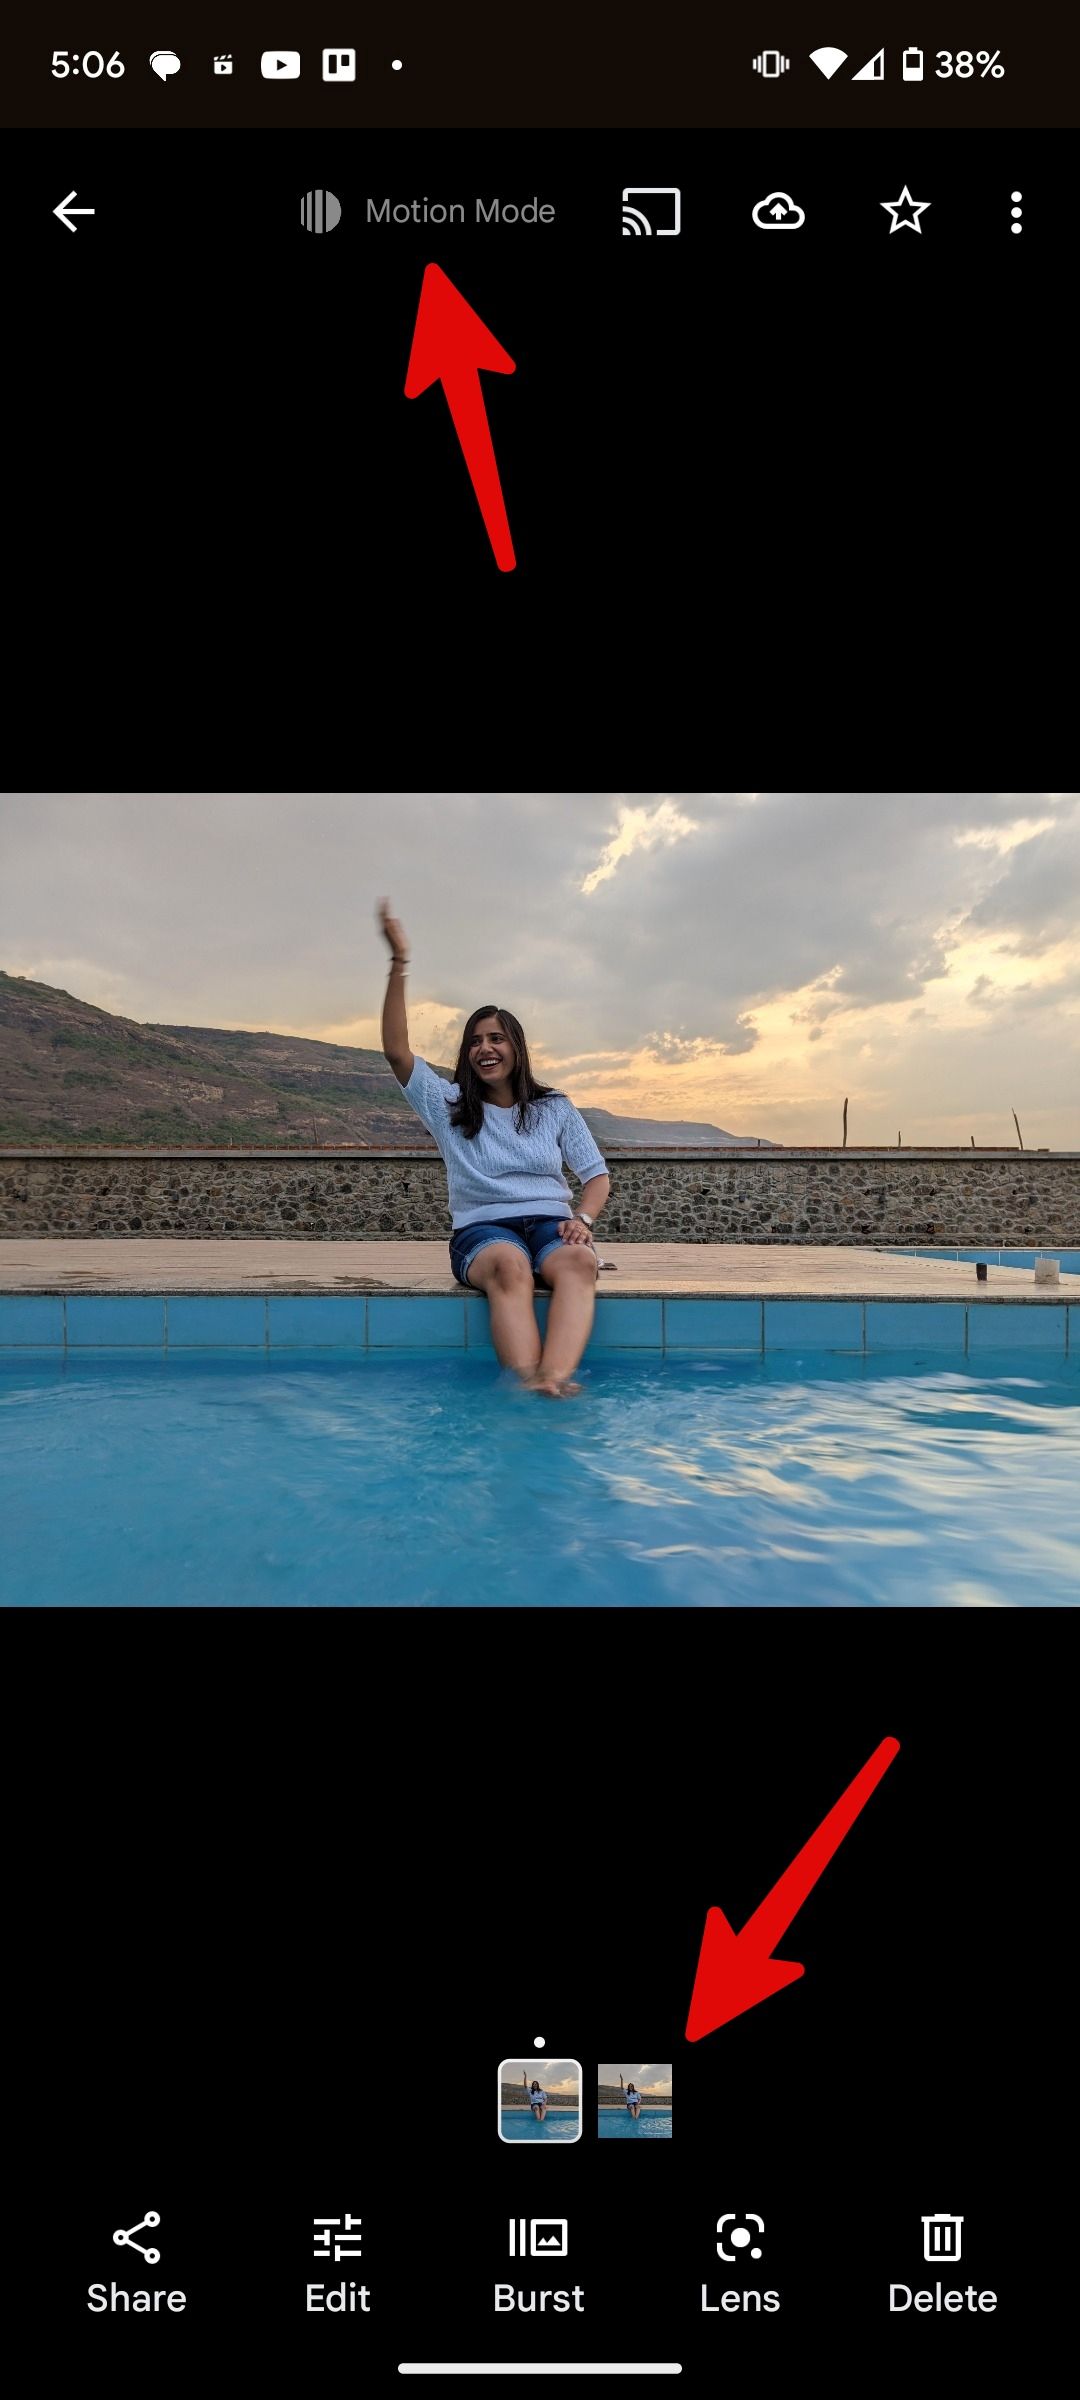
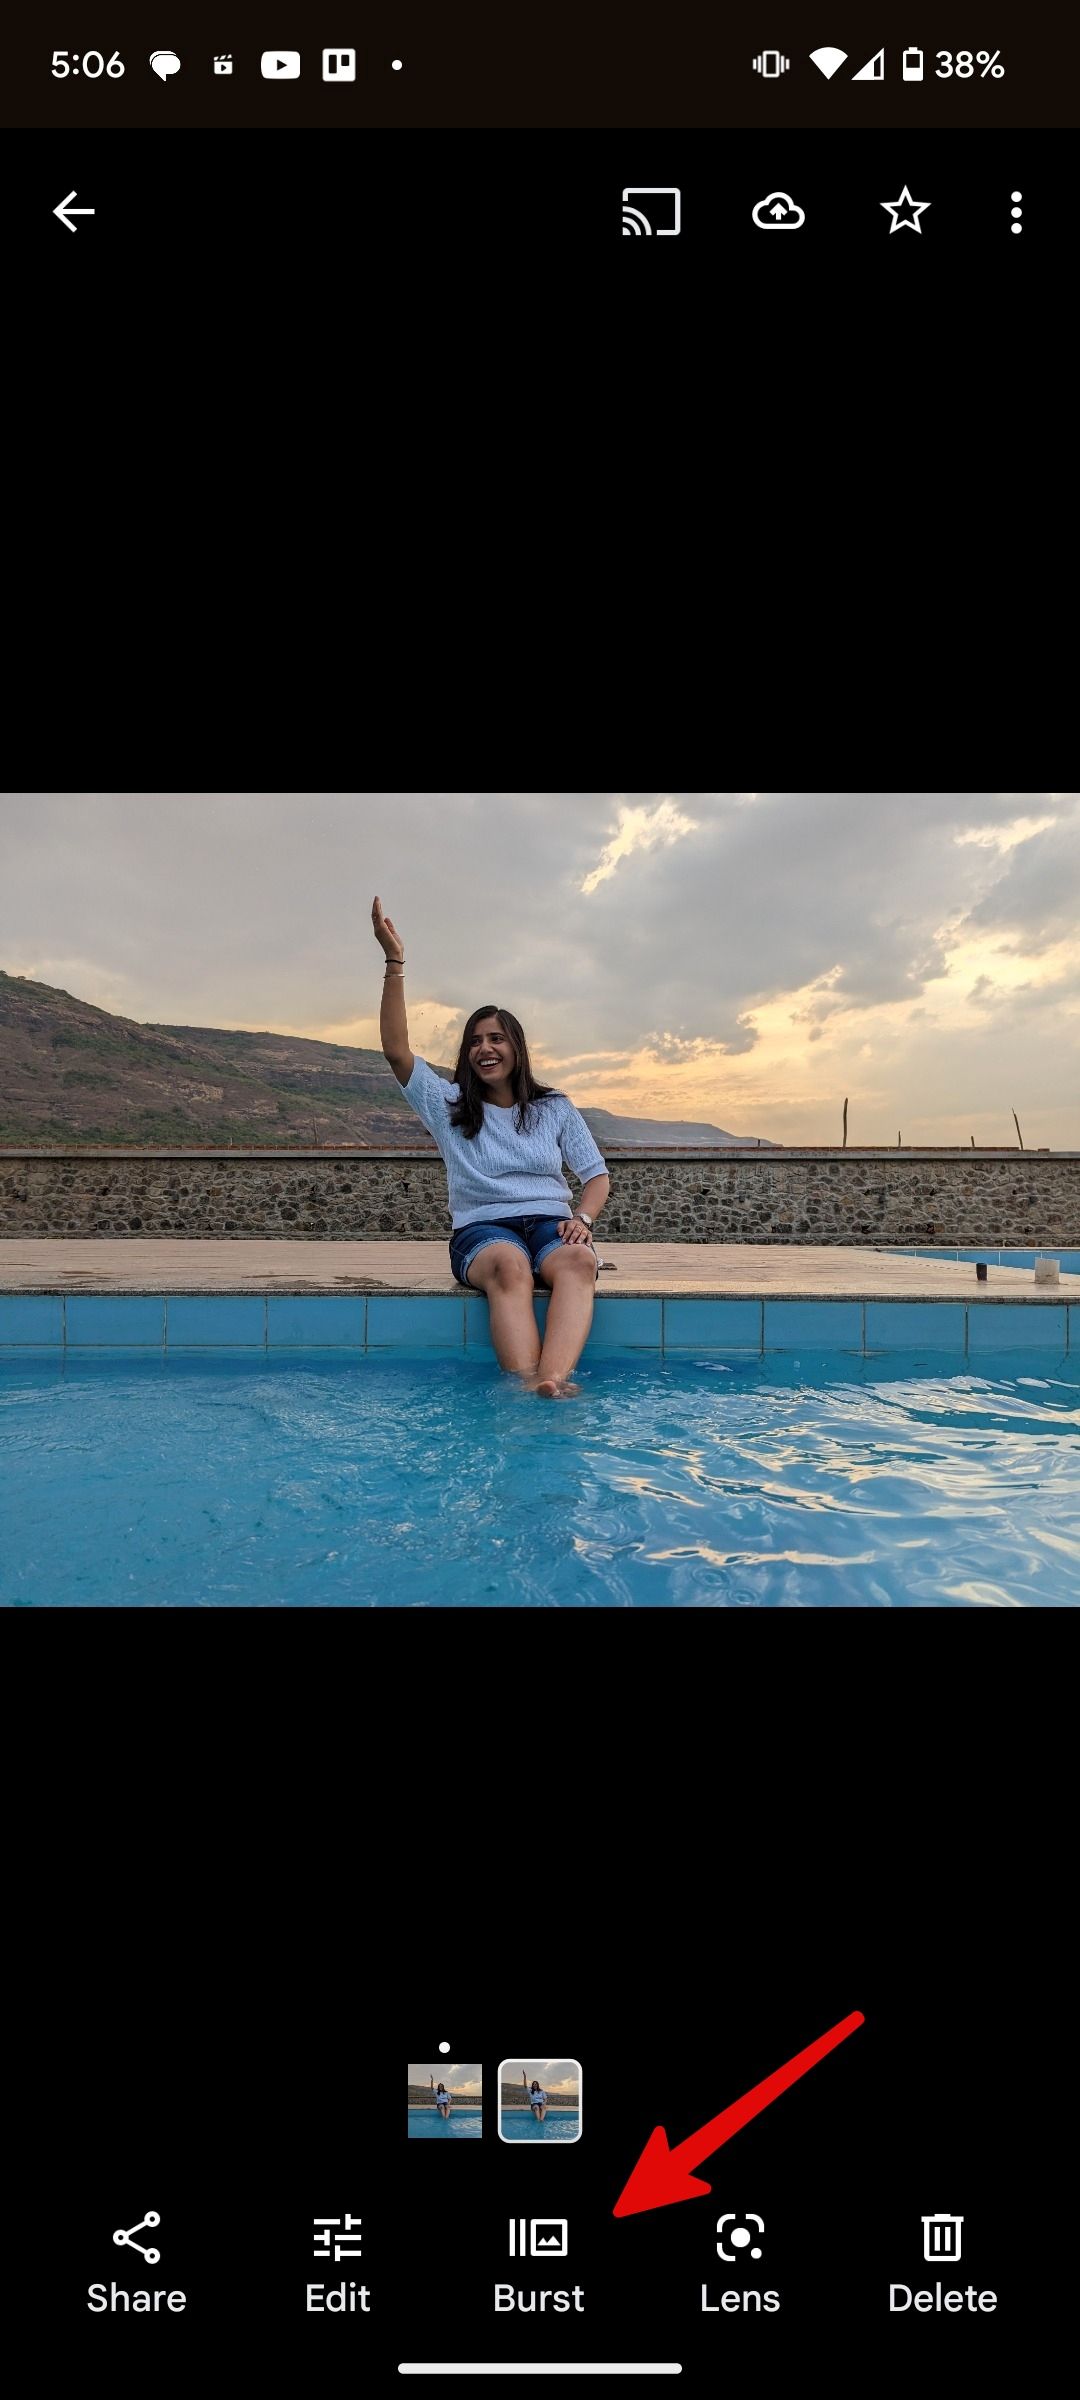
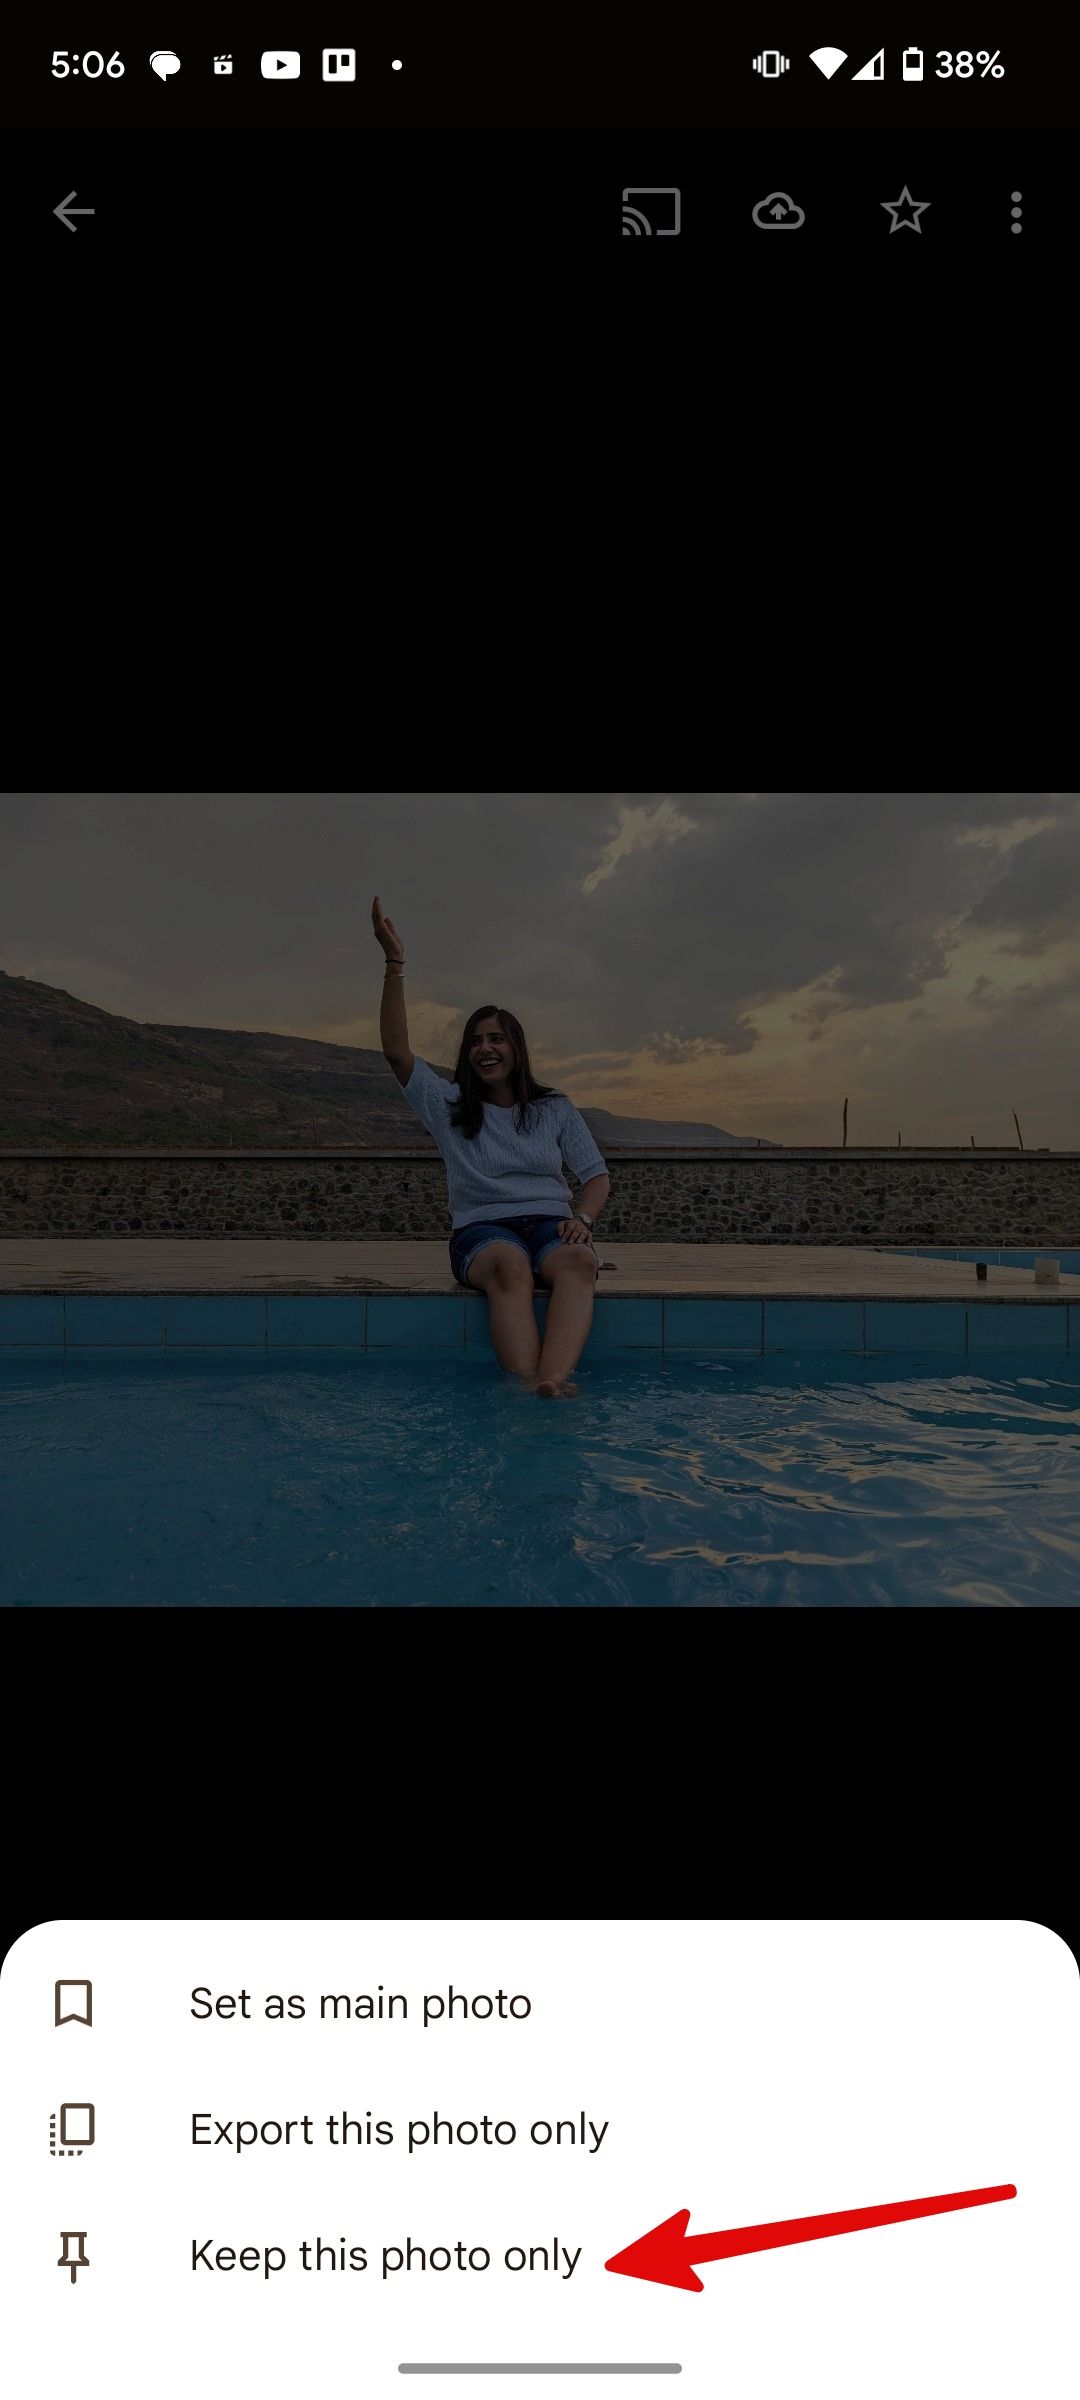
Motion Mode worked like a charm in our testing. The example above shows how the app fixed the hand blur and stabilized water waves.
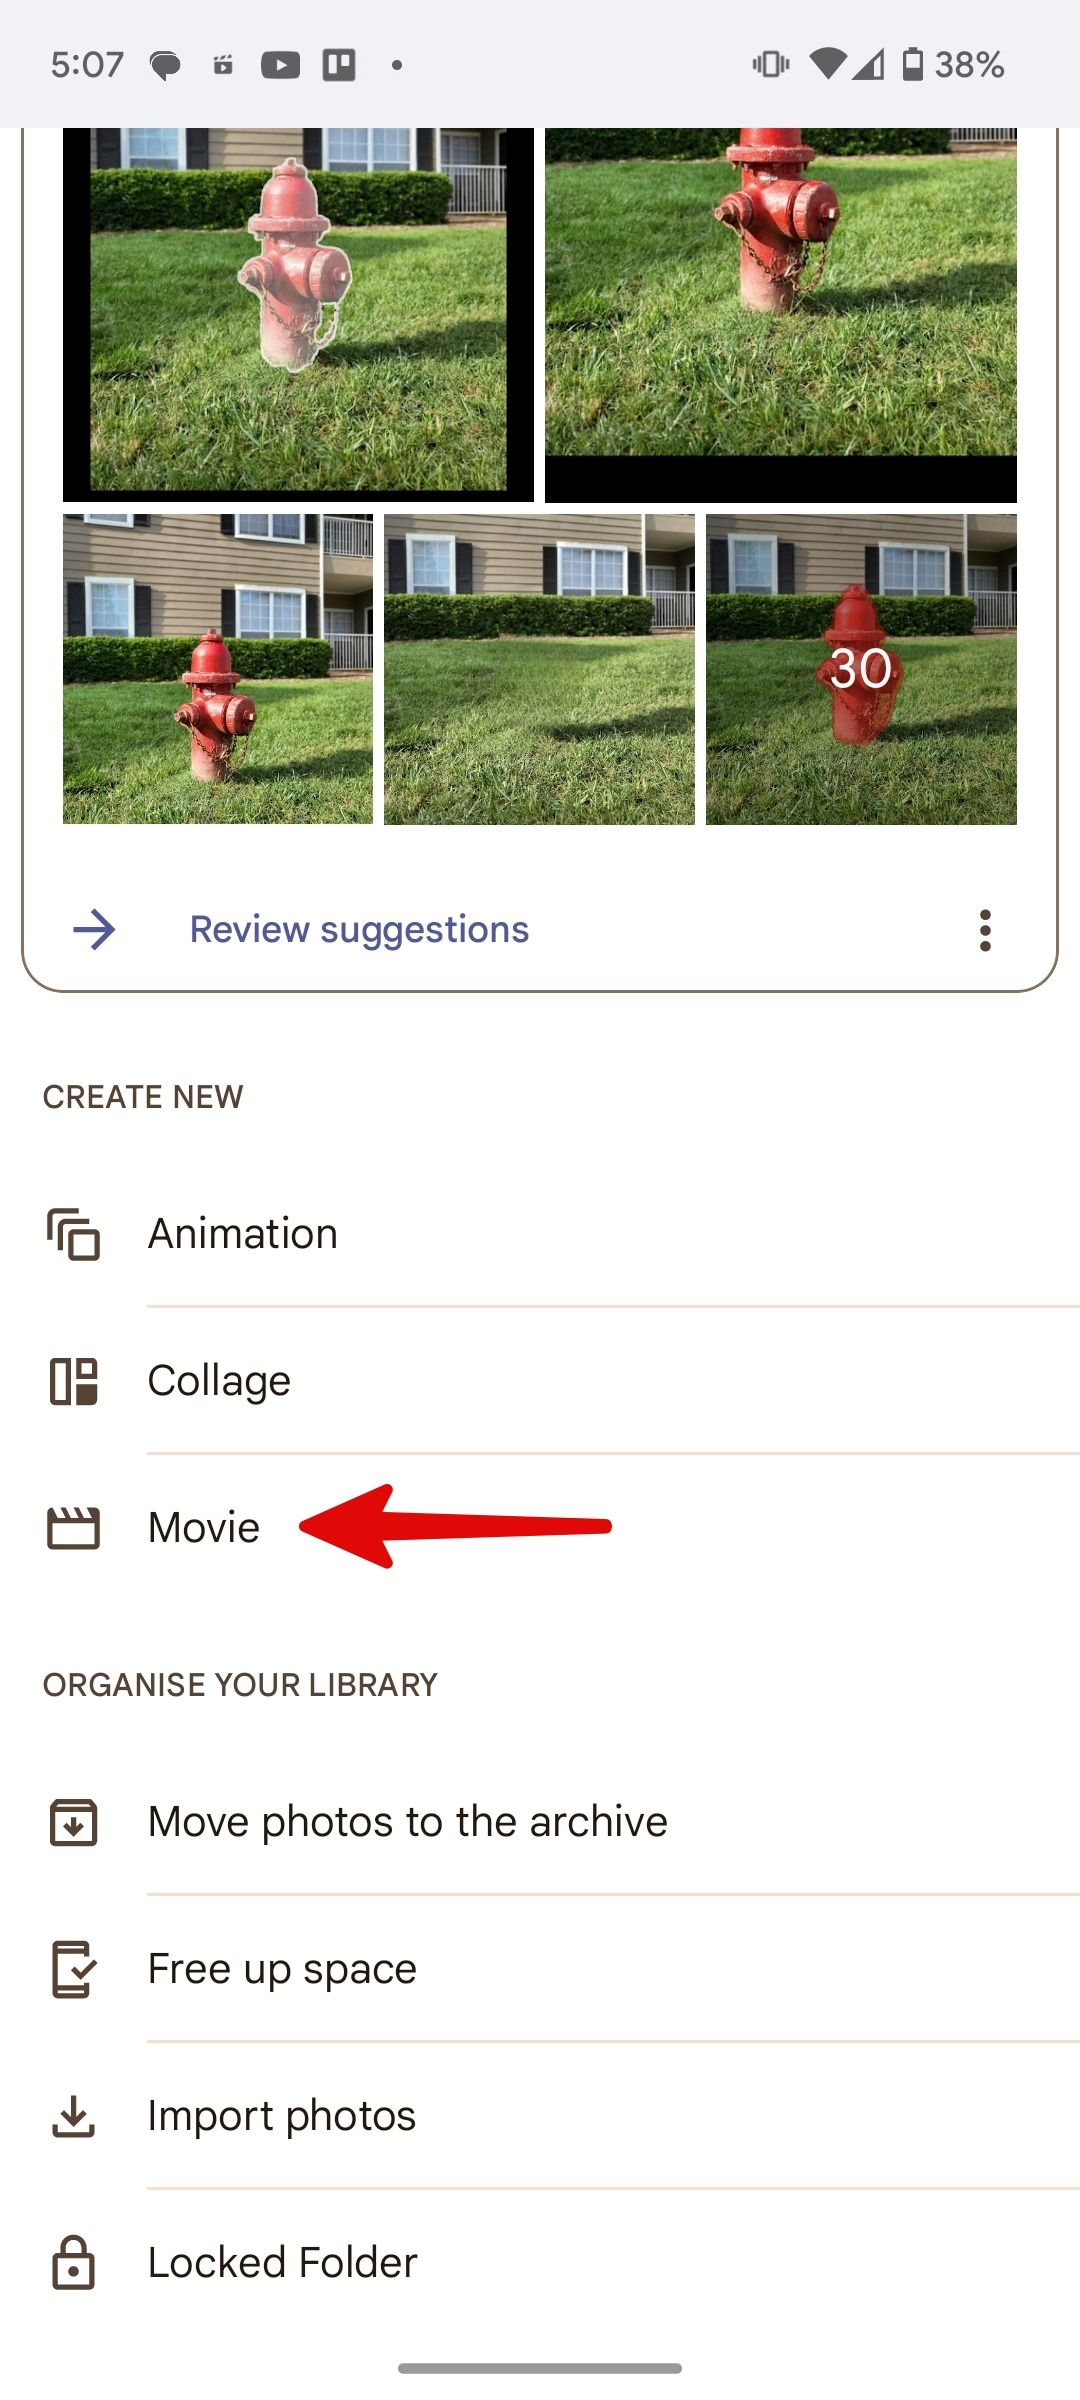
Make a movie in Google Photos
You can select up to 50 photos and videos and create a stunning movie with a mesmerizing tune in the background.
-
Launch
Google Photos
on your phone. -
Move to the
Library
and select
Utilities
. -
Scroll to
Movie
. -
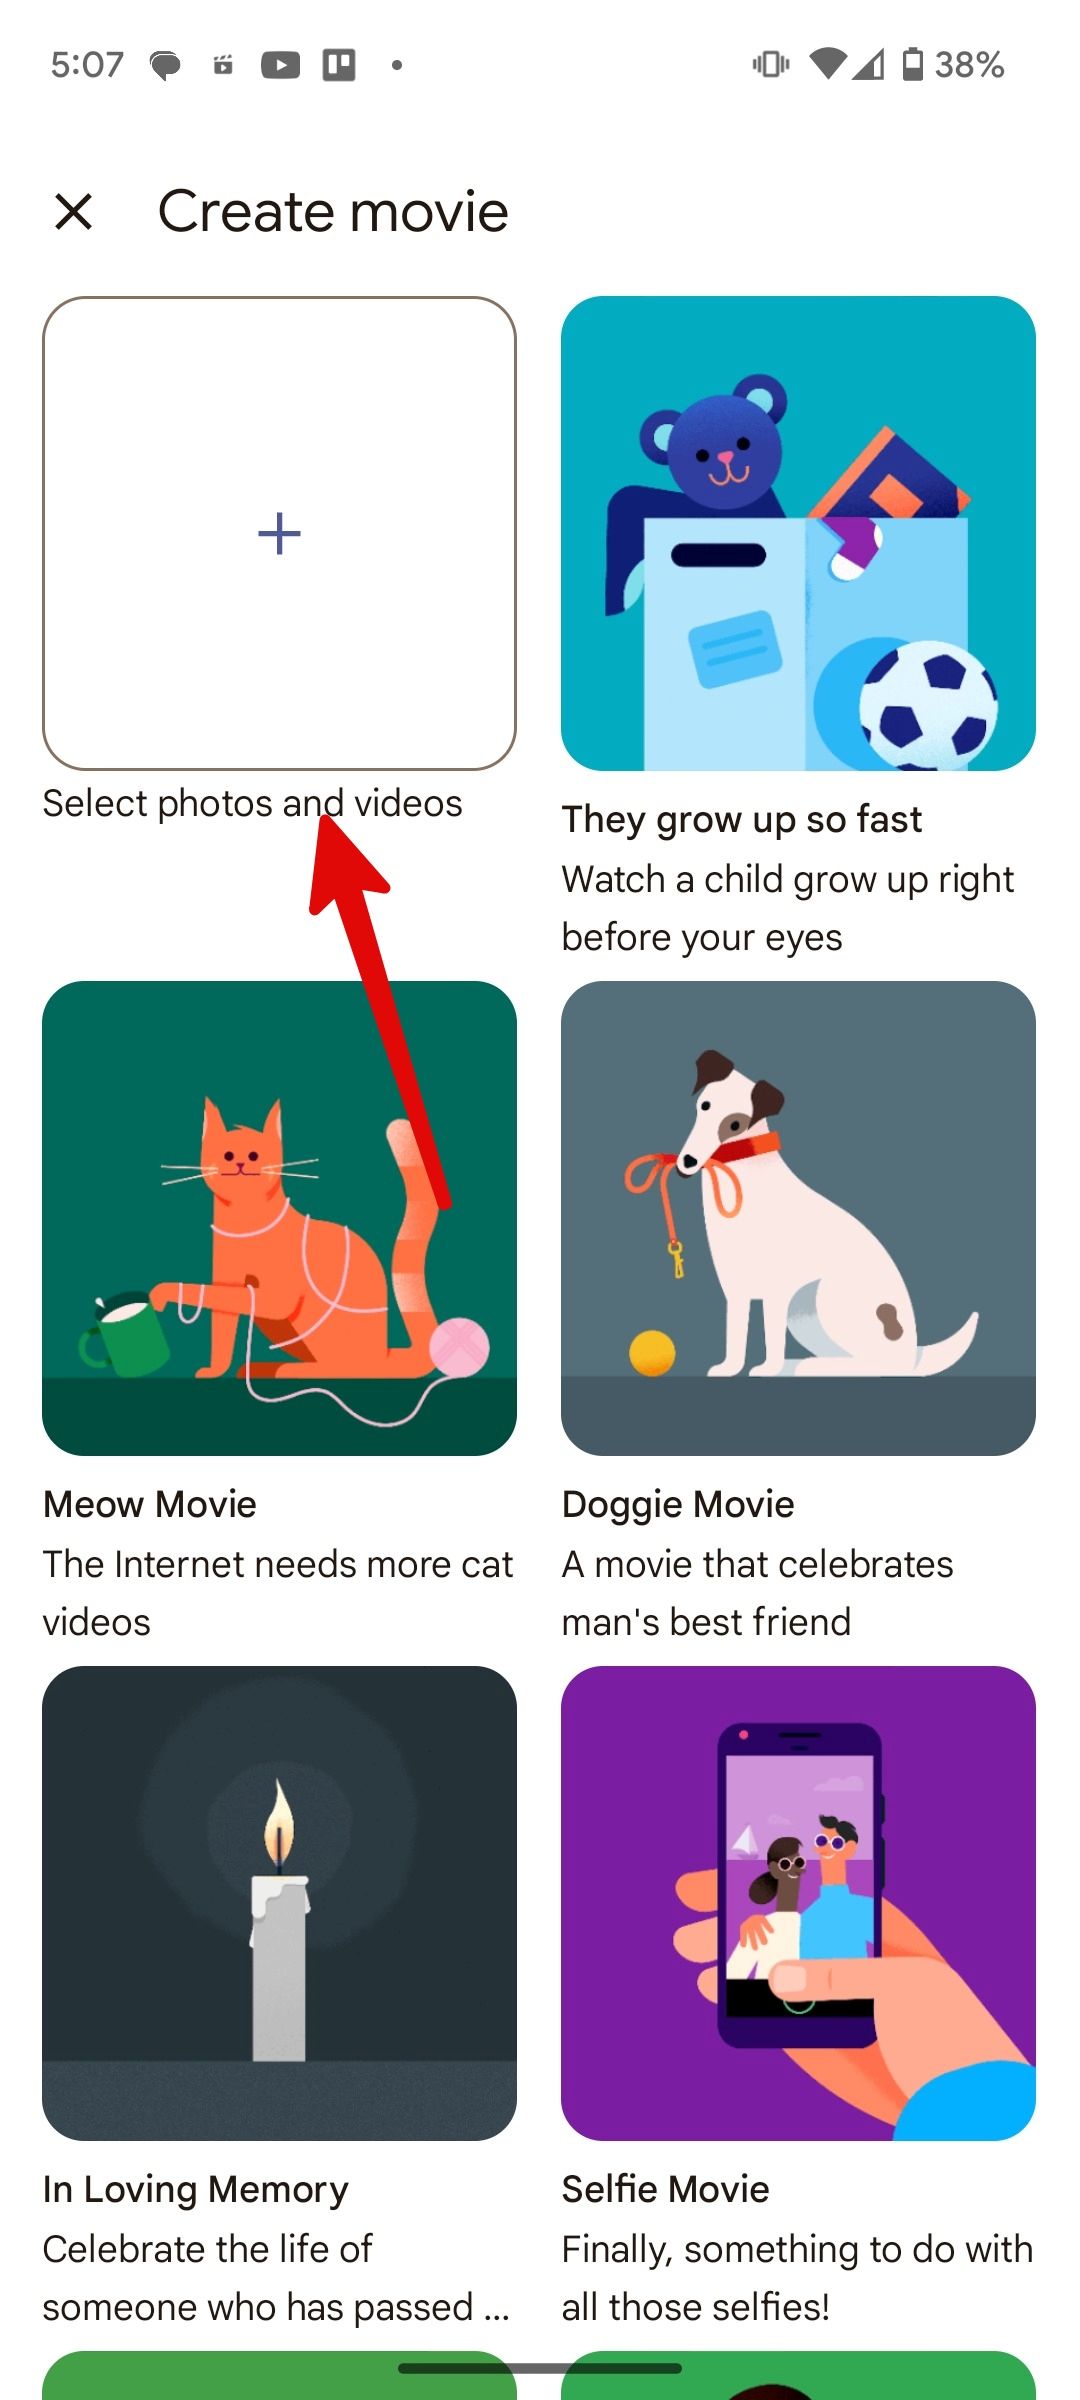
Choose
Select photos & videos
. You can also select from several ready-to-use templates. Ask Google Photos to make a movie from your pet photos, watch your child grow up, create a movie from your selfies, put together a video clip for your Valentine, and more. -
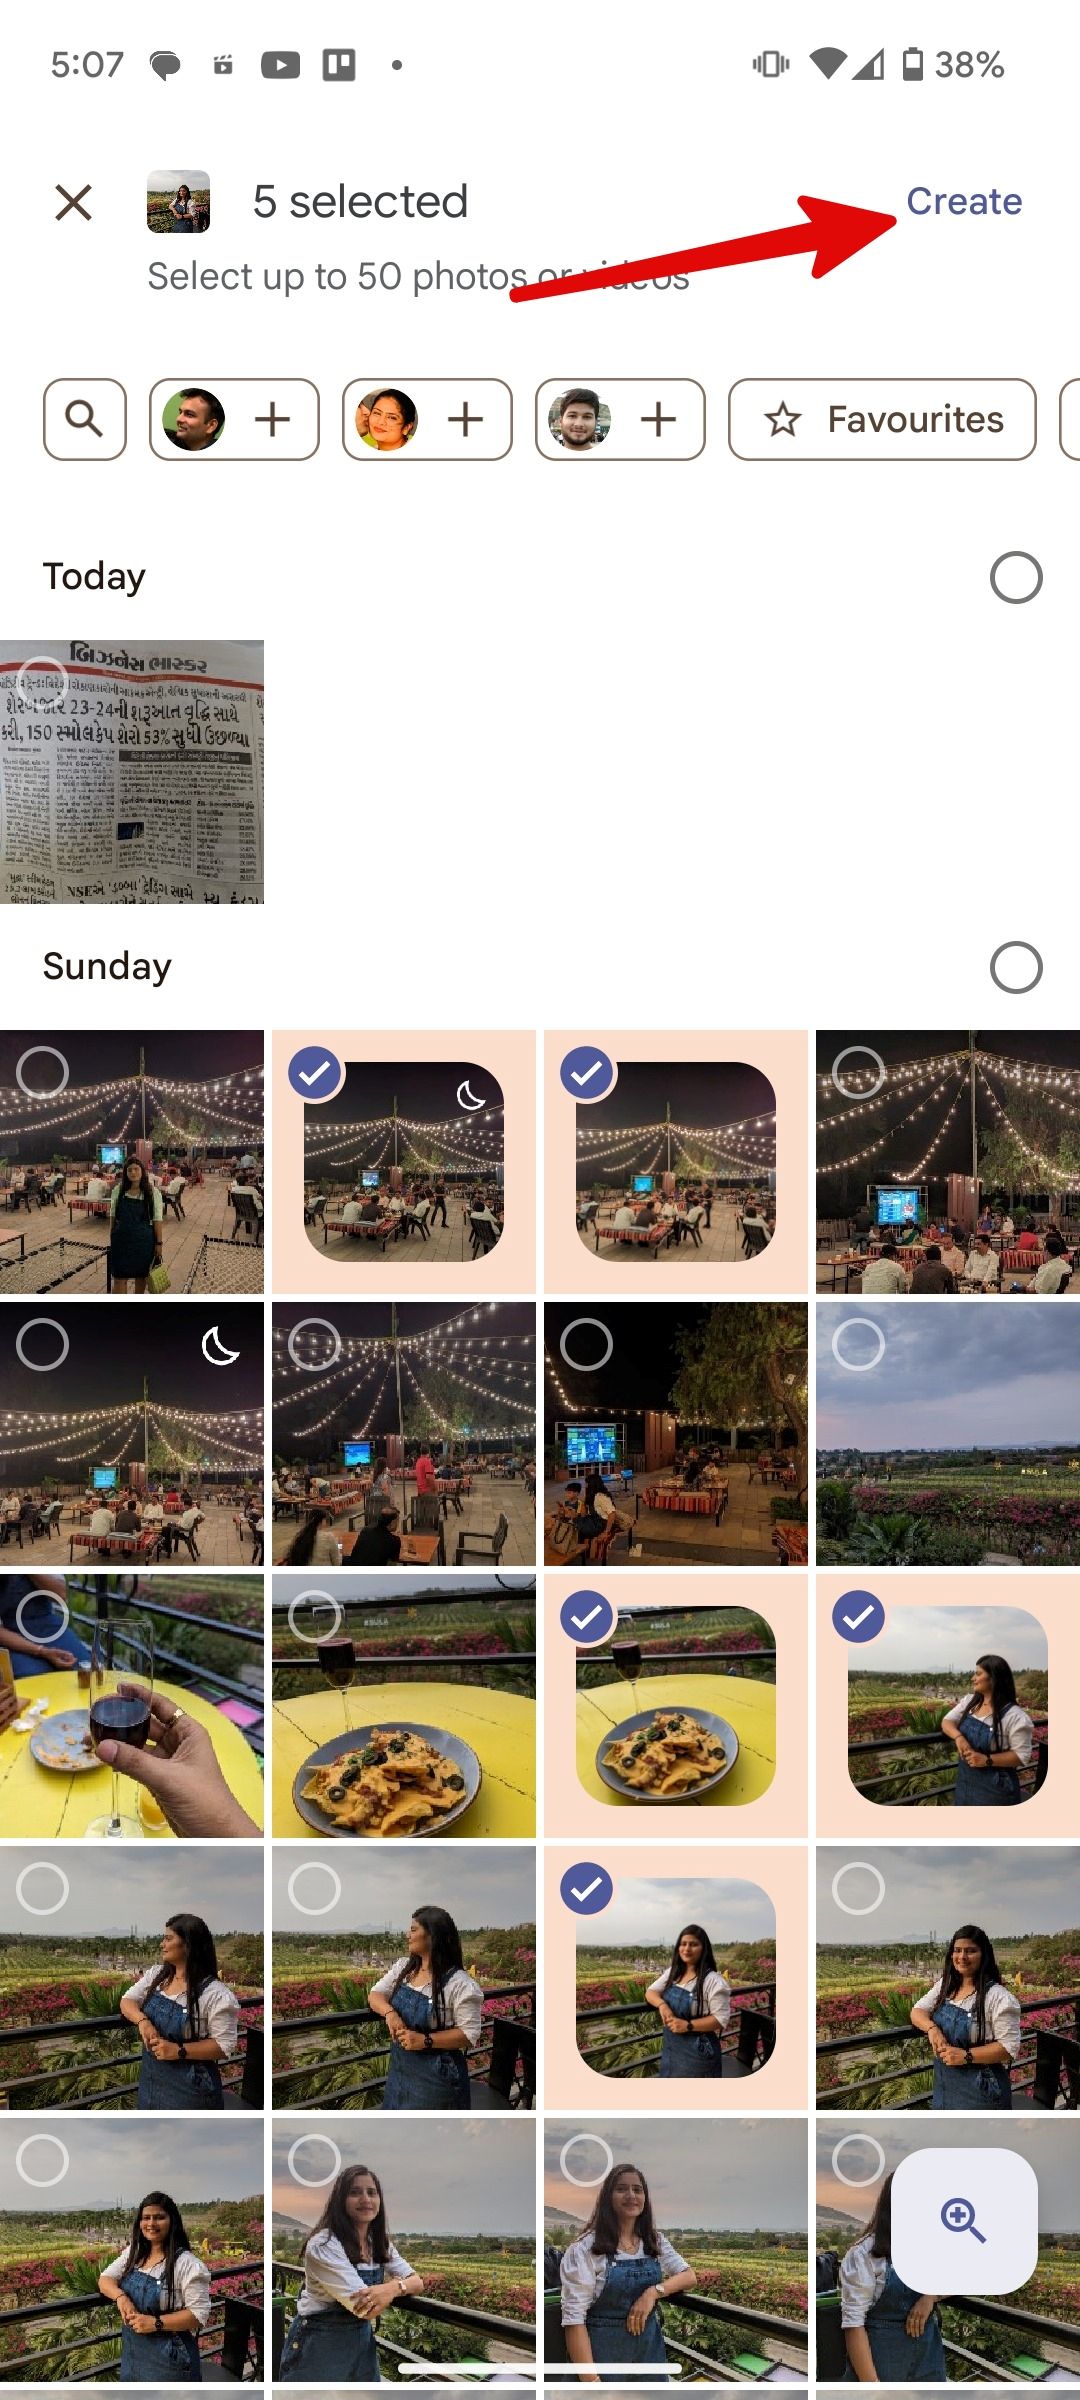
Select up to 50 photos or videos from the following menu. Tap
Create
. - Google Photos uploads the selected media and opens a dedicated editor.
- Change video orientation, add a tune, and rearrange photos or videos based on the event timeline.
- Add new photos or videos from the bottom menu.
-
Tap
Save
at the top, and your movie is ready to share on social media.
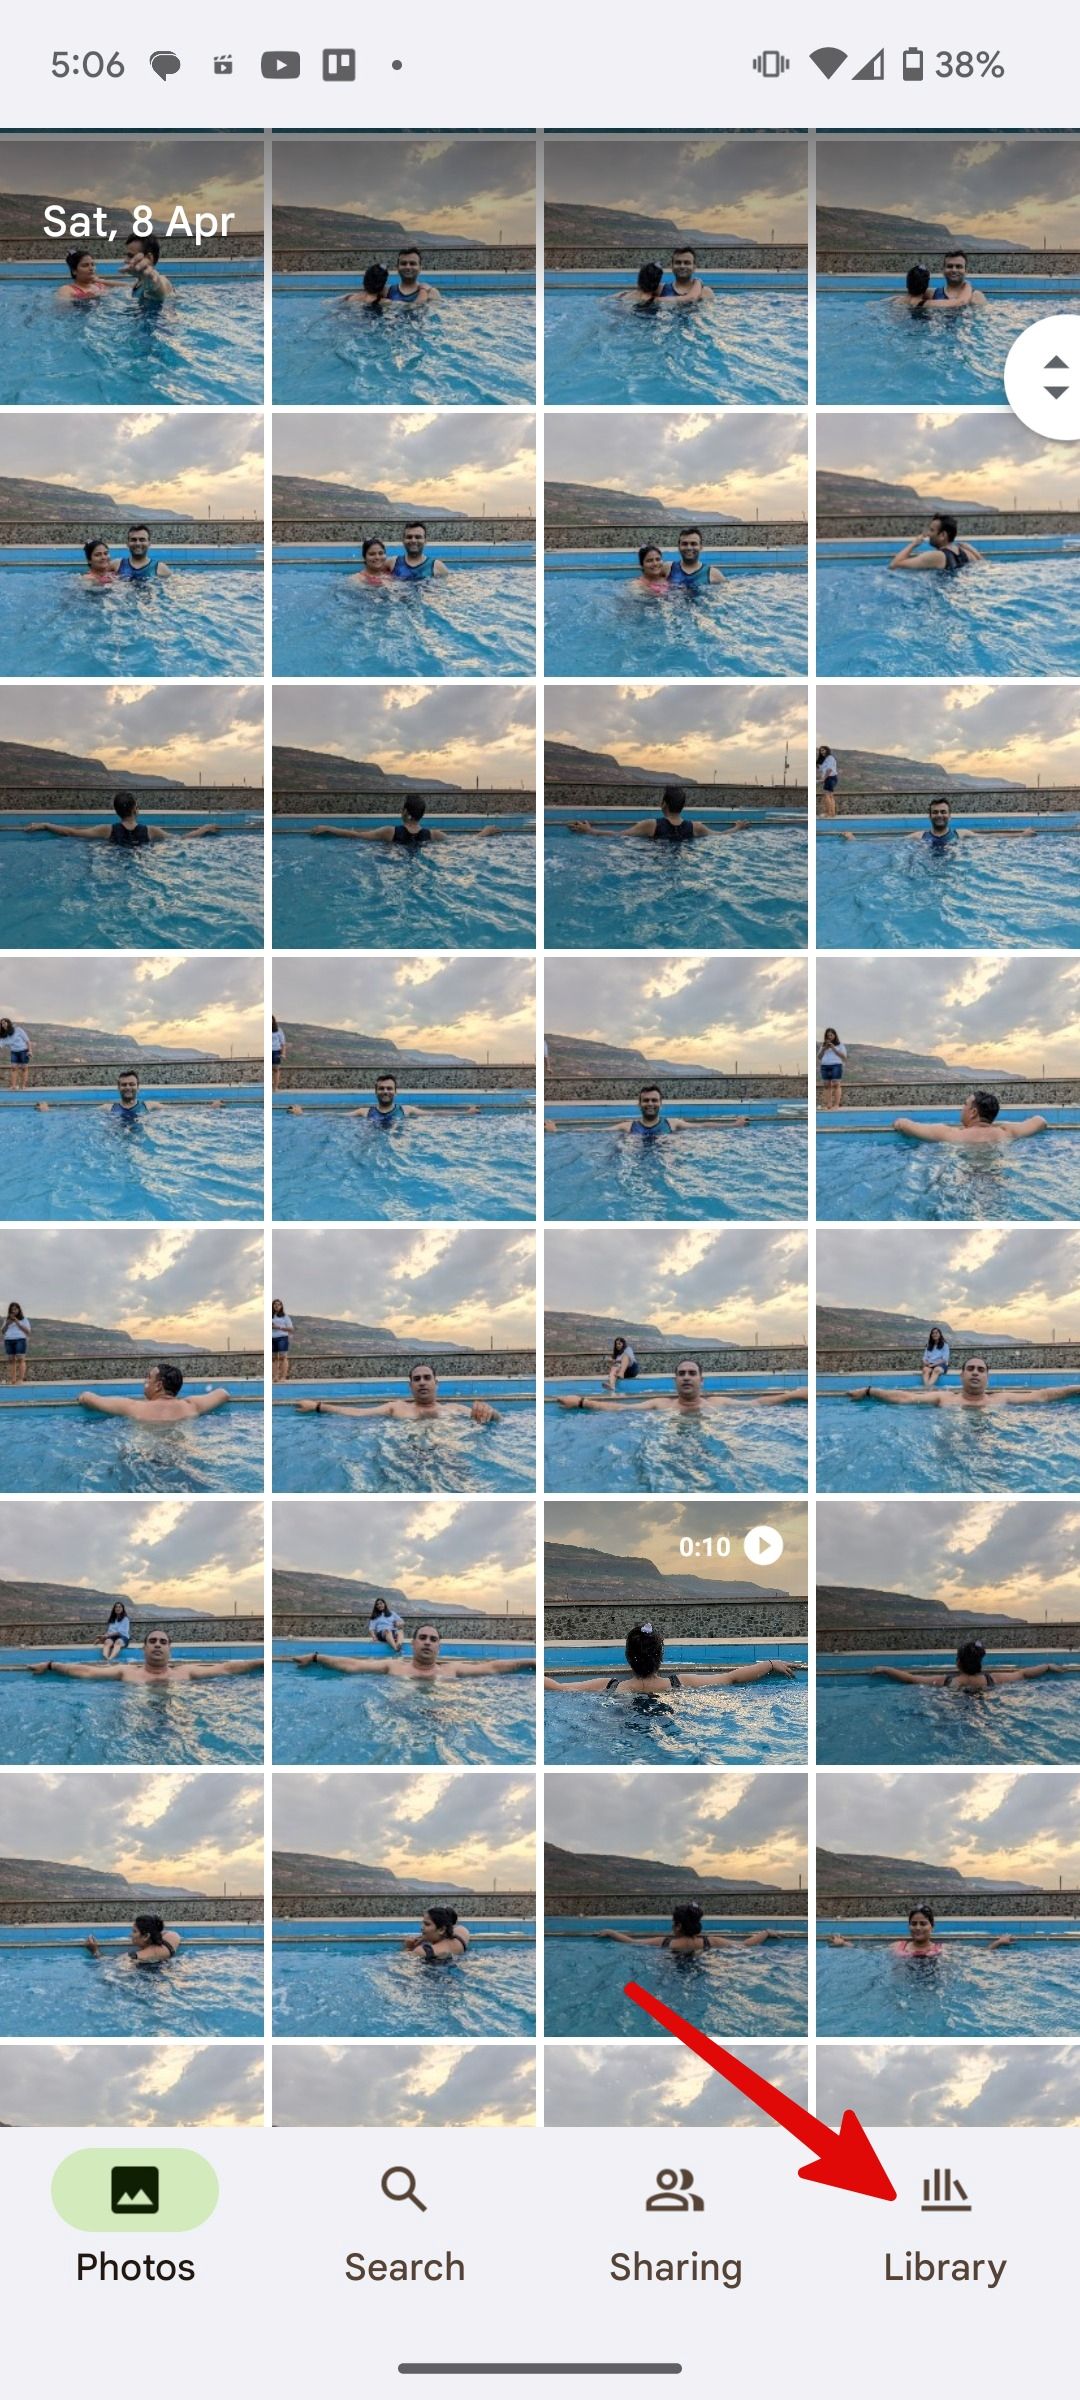
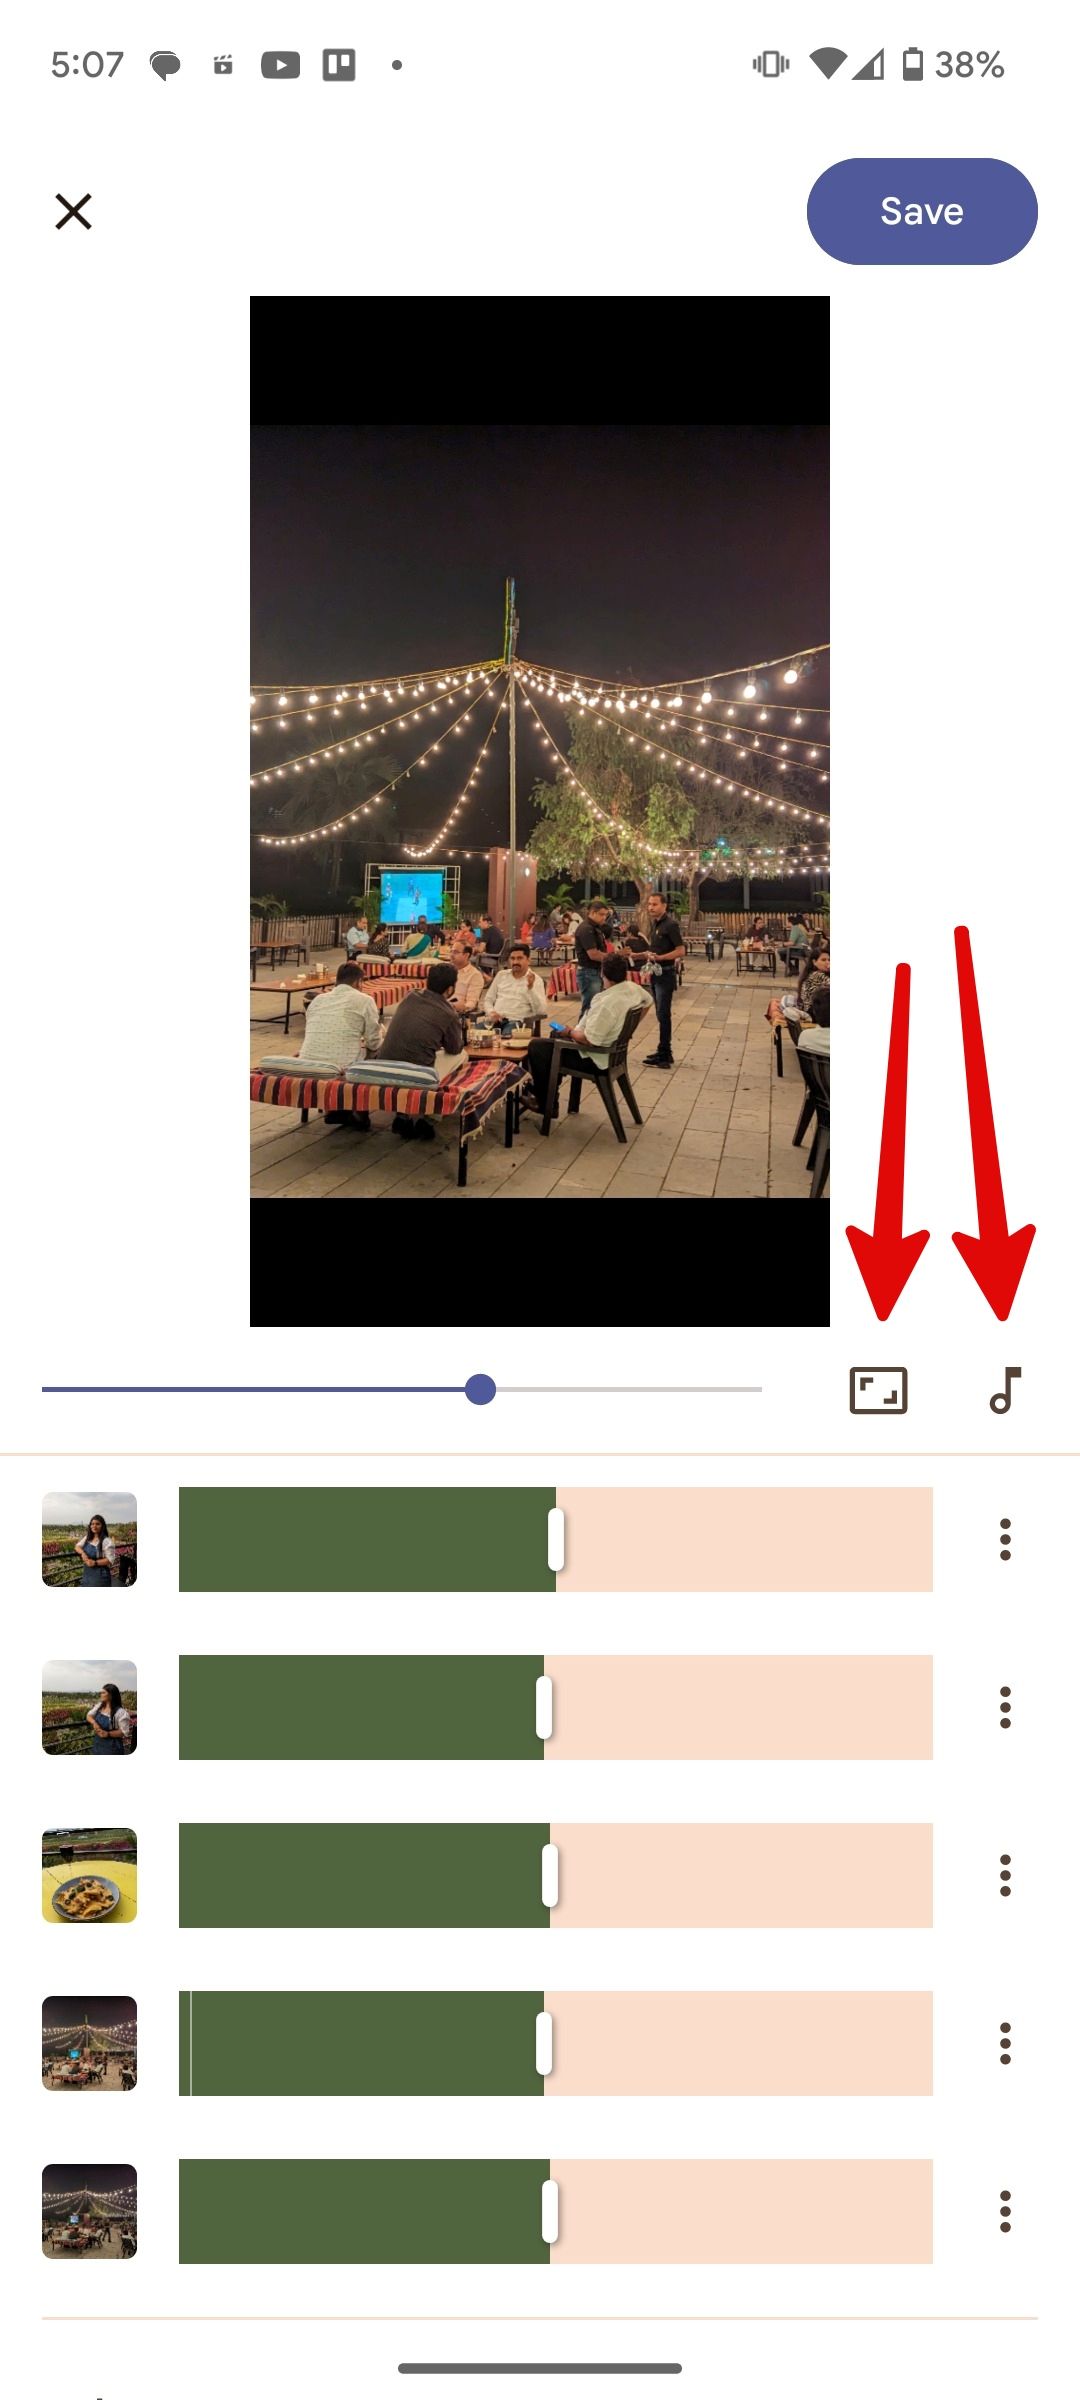
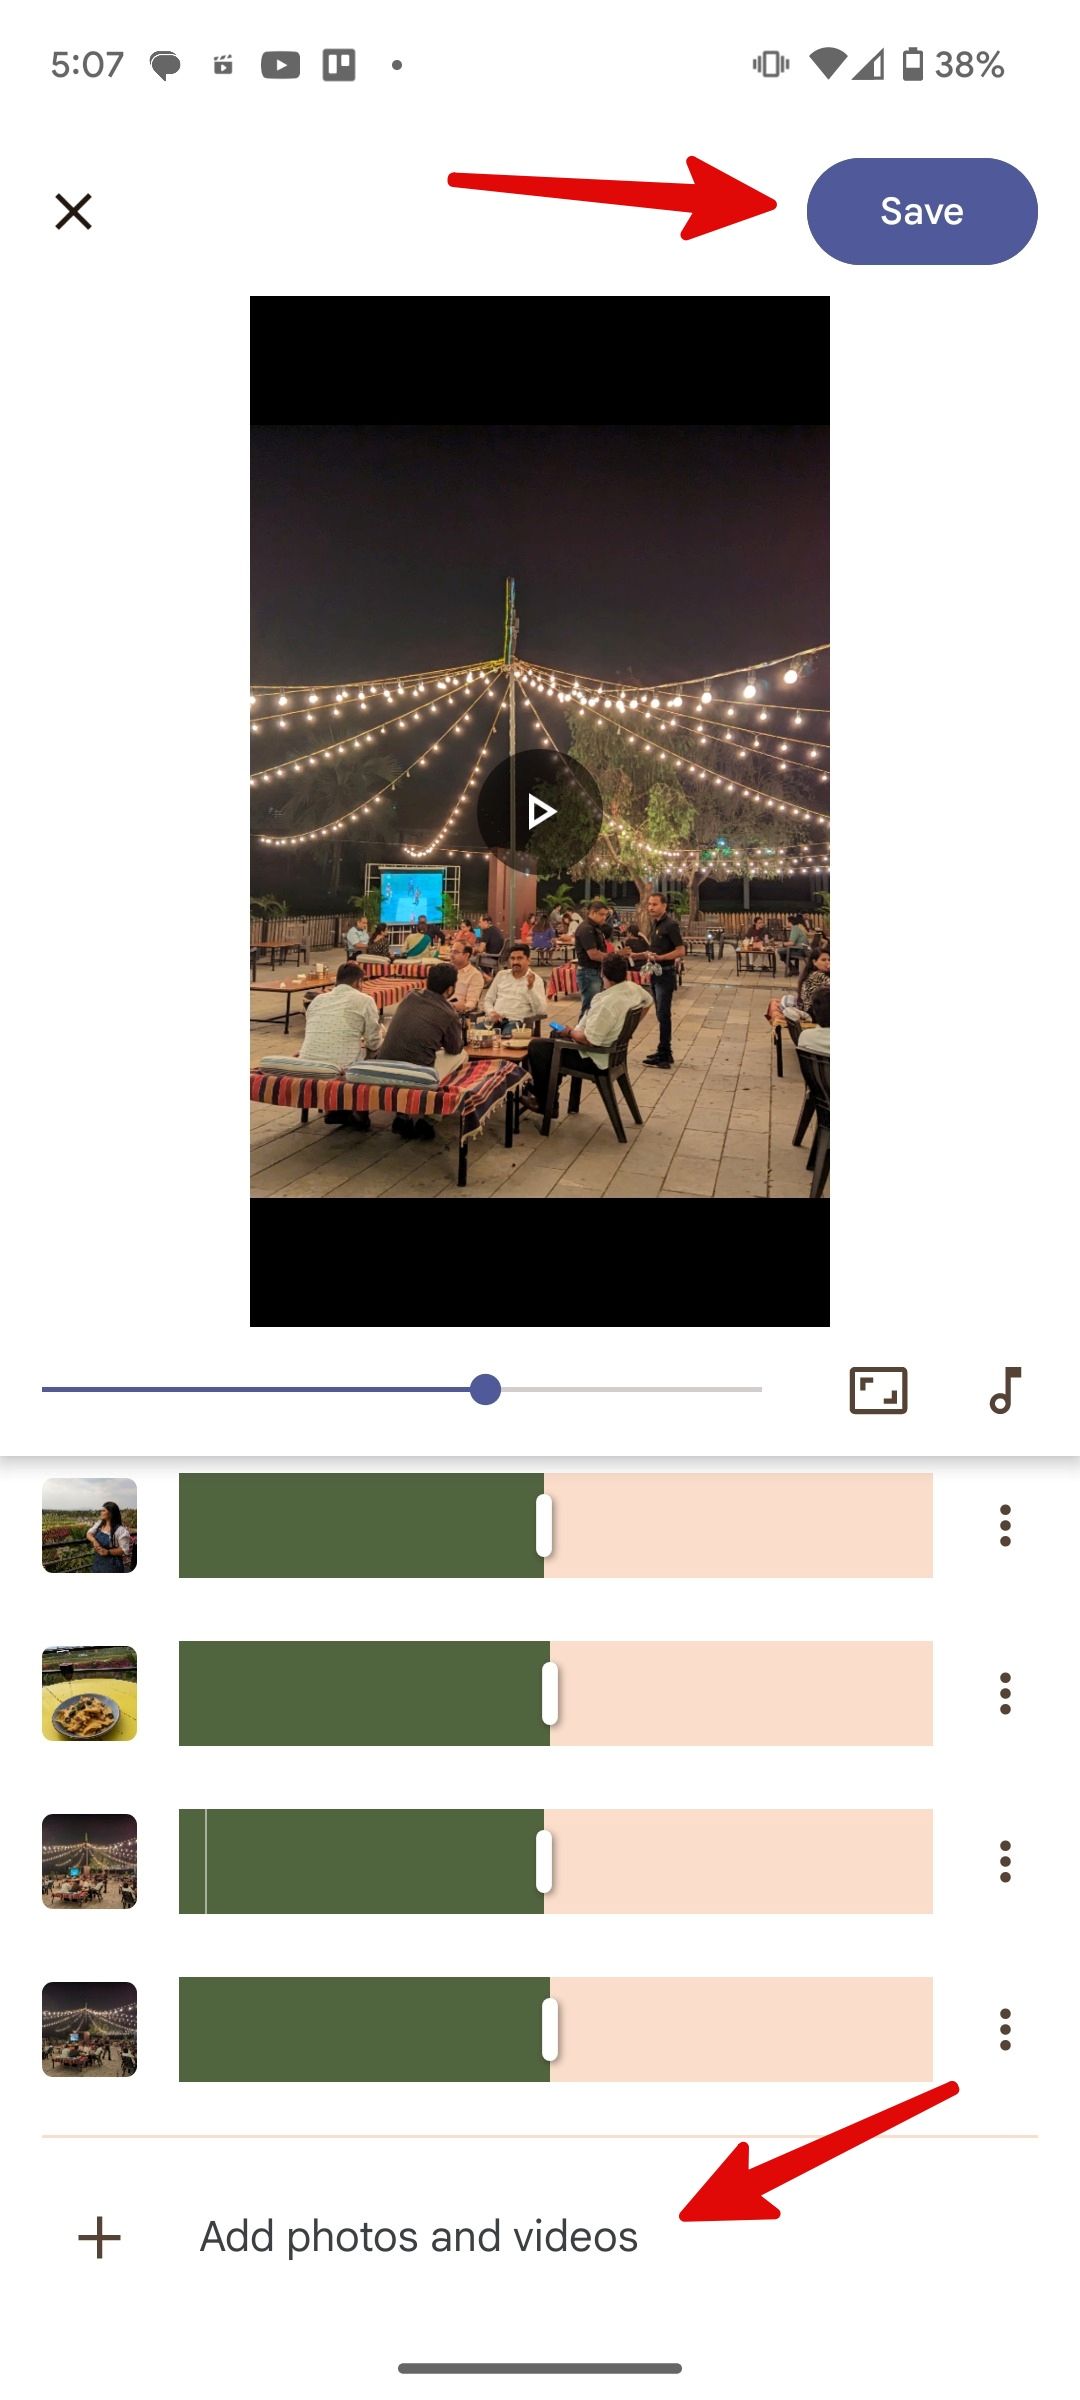
You can’t add music from the YouTube Music library. Apple offers a neat Apple Music integration while creating Memories in the Photos app.
Create an animation
You can select up to 50 photos in Google Photos and create a GIF.
-
Head to the
Utilities
menu in Google Photos (check the steps above). -
Scroll to
Animation
. -
Select up to 50 photos and tap
Create
at the top. -
Google Photos creates and saves a GIF to your account. You’ll find it in the Photos tab.
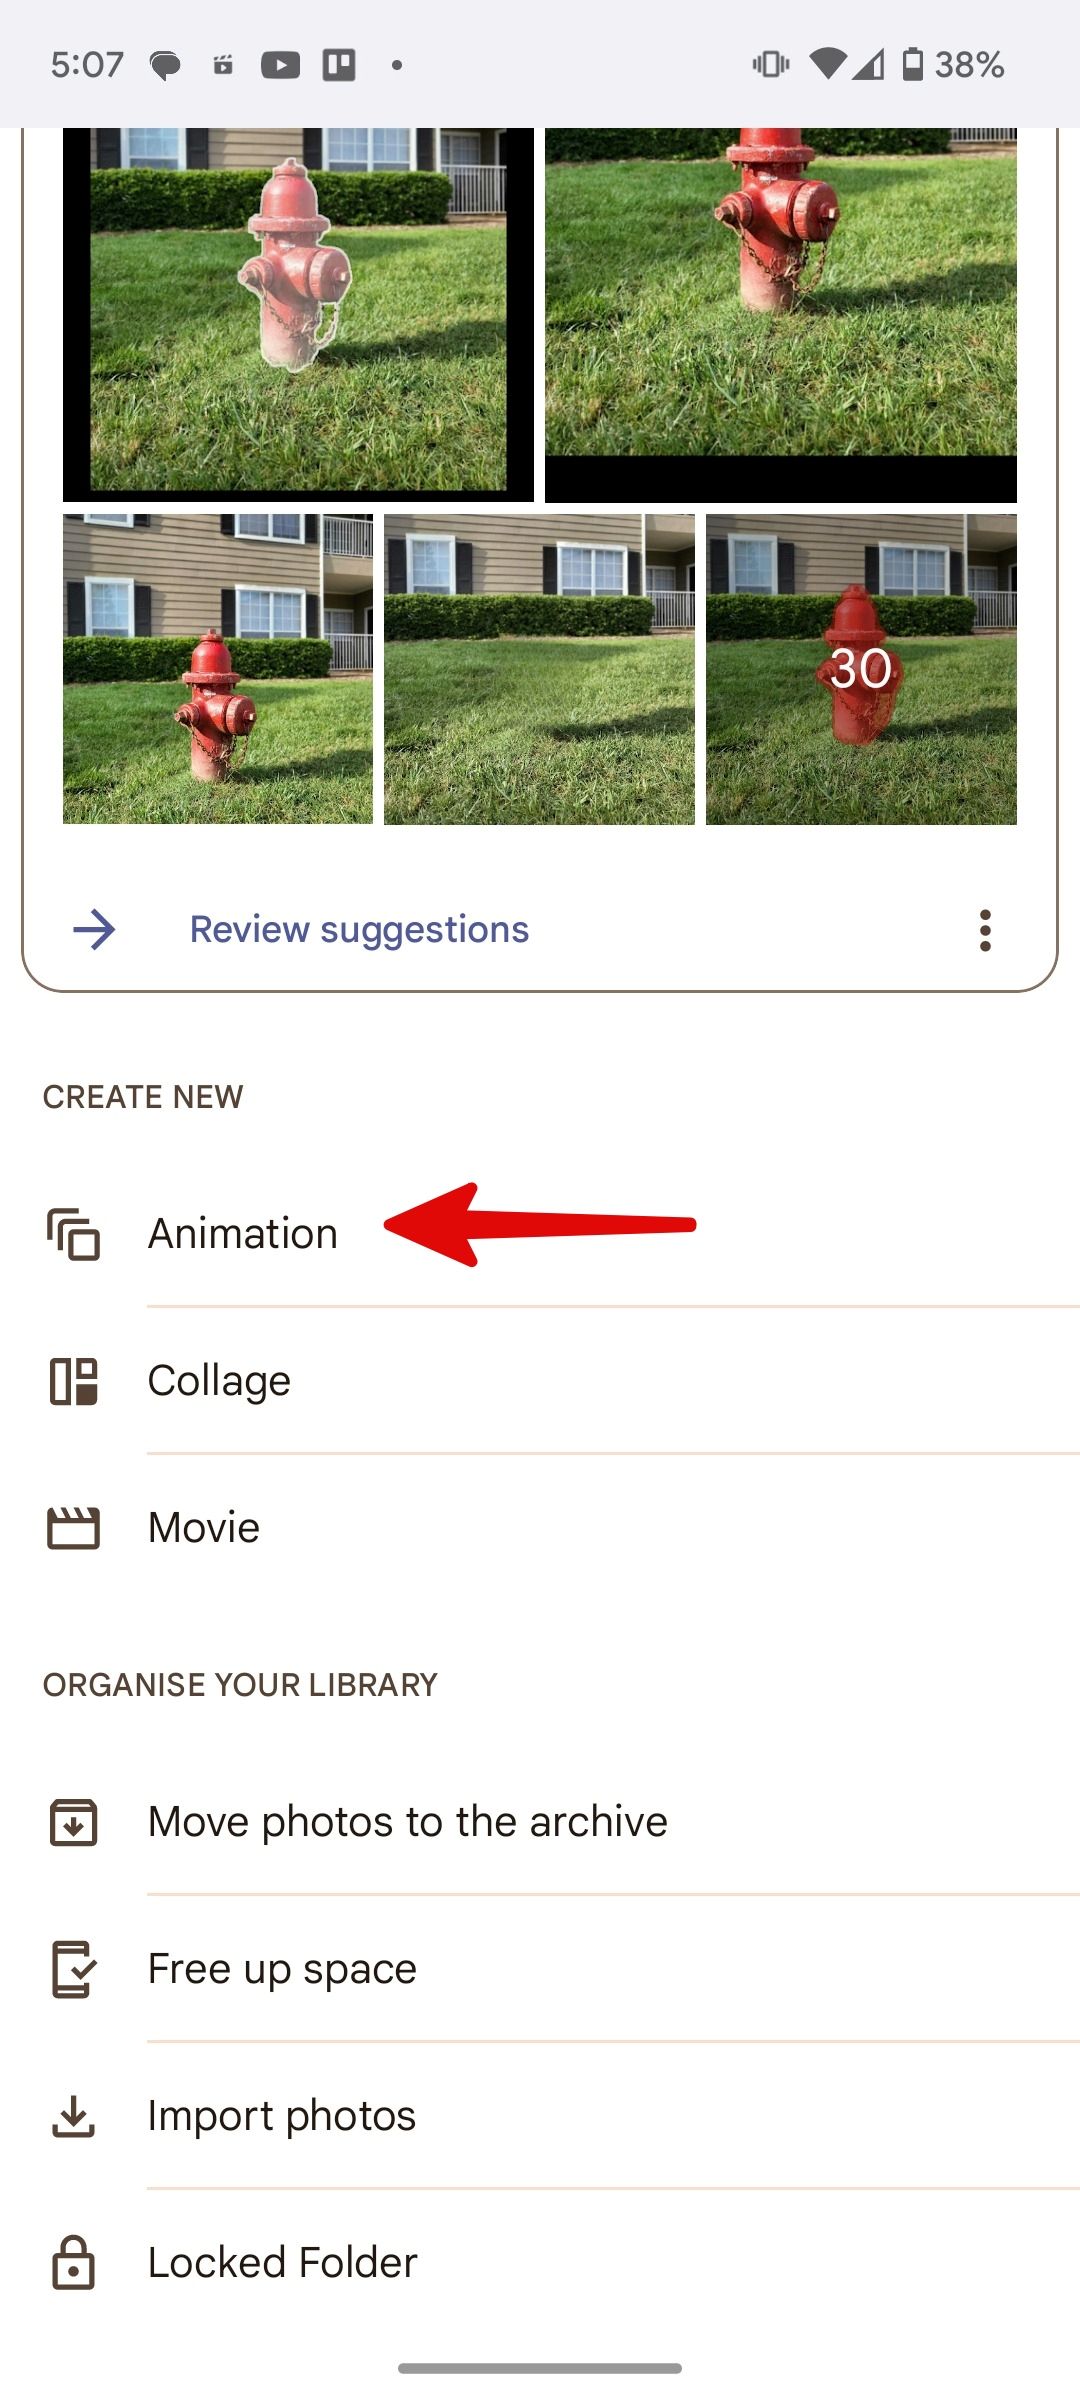

Create a collage in Google Photos
Google Photos received a major makeover to create designer collages on the go. Read our dedicated post to make photo collages on Android. It talks about Google Photos and other third-party apps to make collages.
Google Photos is more than enough for most of us
After making changes to your photos and videos, hide them behind a locked folder to keep them safe from prying eyes. If you want to explore advanced editing tools, use third-party apps like Lightroom to make tweaks.
Xem chi tiết và đăng kýXem chi tiết và đăng kýXem chi tiết và đăng ký

Khám phá thêm từ Phụ Kiện Đỉnh
Đăng ký để nhận các bài đăng mới nhất được gửi đến email của bạn.

