

Review sản phẩm
Tự Tay Tạo View Tuỳ Chỉnh: Hướng Dẫn Chi Tiết!
Th4
## Tự Tay Tạo View Tuỳ Chỉnh: Hướng Dẫn Chi Tiết!
Giới thiệu về việc tạo Custom Views:
Bài viết này sẽ hướng dẫn bạn cách tạo các Custom Views (View tùy chỉnh) một cách chi tiết và dễ hiểu. Tạo Custom Views cho phép bạn thiết kế các giao diện người dùng (UI) độc đáo và phù hợp hoàn toàn với nhu cầu của ứng dụng. Bạn sẽ học cách tùy chỉnh giao diện, xử lý sự kiện và tích hợp chúng vào project của mình. Từ đó, ứng dụng của bạn sẽ trở nên chuyên nghiệp và thu hút hơn.
(Phần nội dung chi tiết sẽ được thêm vào đây. Vì bài gốc chỉ cung cấp tiêu đề, tôi không thể viết phần nội dung chi tiết. Bạn cần cung cấp thêm thông tin để tôi có thể hoàn thành phần này.)
(Ví dụ về nội dung chi tiết có thể bao gồm các phần sau):
* Bước 1: Khái niệm cơ bản về Custom Views
* Bước 2: Tạo một Custom View đơn giản
* Bước 3: Sử dụng XML để thiết kế layout
* Bước 4: Xử lý các sự kiện người dùng (touch events)
* Bước 5: Tùy chỉnh thuộc tính (attributes)
* Bước 6: Sử dụng Custom Views trong project
* Bước 7: Các ví dụ thực tiễn và lời khuyên
—
Mua ngay sản phẩm chính hãng tại Queen Mobile!
Queen Mobile là nhà cung cấp uy tín các sản phẩm điện thoại iPhone, máy tính bảng iPad, đồng hồ thông minh Smartwatch và phụ kiện Apple chính hãng tại Việt Nam. Chúng tôi cam kết mang đến cho bạn những sản phẩm chất lượng cao cùng với dịch vụ khách hàng chuyên nghiệp. Khám phá ngay bộ sưu tập đa dạng và lựa chọn sản phẩm phù hợp nhất với bạn!
[Link đến website Queen Mobile]#CustomViews #AndroidDevelopment #iOSDevelopment #PhátTriểnỨngDụng #LậpTrìnhDiĐộng #UI #UX #QueenMobile #iPhone #iPad #Smartwatch #Apple #CôngNghệ #MuaSắm #ĐiệnThoại #Tablet
(Lưu ý: Để bài viết hoàn chỉnh hơn, bạn cần cung cấp thêm thông tin chi tiết về cách tạo Custom Views. Tôi đã thêm các hashtag liên quan và gợi ý về nội dung chi tiết để bạn tham khảo.)
Giới thiệu How to create custom views
: How to create custom views
Hãy viết lại bài viết dài kèm hashtag về việc đánh giá sản phẩm và mua ngay tại Queen Mobile bằng tiếng VIệt: How to create custom views
Mua ngay sản phẩm tại Việt Nam:
QUEEN MOBILE chuyên cung cấp điện thoại Iphone, máy tính bảng Ipad, đồng hồ Smartwatch và các phụ kiện APPLE và các giải pháp điện tử và nhà thông minh. Queen Mobile rất hân hạnh được phục vụ quý khách….
_____________________________________________________
Mua #Điện_thoại #iphone #ipad #macbook #samsung #xiaomi #poco #oppo #snapdragon giá tốt, hãy ghé [𝑸𝑼𝑬𝑬𝑵 𝑴𝑶𝑩𝑰𝑳𝑬]
✿ 149 Hòa Bình, phường Hiệp Tân, quận Tân Phú, TP HCM
✿ 402B, Hai Bà Trưng, P Tân Định, Q 1, HCM
✿ 287 đường 3/2 P 10, Q 10, HCM
Hotline (miễn phí) 19003190
Thu cũ đổi mới
Rẻ hơn hoàn tiền
Góp 0%
Thời gian làm việc: 9h – 21h.
KẾT LUẬN
Hãy viết đoạn tóm tắt về nội dung bằng tiếng việt kích thích người mua: How to create custom views
Filter the visual noise and view only days important to you on Google’s Calendar
Source: Unsplash / Wikimedia Commons
At a glance, Google Calendar is a lot to take in, especially when you fill its grids with events. You can switch between the monthly, weekly, and daily views with your favorite keyboard shortcuts. But if you have a specific range, you can customize the layout to match your workflow.
Custom view is a simple feature for cutting out distractions on Calendar. It limits the events and days you see and is accessible from your personal computer’s browser. Using the feature is worth your while to enjoy an uncluttered sight of your events and schedules. Here’s how to set it up and use it.
How to use a custom view in Google Calendar
Custom view in Google Calendar is a setting that allows you to choose how many days or weeks you see at a glance. You don’t set the numbers, as Google provides predefined options for you to choose from. The options start at 2 days and end at 4 weeks. The default is 4 days.
You’ll enter Calendar’s settings menu to change them. Do it on a computer browser, as the mobile app doesn’t include the feature. However, it provides other views to cycle through. You can choose the monthly, weekly, daily, schedule, or a three-day view from the app’s menu.
Follow the steps below to switch Calendar’s views on your device.
Configure and use a custom view on the web app
- Open a browser and visit calendar.google.com. Ensure you’re signed in to your Google account to access the platform.
- Click the gear icon in the upper-right corner. Then select Settings from the drop-down options.
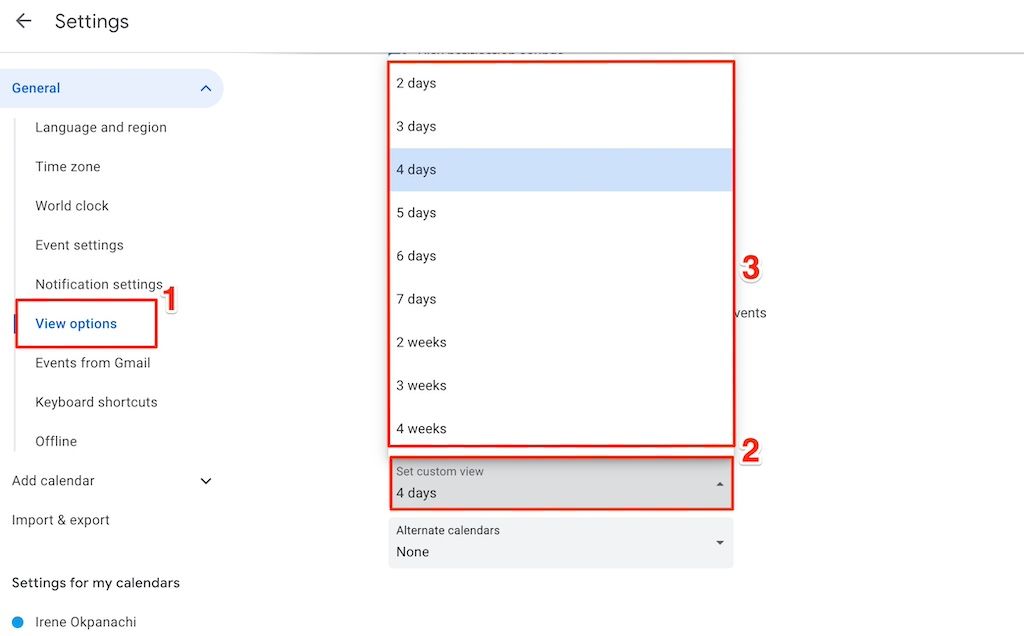
- Go to View options > Set custom view.
- Select how many days or weeks your custom view should have. Google automatically saves your settings afterward.
- Click the back arrow in the upper-left corner to return to the calendar.
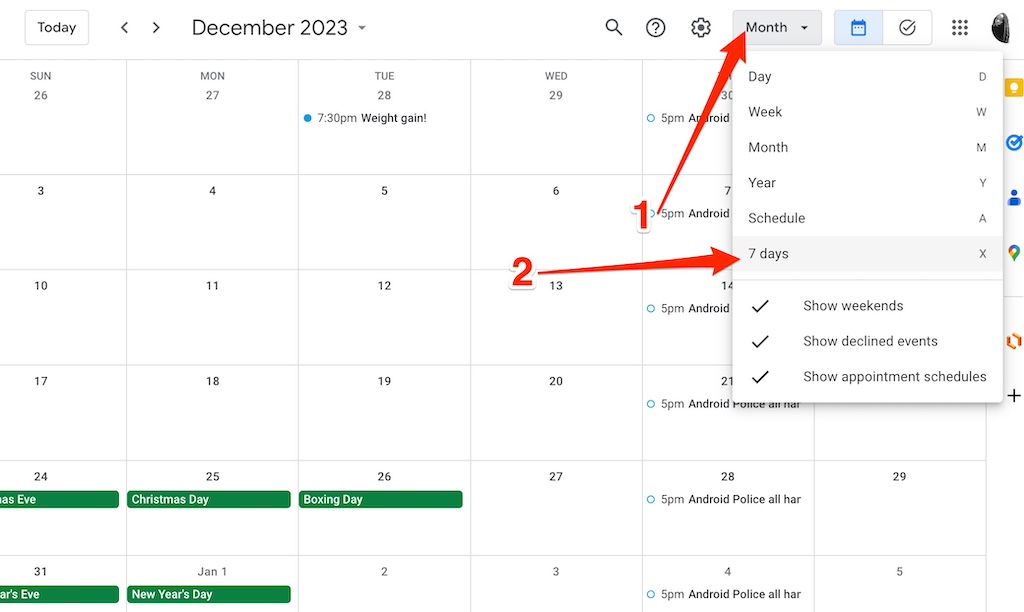
- Click the button showing your current view beside the gear icon. Then, select your custom view to switch to it. You can also press X as a shortcut.
Switch views on the Google Calendar mobile app
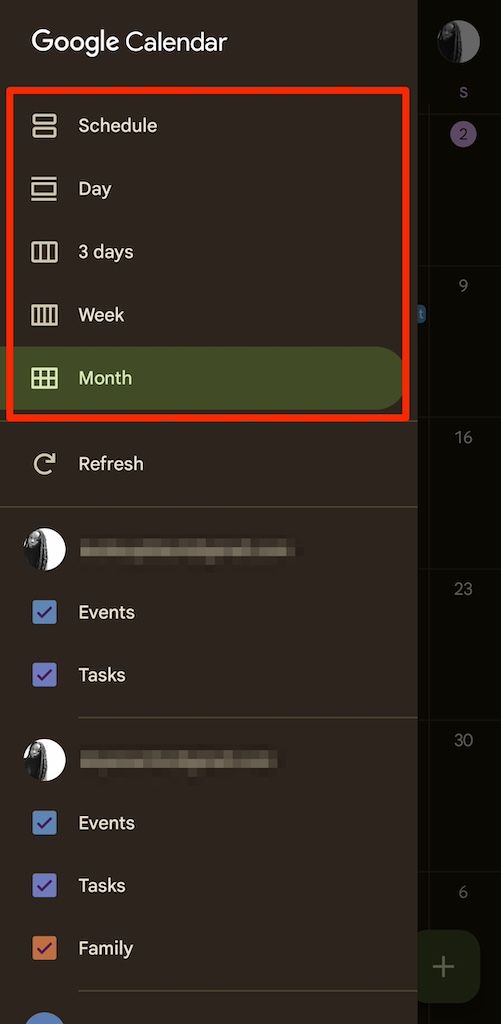
- Open Google Calendar.
- Tap the menu icon in the upper-left corner.
- Select your preferred view.
Tailor Google Calendar to your needs
A month or year view in Calendar is unnecessary if you’ve barely made plans. A custom view lets you focus on the days that are most important to you and reduce the visual noise. It’s one of Calendar’s many tricks for enhancing productivity. You can also email your agenda to yourself, set automatic reminders, and use extensions.

Khám phá thêm từ Phụ Kiện Đỉnh
Đăng ký để nhận các bài đăng mới nhất được gửi đến email của bạn.

