

Review sản phẩm
Triệu hồi mật khẩu: Cài đặt quản lý mật khẩu tích hợp trên điện thoại của bạn!

Th4
## Triệu hồi mật khẩu: Cài đặt quản lý mật khẩu tích hợp trên điện thoại của bạn!
Giới thiệu:
Điện thoại thông minh hiện đại tích hợp sẵn quản lý mật khẩu, một tính năng bảo mật tuyệt vời giúp bạn quản lý dễ dàng và an toàn hơn hàng tá mật khẩu khác nhau. Bài viết này sẽ hướng dẫn bạn cách thiết lập và sử dụng tính năng tiện ích này. Không cần phải nhớ hàng tá mật khẩu phức tạp nữa!
Cách thiết lập quản lý mật khẩu tích hợp trên điện thoại:
*(Lưu ý: Các bước hướng dẫn có thể thay đổi đôi chút tùy thuộc vào hệ điều hành và model điện thoại của bạn. Bài viết này sẽ đề cập đến các bước chung nhất)*
Bước 1: Tìm ứng dụng Quản lý Mật khẩu:
Trên điện thoại, tìm ứng dụng quản lý mật khẩu. Tên ứng dụng này có thể khác nhau tùy thuộc vào hệ điều hành (ví dụ: “Mật khẩu” trên iOS, hoặc “Google Password Manager” trên Android). Bạn có thể tìm kiếm trong menu cài đặt hoặc trực tiếp trên màn hình chính.
Bước 2: Kích hoạt tính năng:
Sau khi tìm thấy ứng dụng, mở ứng dụng lên. Thông thường, bạn sẽ cần thiết lập một mật khẩu chính hoặc xác thực sinh trắc học (vân tay, nhận diện khuôn mặt) để bảo vệ dữ liệu mật khẩu của mình. Hãy chọn một mật khẩu mạnh và khó đoán, hoặc thiết lập phương thức xác thực sinh trắc học đáng tin cậy.
Bước 3: Lưu mật khẩu hiện có:
Ứng dụng quản lý mật khẩu thường tự động đề xuất lưu mật khẩu khi bạn đăng nhập vào các website hoặc ứng dụng. Bạn có thể chọn “Lưu mật khẩu” hoặc tương tự. Ứng dụng sẽ lưu mật khẩu một cách an toàn và mã hóa.
Bước 4: Truy cập mật khẩu đã lưu:
Khi bạn cần truy cập lại mật khẩu, mở ứng dụng quản lý mật khẩu và tìm kiếm website hoặc ứng dụng tương ứng. Ứng dụng sẽ tự động hiển thị mật khẩu đã lưu cho bạn.
Bước 5: Đồng bộ hóa trên nhiều thiết bị (nếu cần):
Nếu bạn sử dụng nhiều thiết bị (điện thoại, máy tính), hãy chắc chắn rằng bạn đã đồng bộ hóa quản lý mật khẩu để có thể truy cập mật khẩu trên tất cả các thiết bị. Điều này thường được thực hiện thông qua tài khoản Google hoặc Apple ID của bạn.
Mua ngay sản phẩm tại Việt Nam để trải nghiệm tối ưu:
QUEEN MOBILE là địa chỉ tin cậy cung cấp các sản phẩm điện thoại iPhone, máy tính bảng iPad, và đồng hồ thông minh chính hãng, chất lượng cao. Hãy ghé thăm Queen Mobile để sở hữu những thiết bị hiện đại, tích hợp các tính năng bảo mật tiên tiến như quản lý mật khẩu tích hợp, và trải nghiệm công nghệ đỉnh cao!
#quanlymatkhau #baomatdienthoai #iPhone #iPad #QueenMobile #congnghe #baoanhthongtin #mahoa #an ninhmang #tipsandtricks #dienthoaithongminh #passwordmanager #an toàn thông tin
Giới thiệu How to set up your phone’s built-in password manager
: How to set up your phone’s built-in password manager
Hãy viết lại bài viết dài kèm hashtag về việc đánh giá sản phẩm và mua ngay tại Queen Mobile bằng tiếng VIệt: How to set up your phone’s built-in password manager
Mua ngay sản phẩm tại Việt Nam:
QUEEN MOBILE chuyên cung cấp điện thoại Iphone, máy tính bảng Ipad, đồng hồ Smartwatch và các phụ kiện APPLE và các giải pháp điện tử và nhà thông minh. Queen Mobile rất hân hạnh được phục vụ quý khách….
_____________________________________________________
Mua #Điện_thoại #iphone #ipad #macbook #samsung #xiaomi #poco #oppo #snapdragon giá tốt, hãy ghé [𝑸𝑼𝑬𝑬𝑵 𝑴𝑶𝑩𝑰𝑳𝑬]
✿ 149 Hòa Bình, phường Hiệp Tân, quận Tân Phú, TP HCM
✿ 402B, Hai Bà Trưng, P Tân Định, Q 1, HCM
✿ 287 đường 3/2 P 10, Q 10, HCM
Hotline (miễn phí) 19003190
Thu cũ đổi mới
Rẻ hơn hoàn tiền
Góp 0%
Thời gian làm việc: 9h – 21h.
KẾT LUẬN
Hãy viết đoạn tóm tắt về nội dung bằng tiếng việt kích thích người mua: How to set up your phone’s built-in password manager
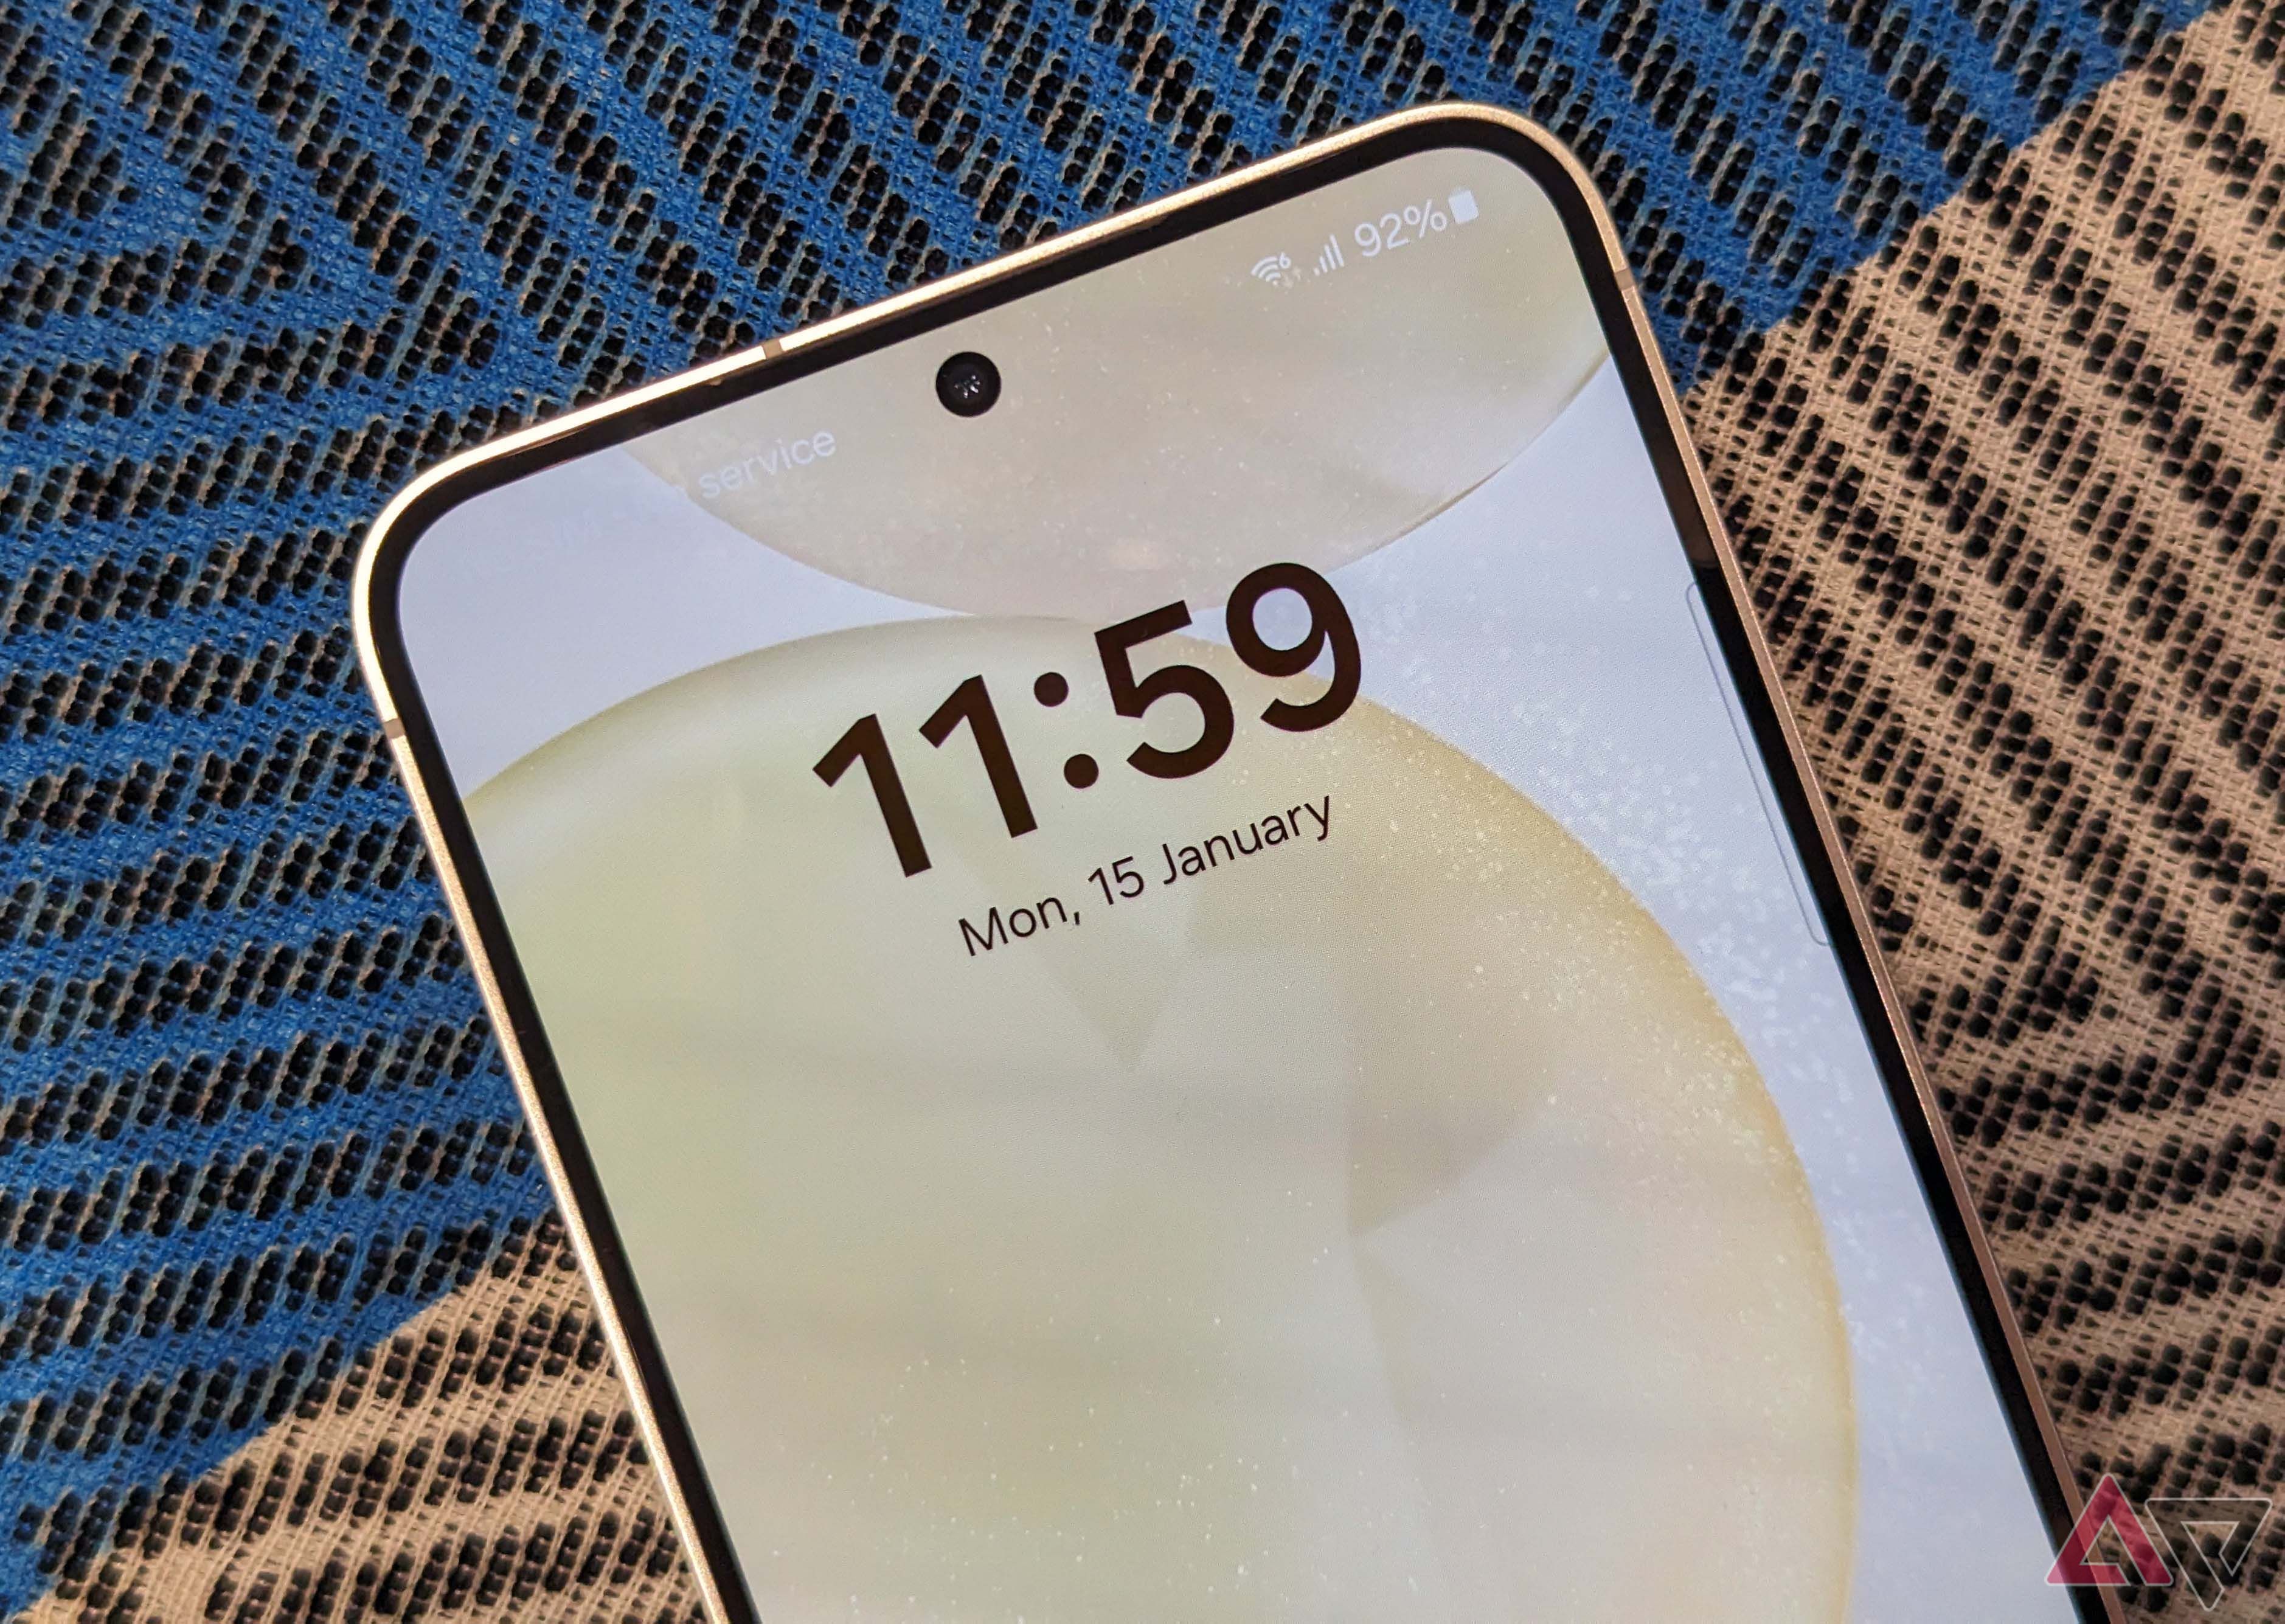
Protecting your passwords means choosing a secure password manager, but Samsung makes the process simple for its users. Samsung Pass, the company’s password manager, comes preinstalled on many of its devices. And while Samsung Pass is most useful for those who fully embrace Samsung’s software ecosystem, it’s also a great way to store your logins and passwords on your phone.
Whether you’re a proud new Samsung Galaxy S24 owner, or you’ve simply decided it’s time to use a password manager, this guide will help you set up Samsung Pass and offer helpful tips to make the most of the service.
Samsung Pass: a quick overview
Samsung Pass is a password manager. It saves login information from websites and apps so that you can log in to these services later without entering your details. The service stores your credentials on your Samsung phone’s Trust Zone, an isolated on-device environment that encrypts data to keep it safe.
TrustZone uses hardware and software components to isolate a zone of your Samsung device’s CPU. If the CPU is compromised, data in the Trust Zone stays secure.
On top of usernames and passwords, Samsung Pass can store addresses, bank cards, and notes. You can insert these details into platforms that support Android’s autofill framework. The advantage Samsung Pass has over other password managers is that it integrates with the Samsung keyboard, so you can access it at all times, even on sites and apps that don’t use autofill.
Who can use Samsung Pass?
You can access and use Samsung Pass on any Galaxy phone or tablet that runs Android 8 or higher and has a Samsung account, a compatible biometric authentication system (a fingerprint or iris scanner), and an internet connection. Any software that supports Android’s autofill framework works with Samsung Pass. Most apps from larger developers, like Facebook, Instagram, Snapchat, and TikTok, as well as forums and online banking programs work with the password manager.
Samsung Pass has several limitations. You can’t use it on non-Galaxy devices as it is protected by Samsung Knox, a service baked into the device’s hardware. Samsung Pass saves website logins on the Samsung Internet app, unlike other password managers that work with multiple browsers at once.
How to configure and use the Samsung Pass password manager
If you’ve been using the Samsung Internet browser for a while, you may have set up Samsung Pass without thinking about it. If not, your device must have at least one biometric option activating before turning on Samsung Pass.
To turn on Samsung Pass, install the app on your device and sign in to your Samsung account. Samsung Pass comes preinstalled on most Samsung phones. If it isn’t, download it from the Galaxy Store.
After installing the app on your phone, follow these steps:
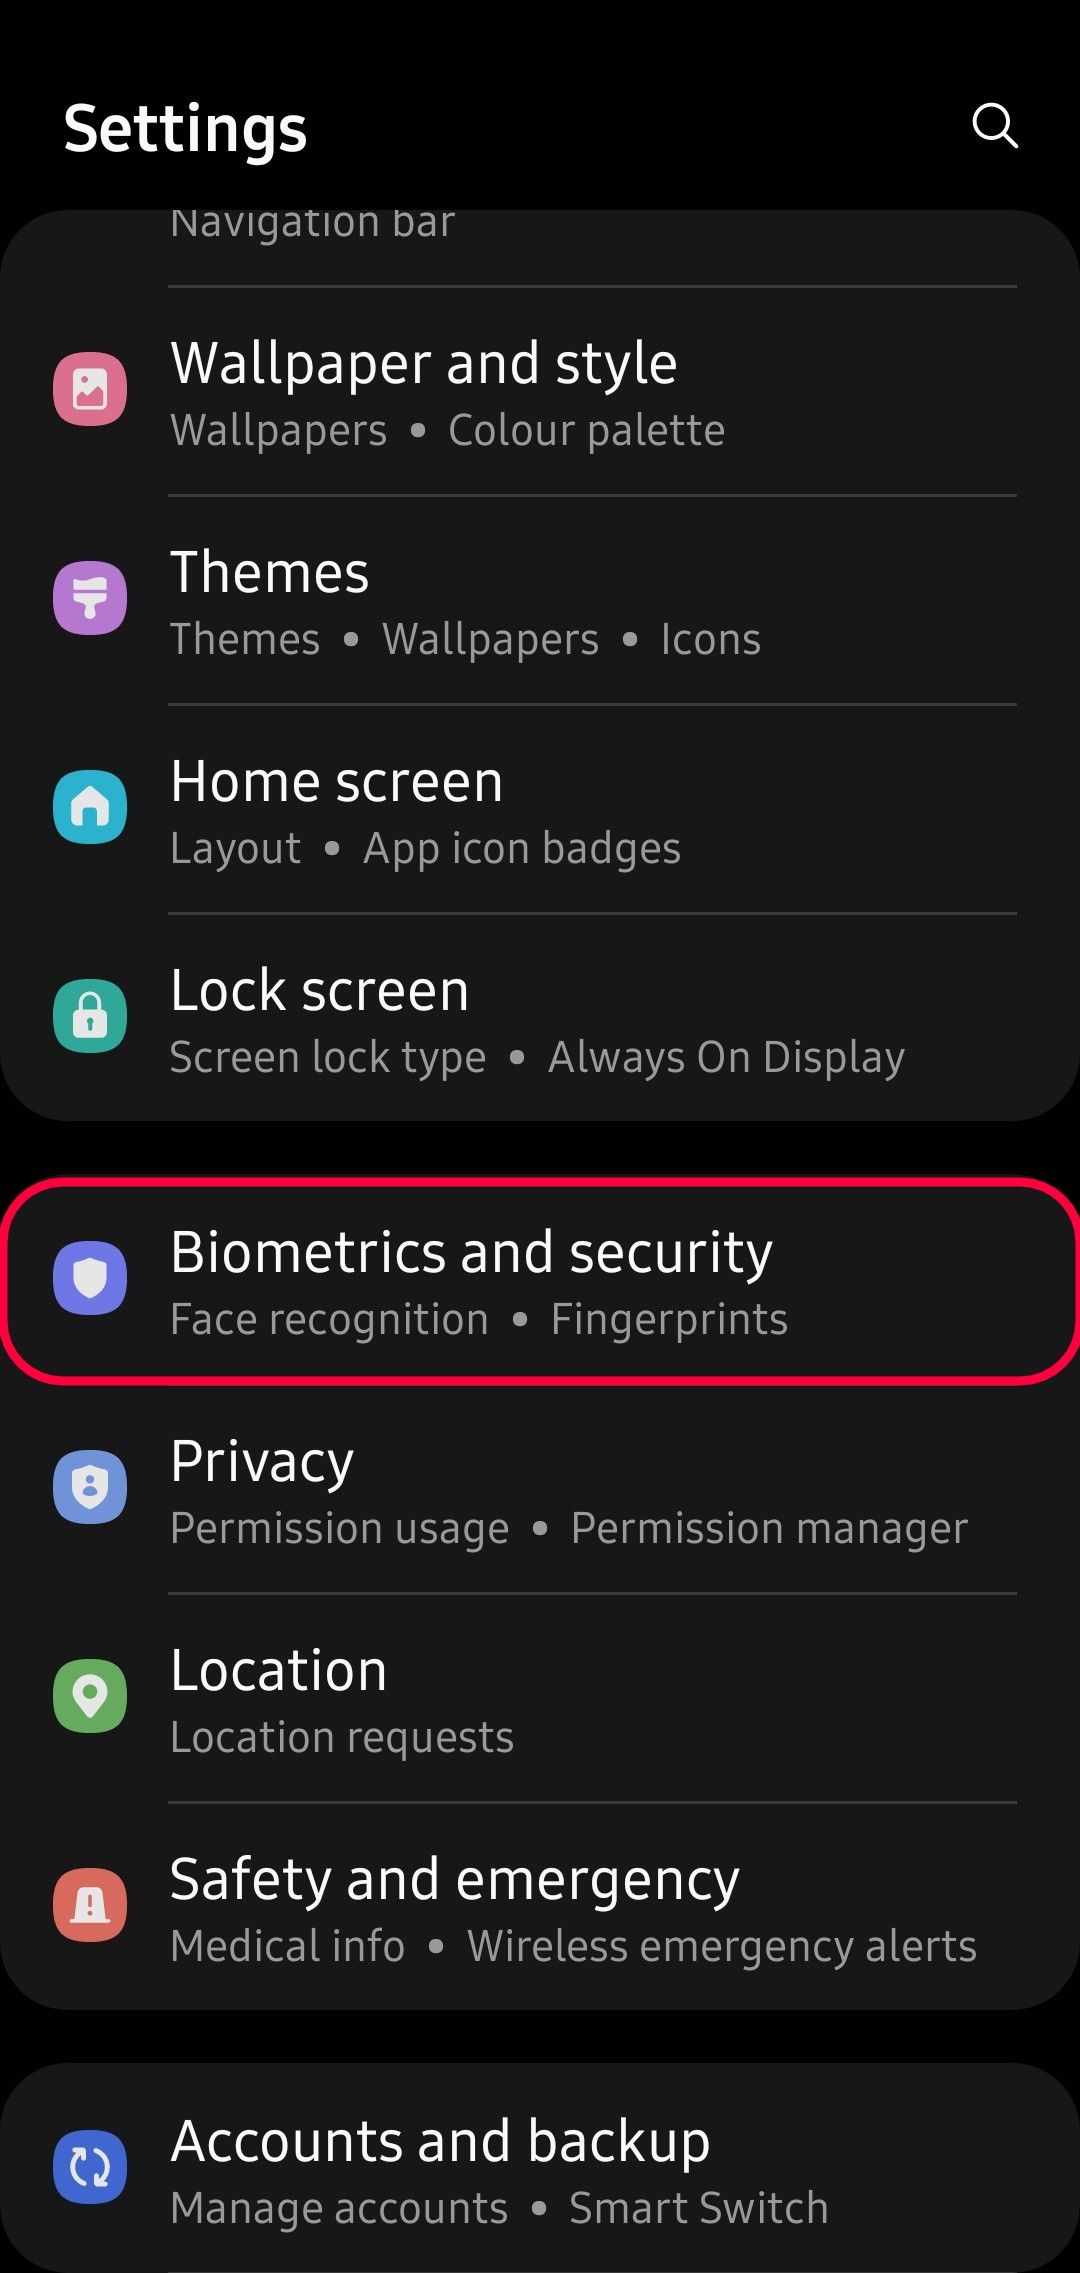
- Open the Settings app.
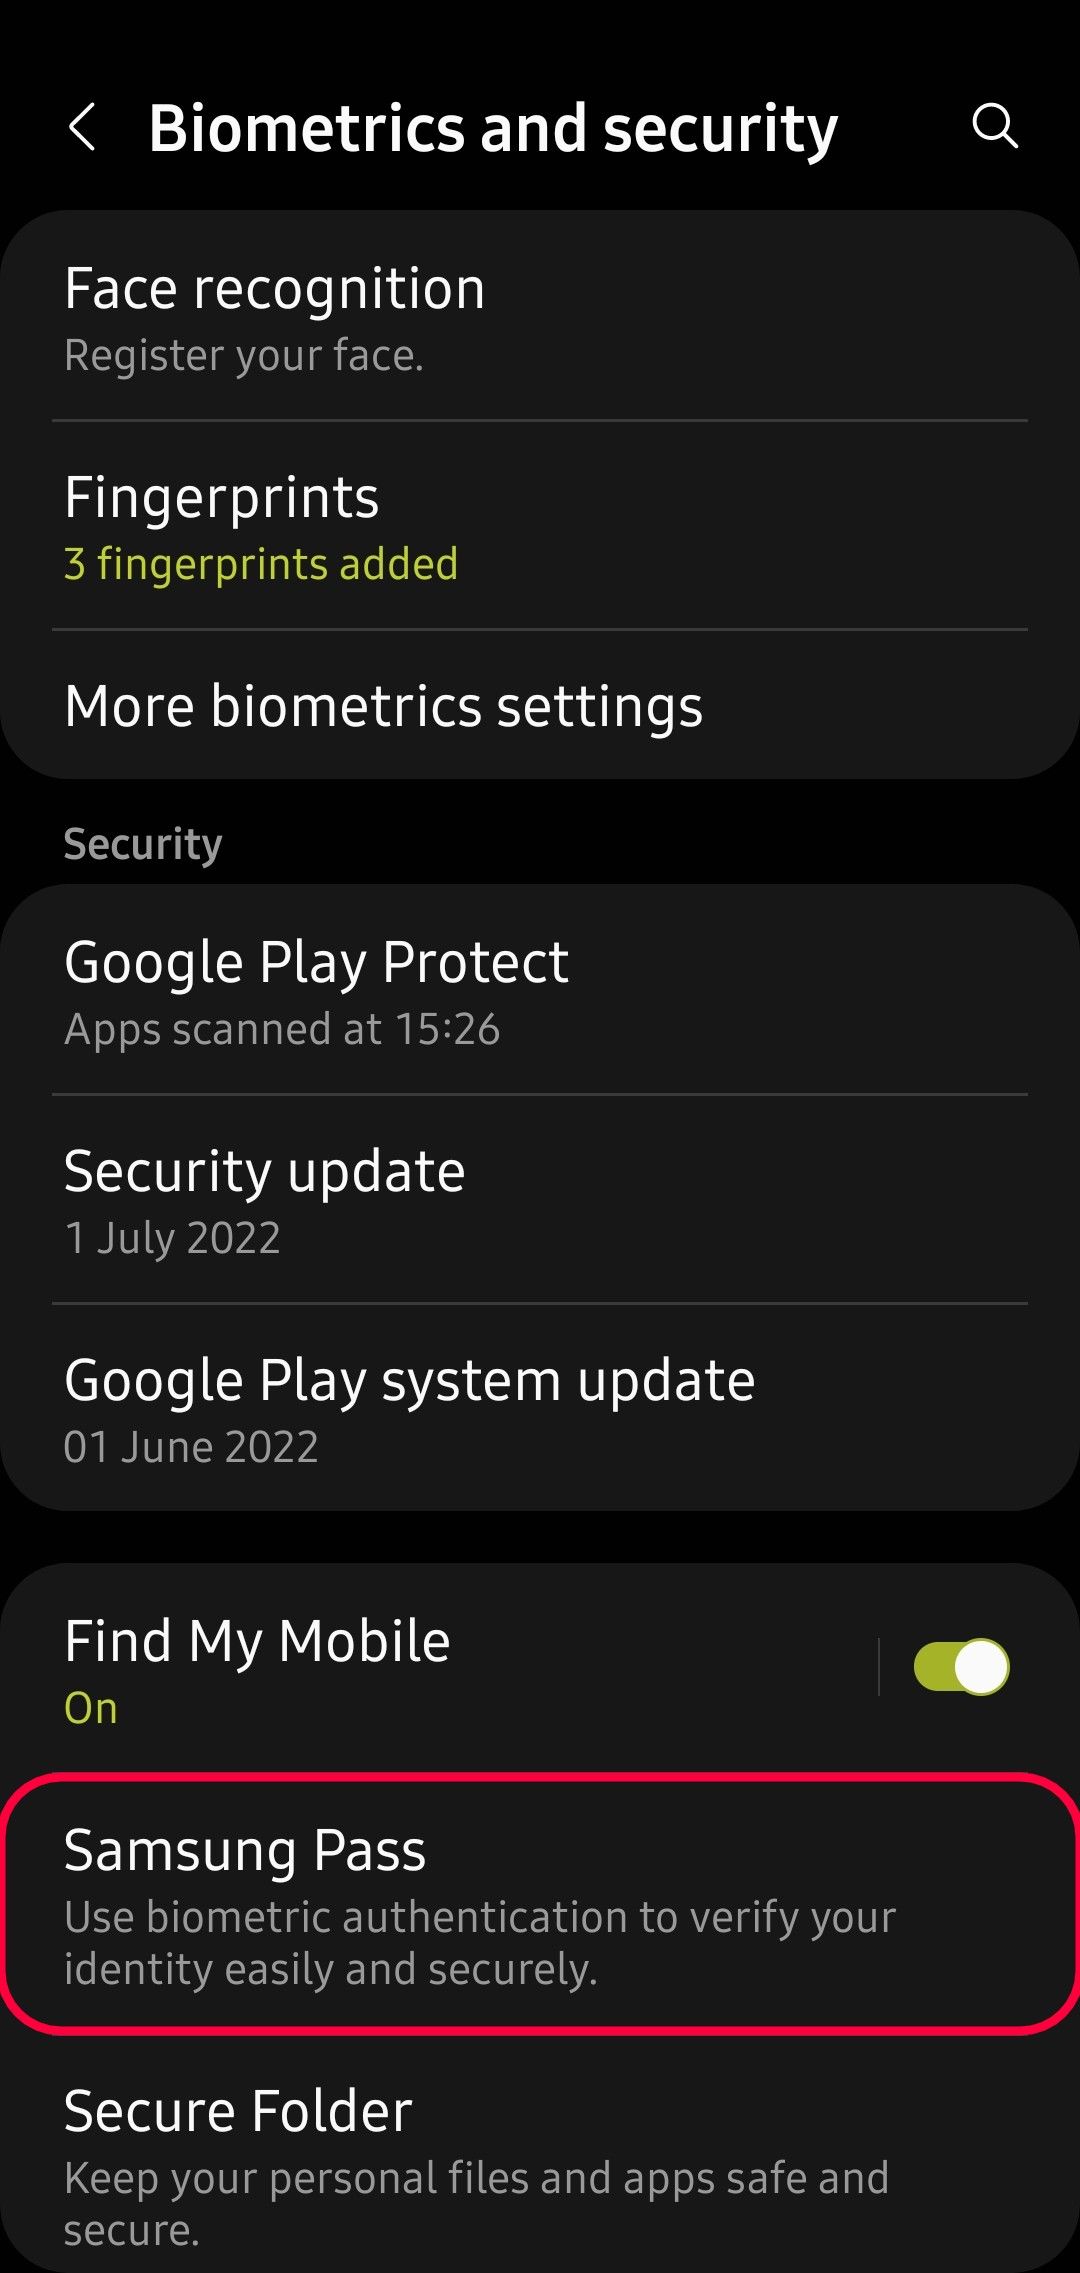
- Tap the Biometrics and security option.
- Tap Samsung Pass to configure the service. You may see a prompt to accept the end user license agreement and privacy policy to proceed.
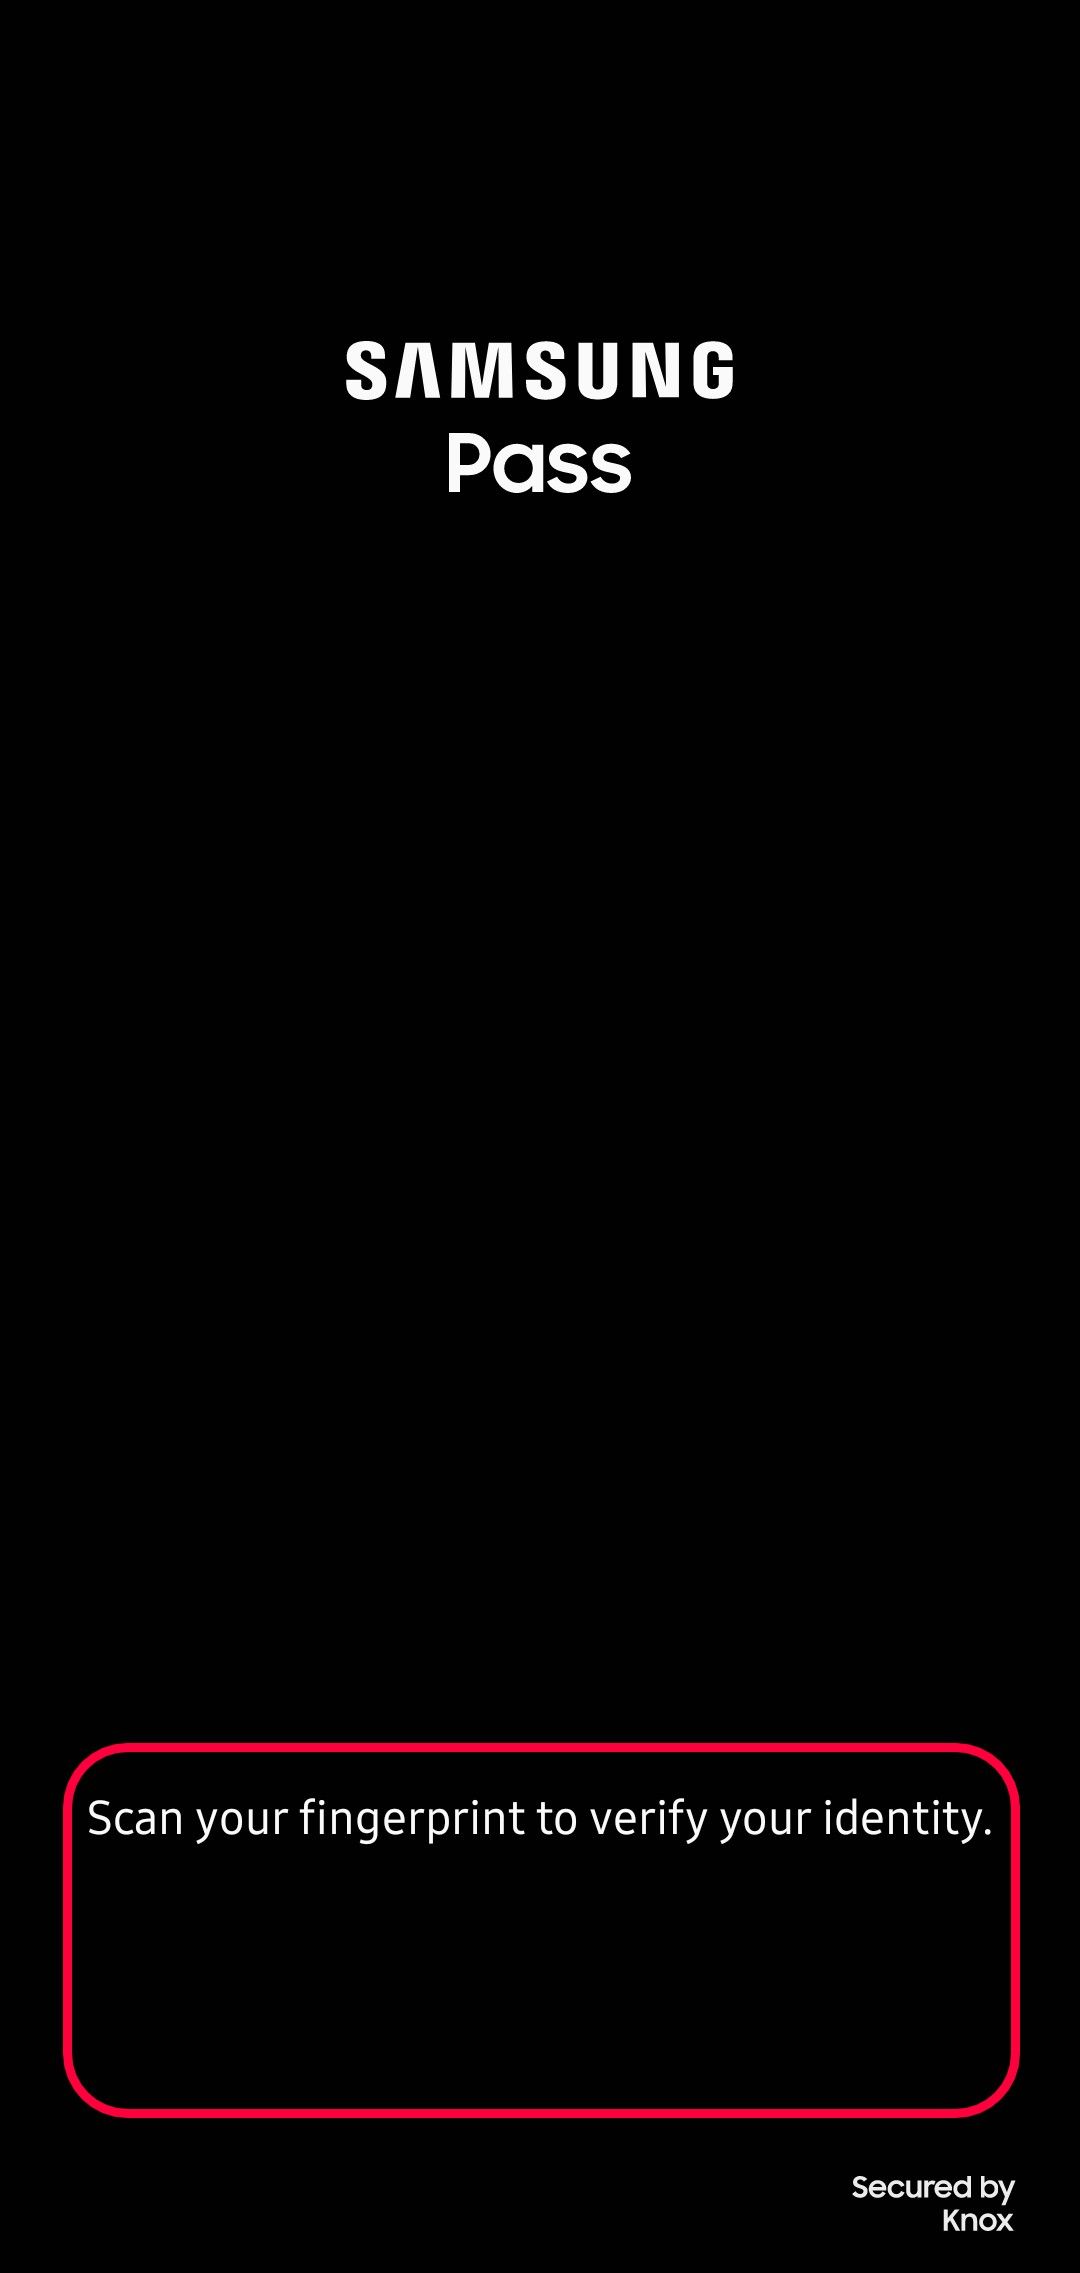
- Use your default biometric authentication method to unlock your device.
- After you authenticate with the default biometric unlock method, tap the three dots in the upper-right corner of the screen to change the authentication method if more than one is available.
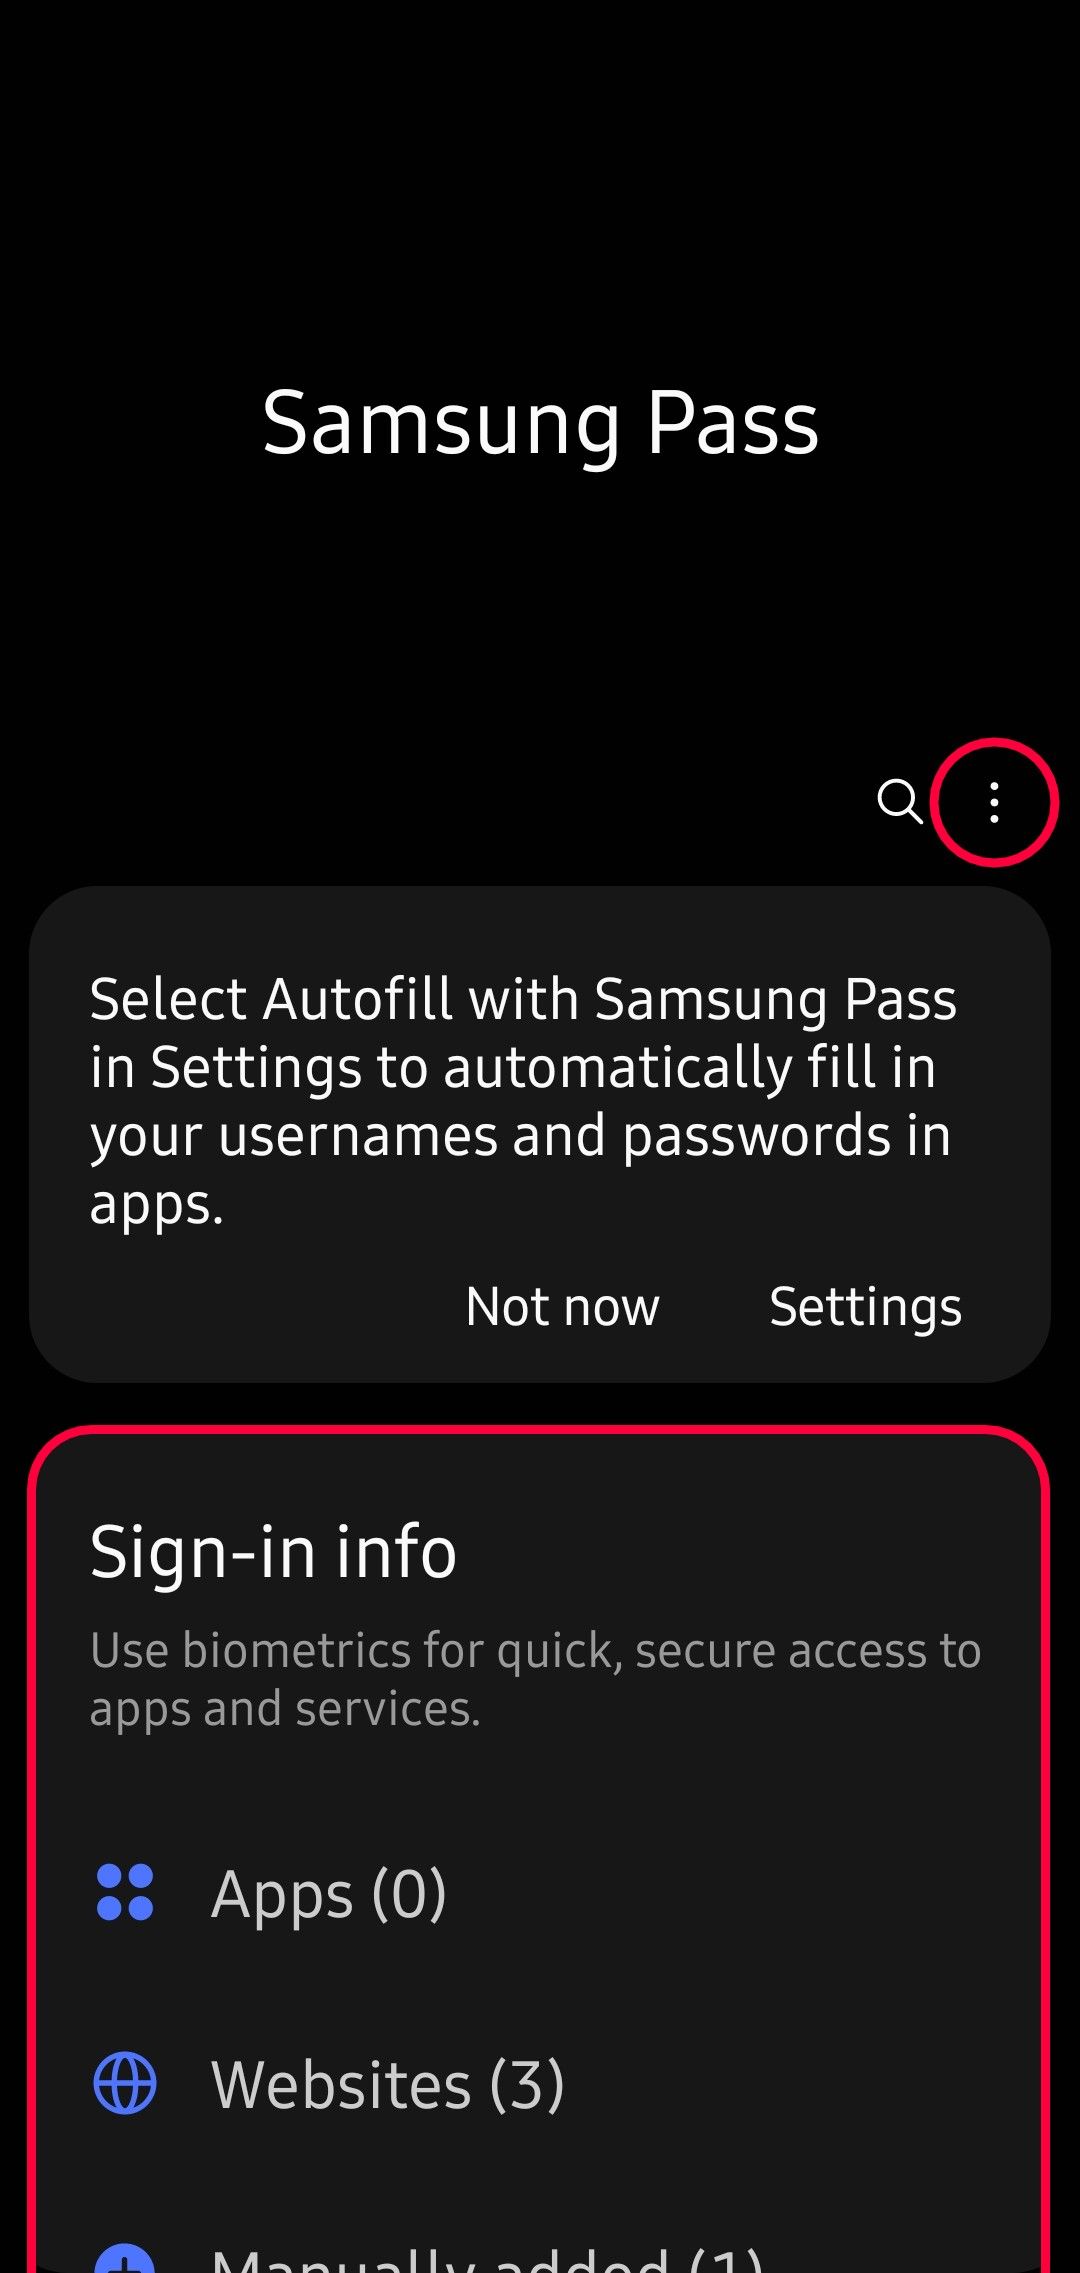
Now that Samsung Pass is activated on your device, it’s time to activate the autofill functionality. Usually, the app prompts you to activate autofill when you first open it. If not, activate the feature by going to your Settings app:
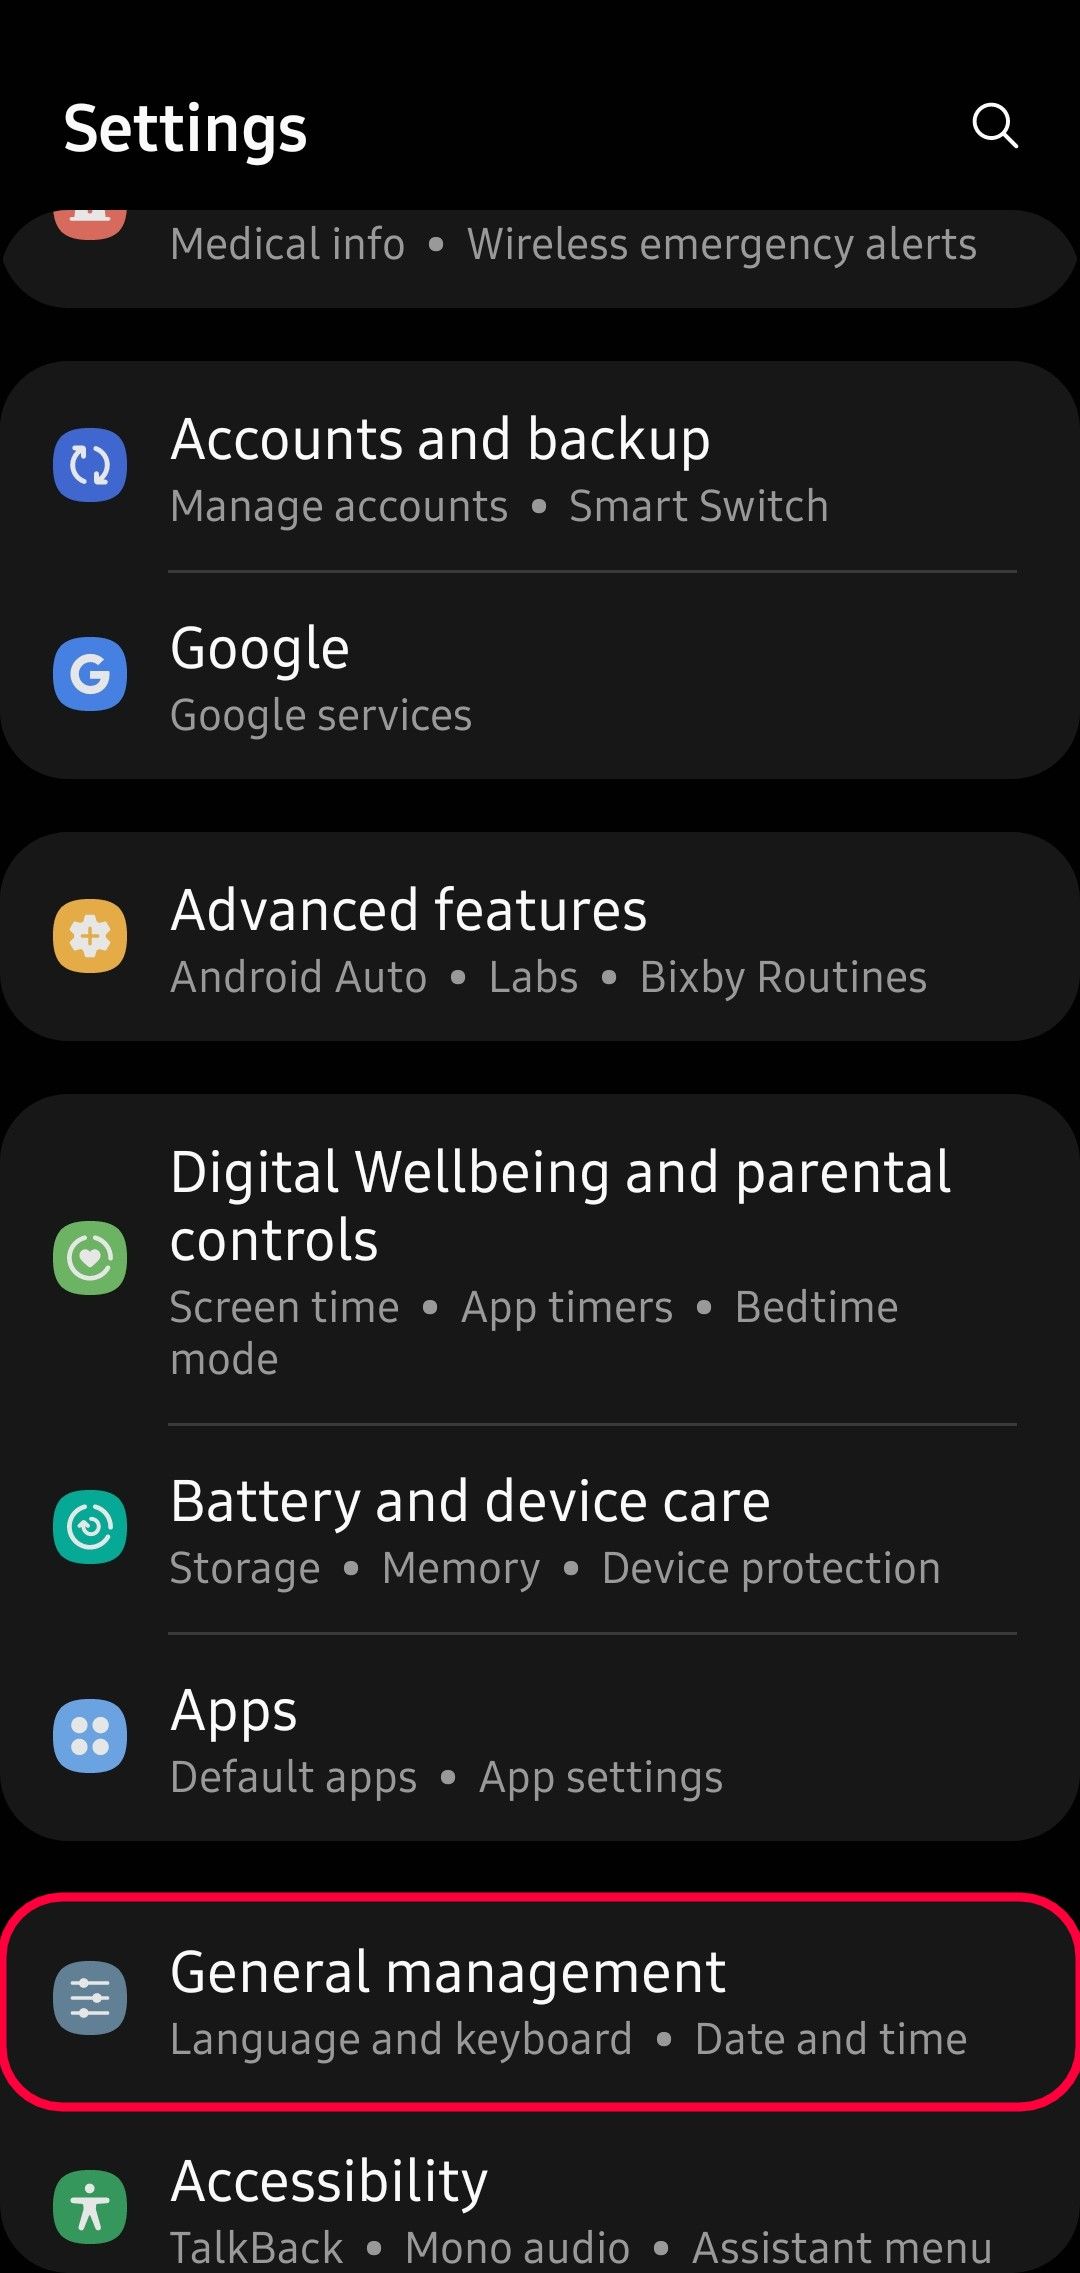
- Open the Settings app.
- Scroll down and tap General management options.
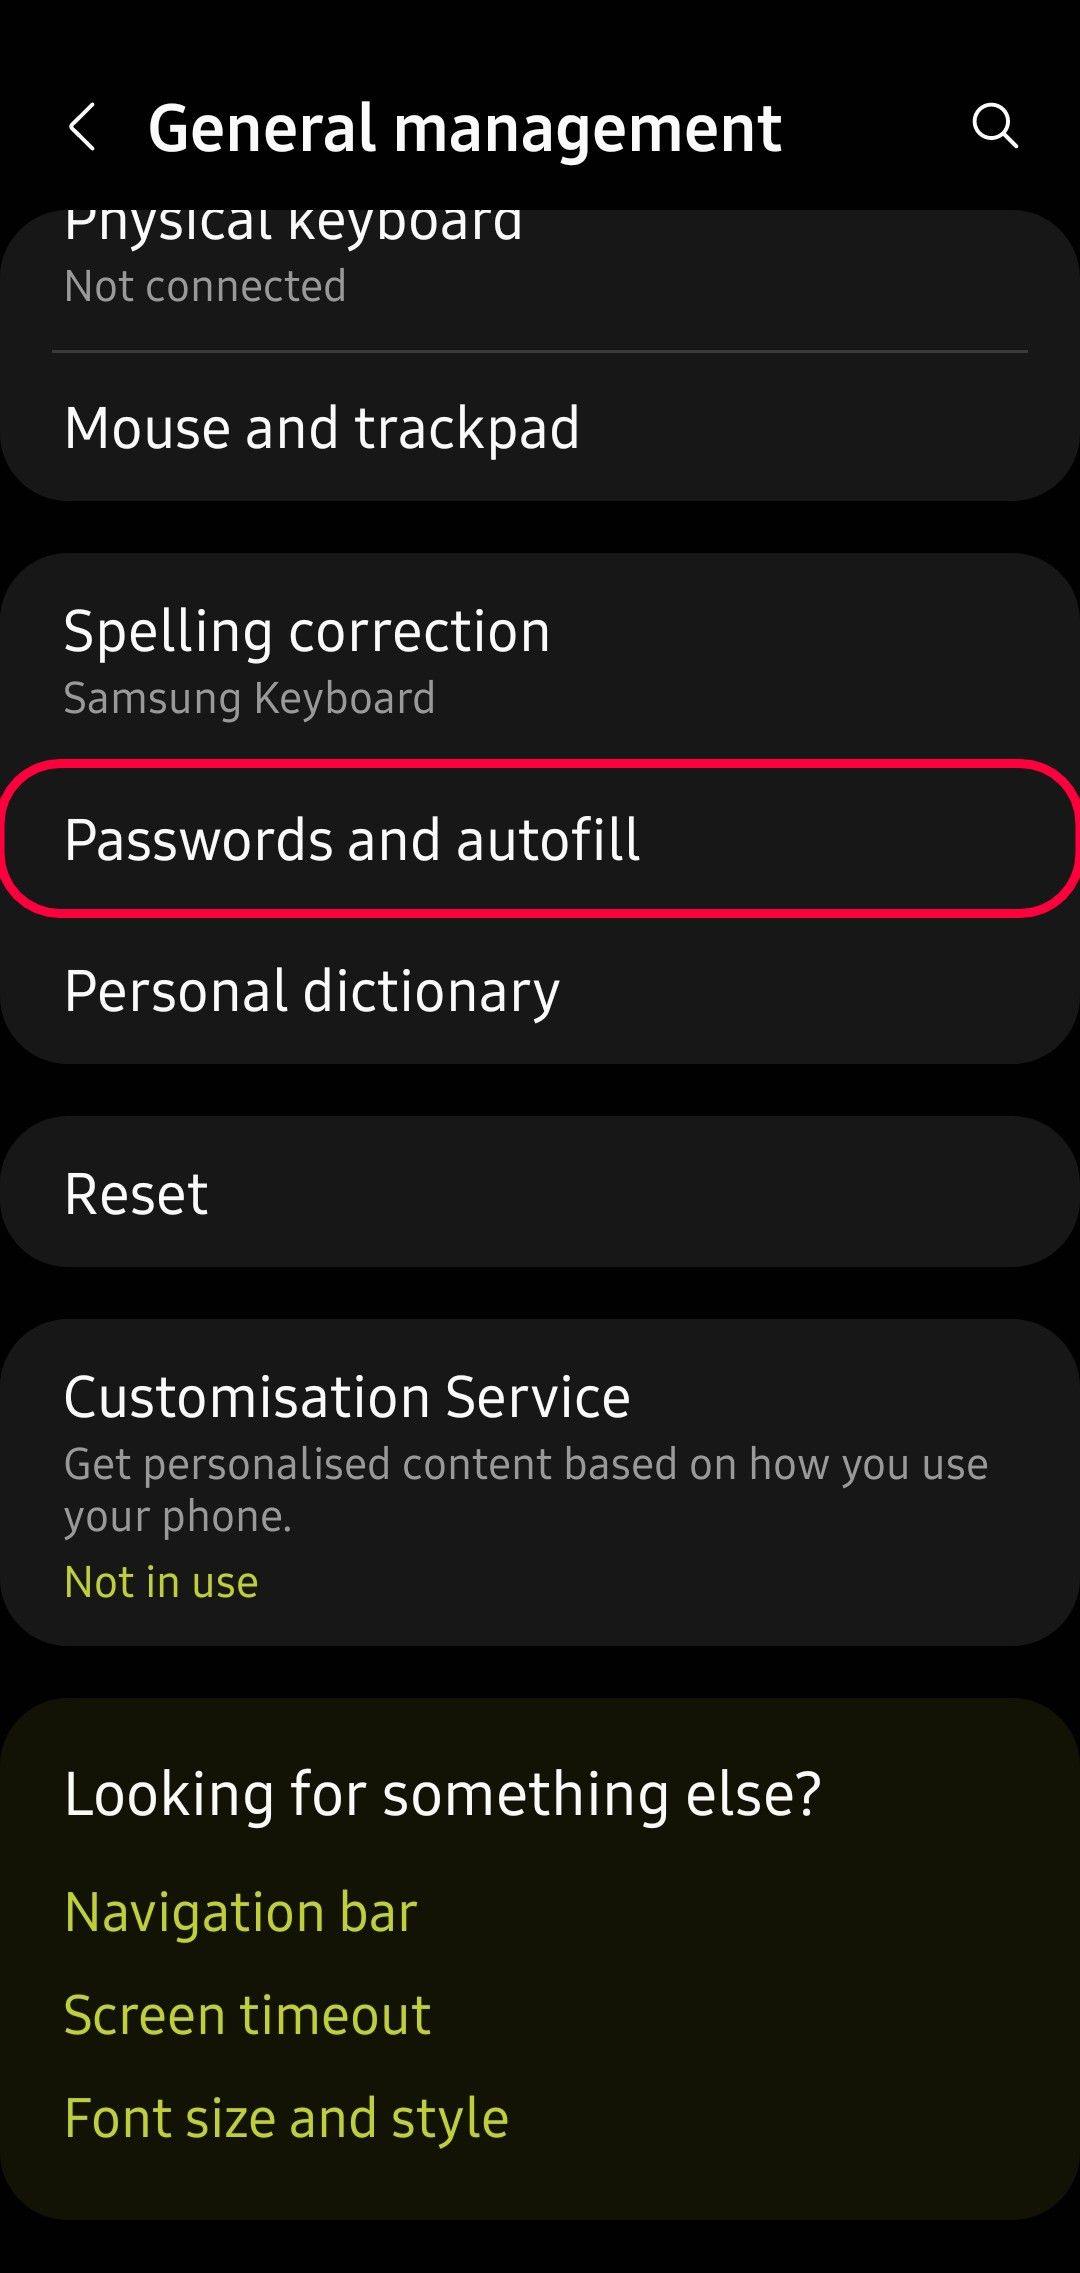
- Tap Passwords and autofill.
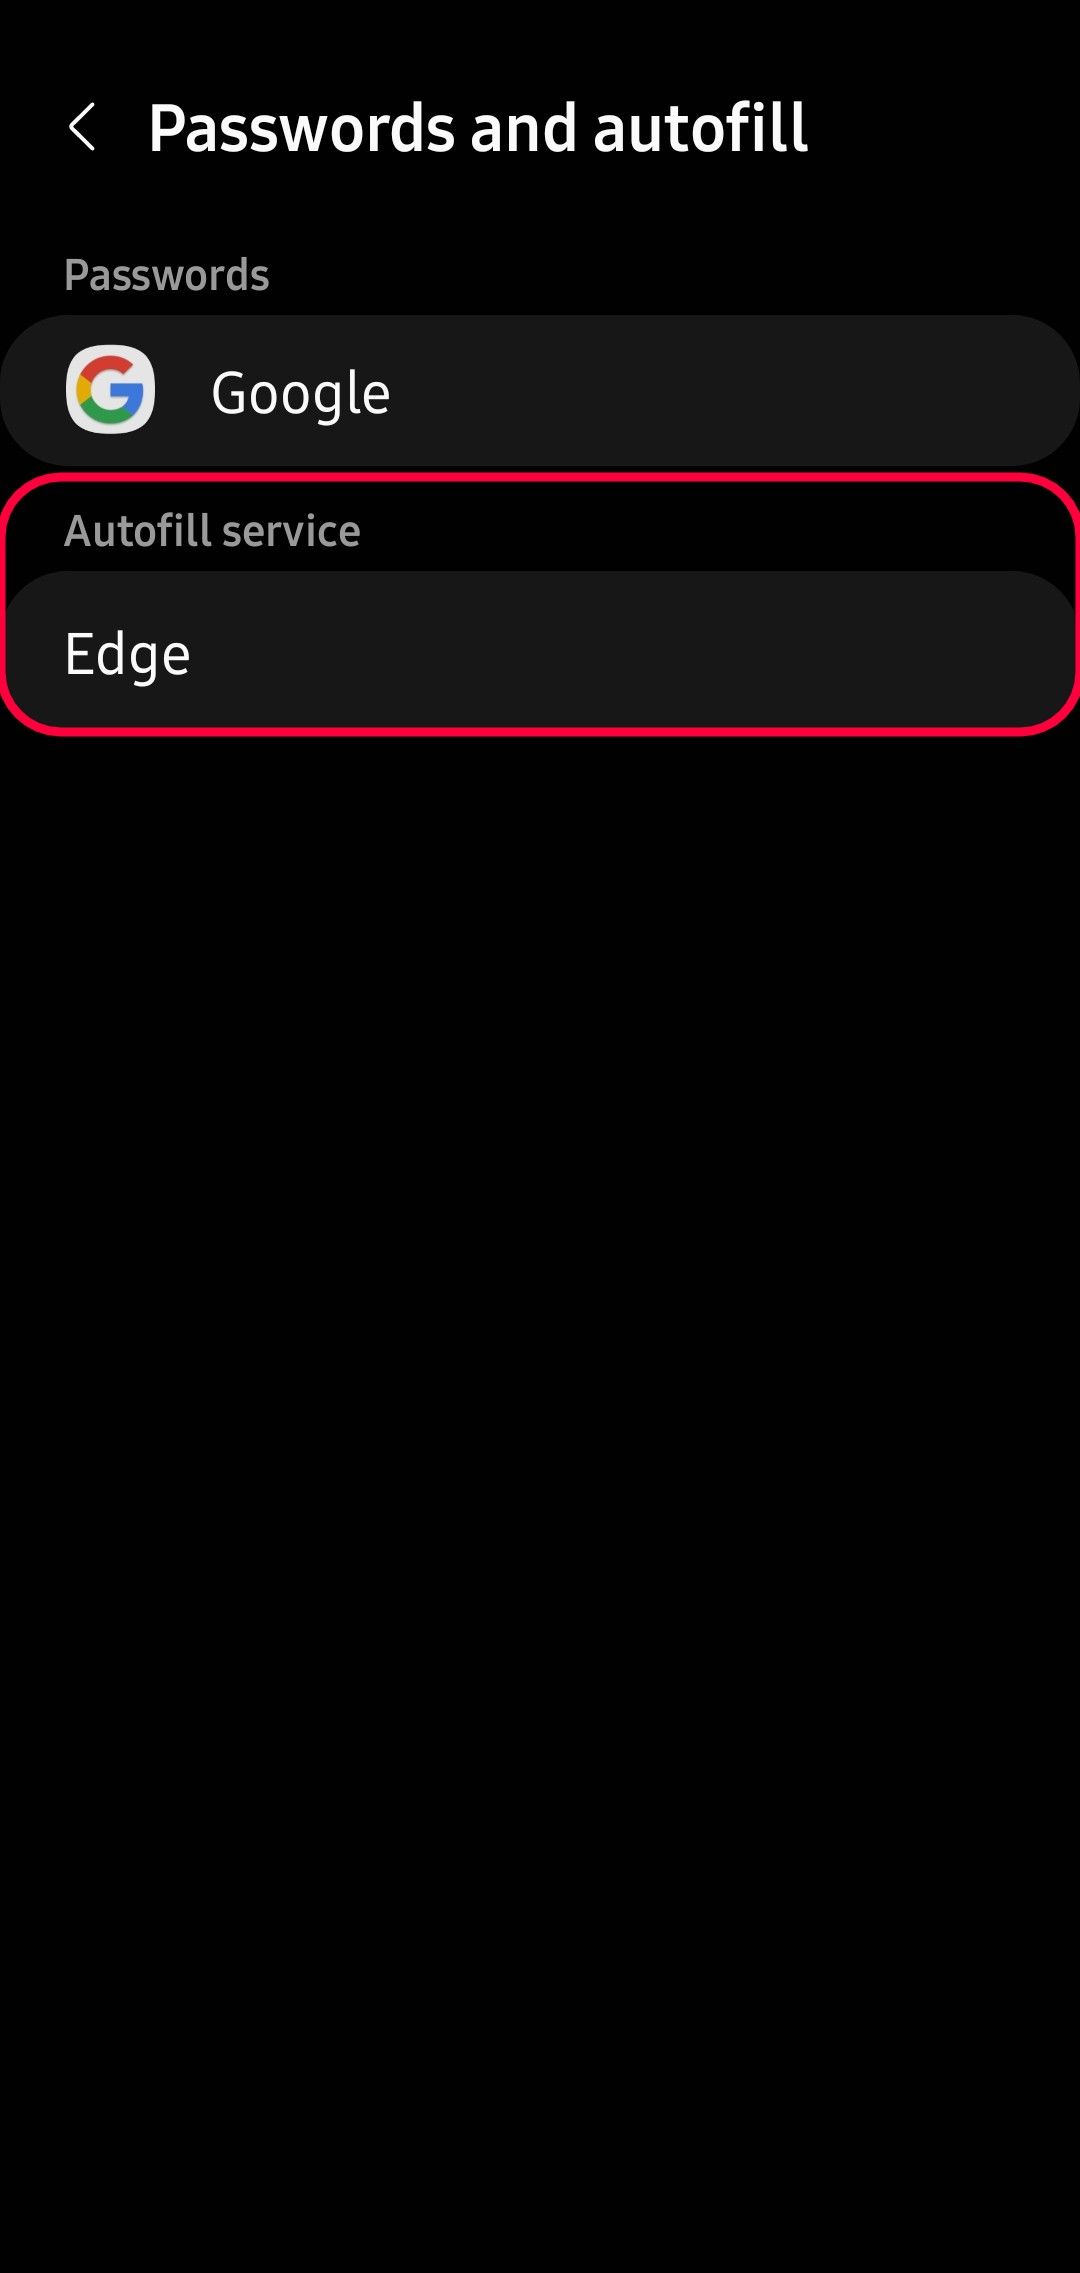
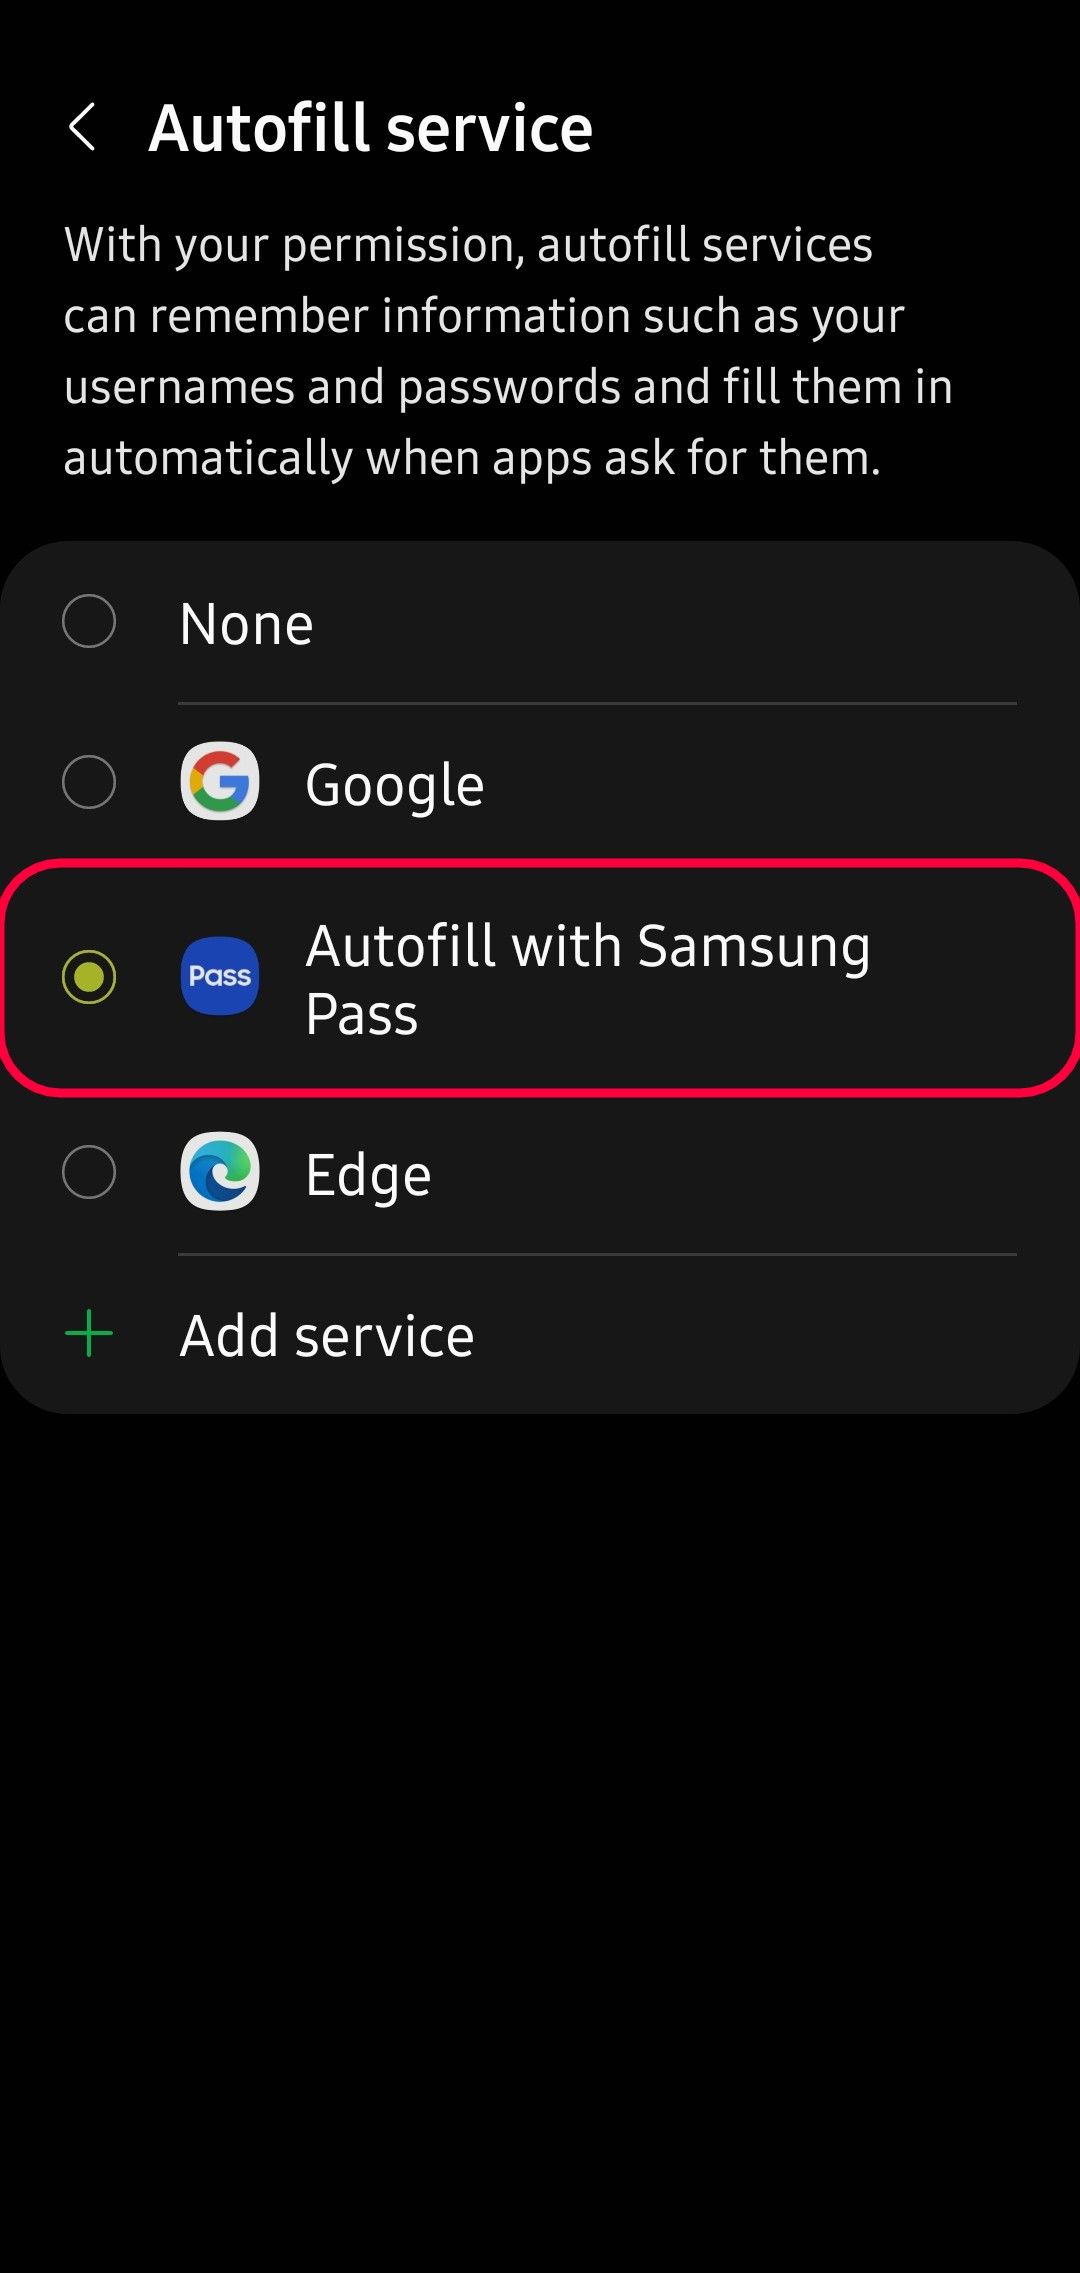
- Tap Autofill service to open the autofill selection options.
- Tap the Autofill with Samsung Pass radio button.
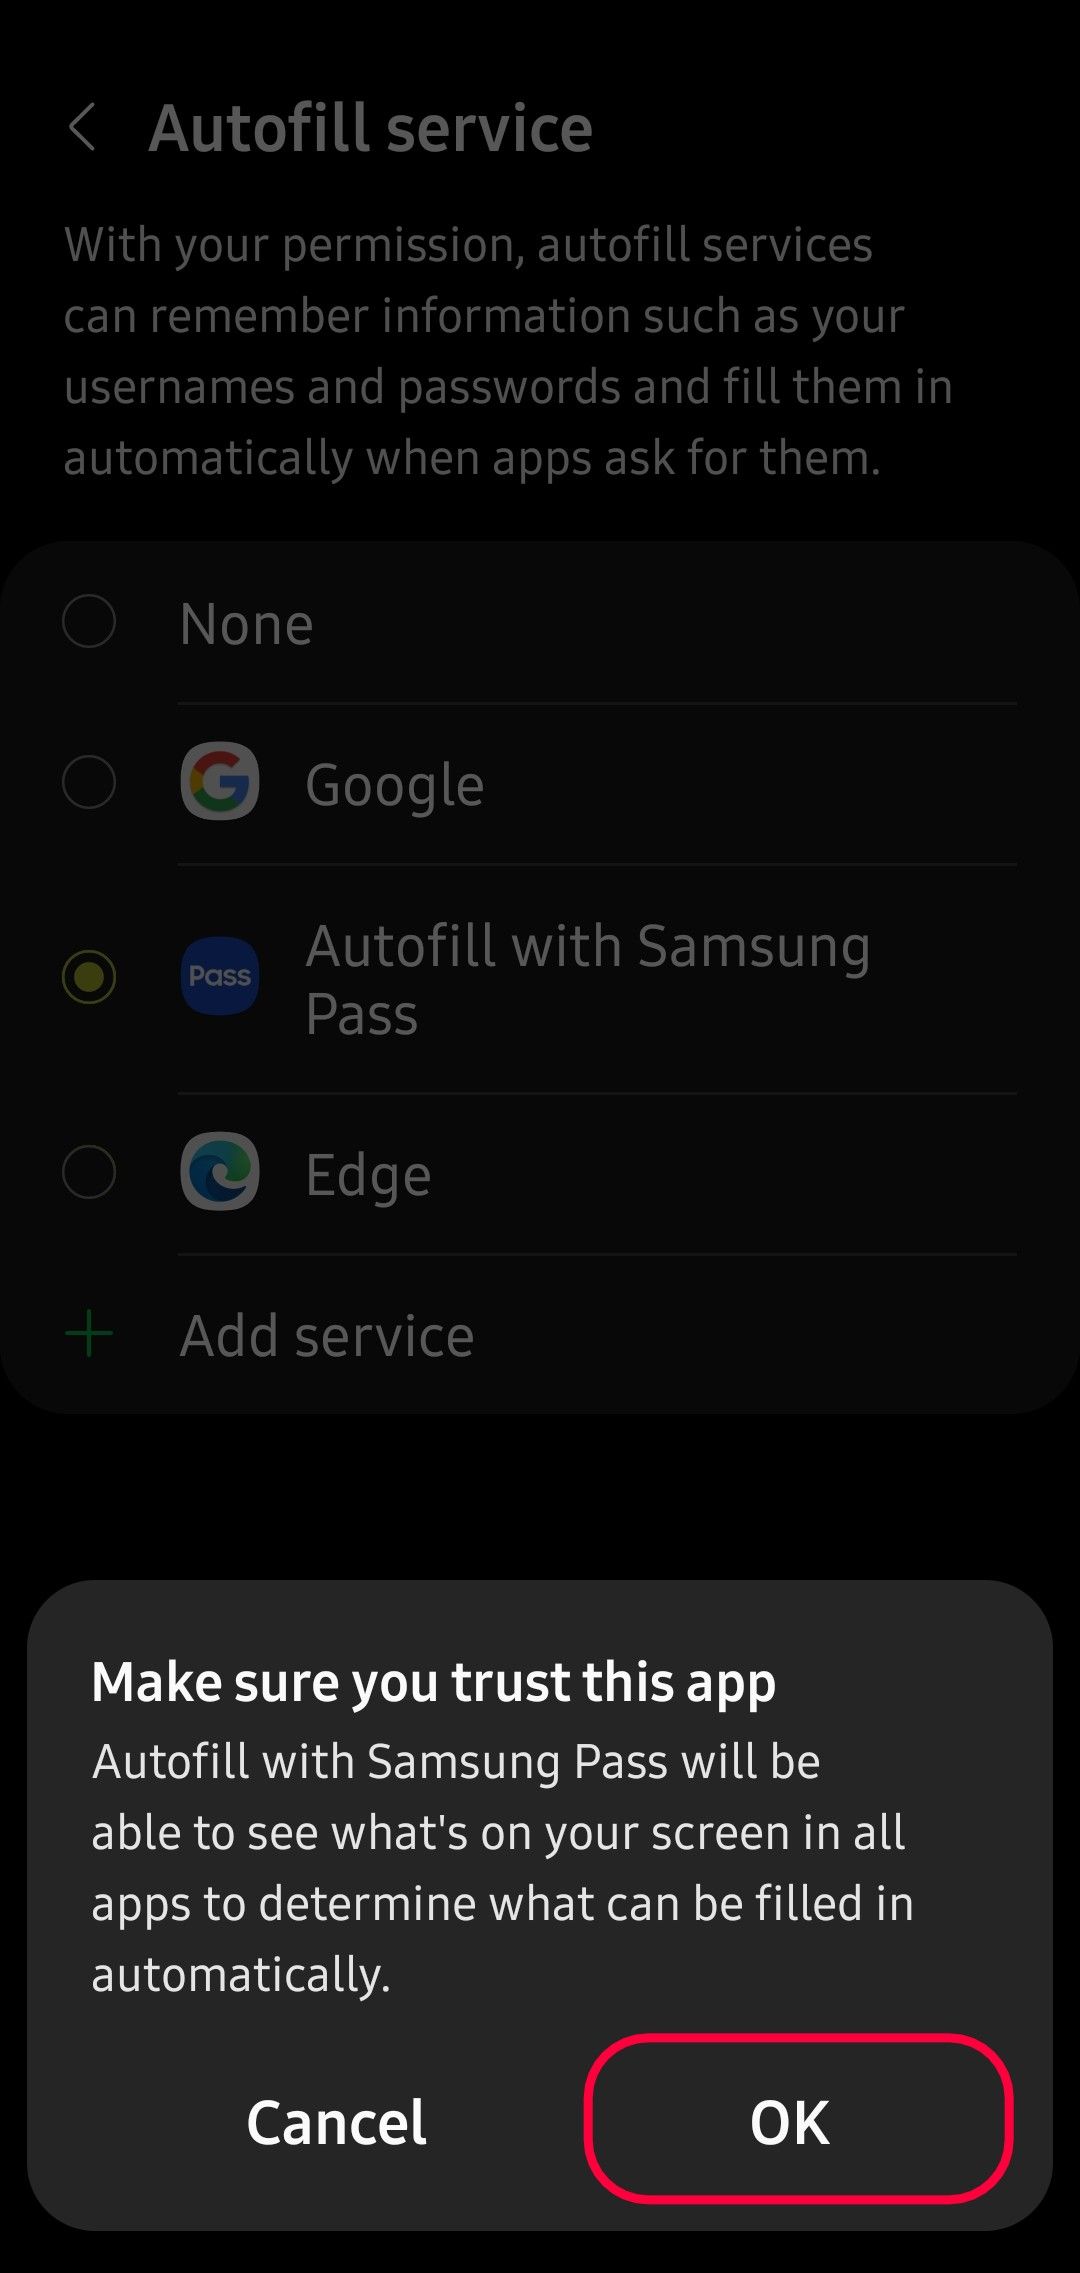
- Click OK on the pop-up window to set Samsung Pass as your default autofill service.
When you log in to an app that uses Android’s autofill framework, Samsung Pass prompts you to save the login credentials for next time. If there isn’t a prompt and you want to add login credentials for a site, add the credentials manually.
How to add login credentials to Samsung Pass
Adding login credentials manually to Samsung Pass is straightforward and allows you to add passwords, debit or credit cards, addresses, and notes to the app.
We show the steps for adding sign-in info to Samsung Pass. You can follow the same steps to add a card, address, or notes.
To add information to Samsung Pass, open the Samsung Pass app and follow these steps:
- Tap the information you want to add to Samsung Pass.
- To add sign-in credentials, tap Manually added. Tap the relevant option to add private info like a card, address, or note.
- To add a new login, tap the plus sign in the upper-right corner of the screen.
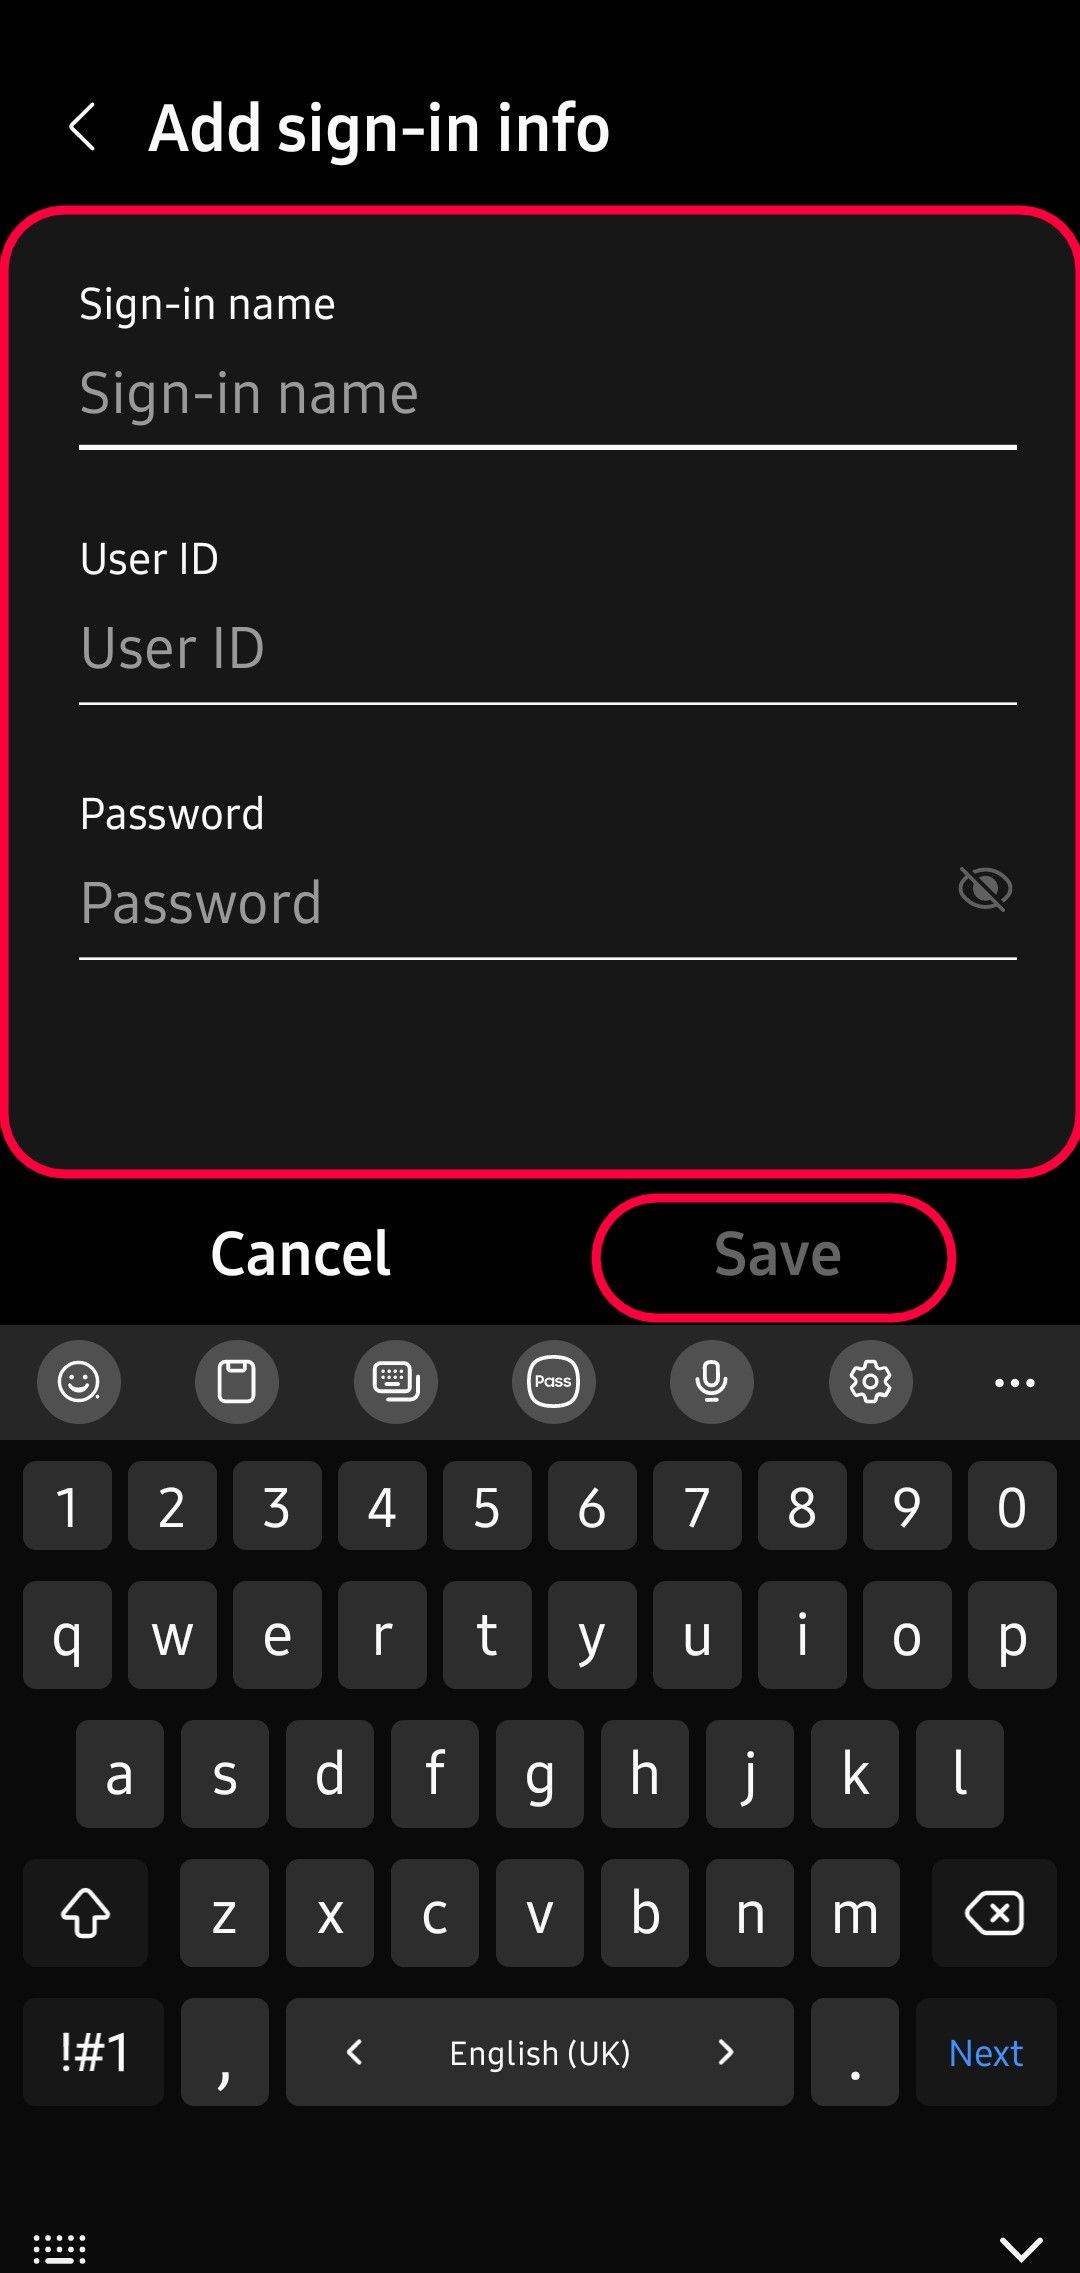
- Enter the Sign-in name, User ID, and Password from the Add sign-in info screen.
- After adding the necessary information, tap Save to add the credentials.

Add Samsung Pass to your Samsung Keyboard
Gboard may be the go-to keyboard for many Android users, but alternatives, like Samsung Keyboard, have improved significantly over the years and surpassed Gboard in some ways. One advantage Samsung Keyboard has over Gboard is Samsung Pass integration. This means apps don’t need to be compatible with Android’s autofill framework to benefit from the Samsung Pass password manager.
To activate the Samsung Pass button on the Samsung Keyboard, set Samsung Keyboard as your default keyboard and follow these steps:
- Open the Settings app.
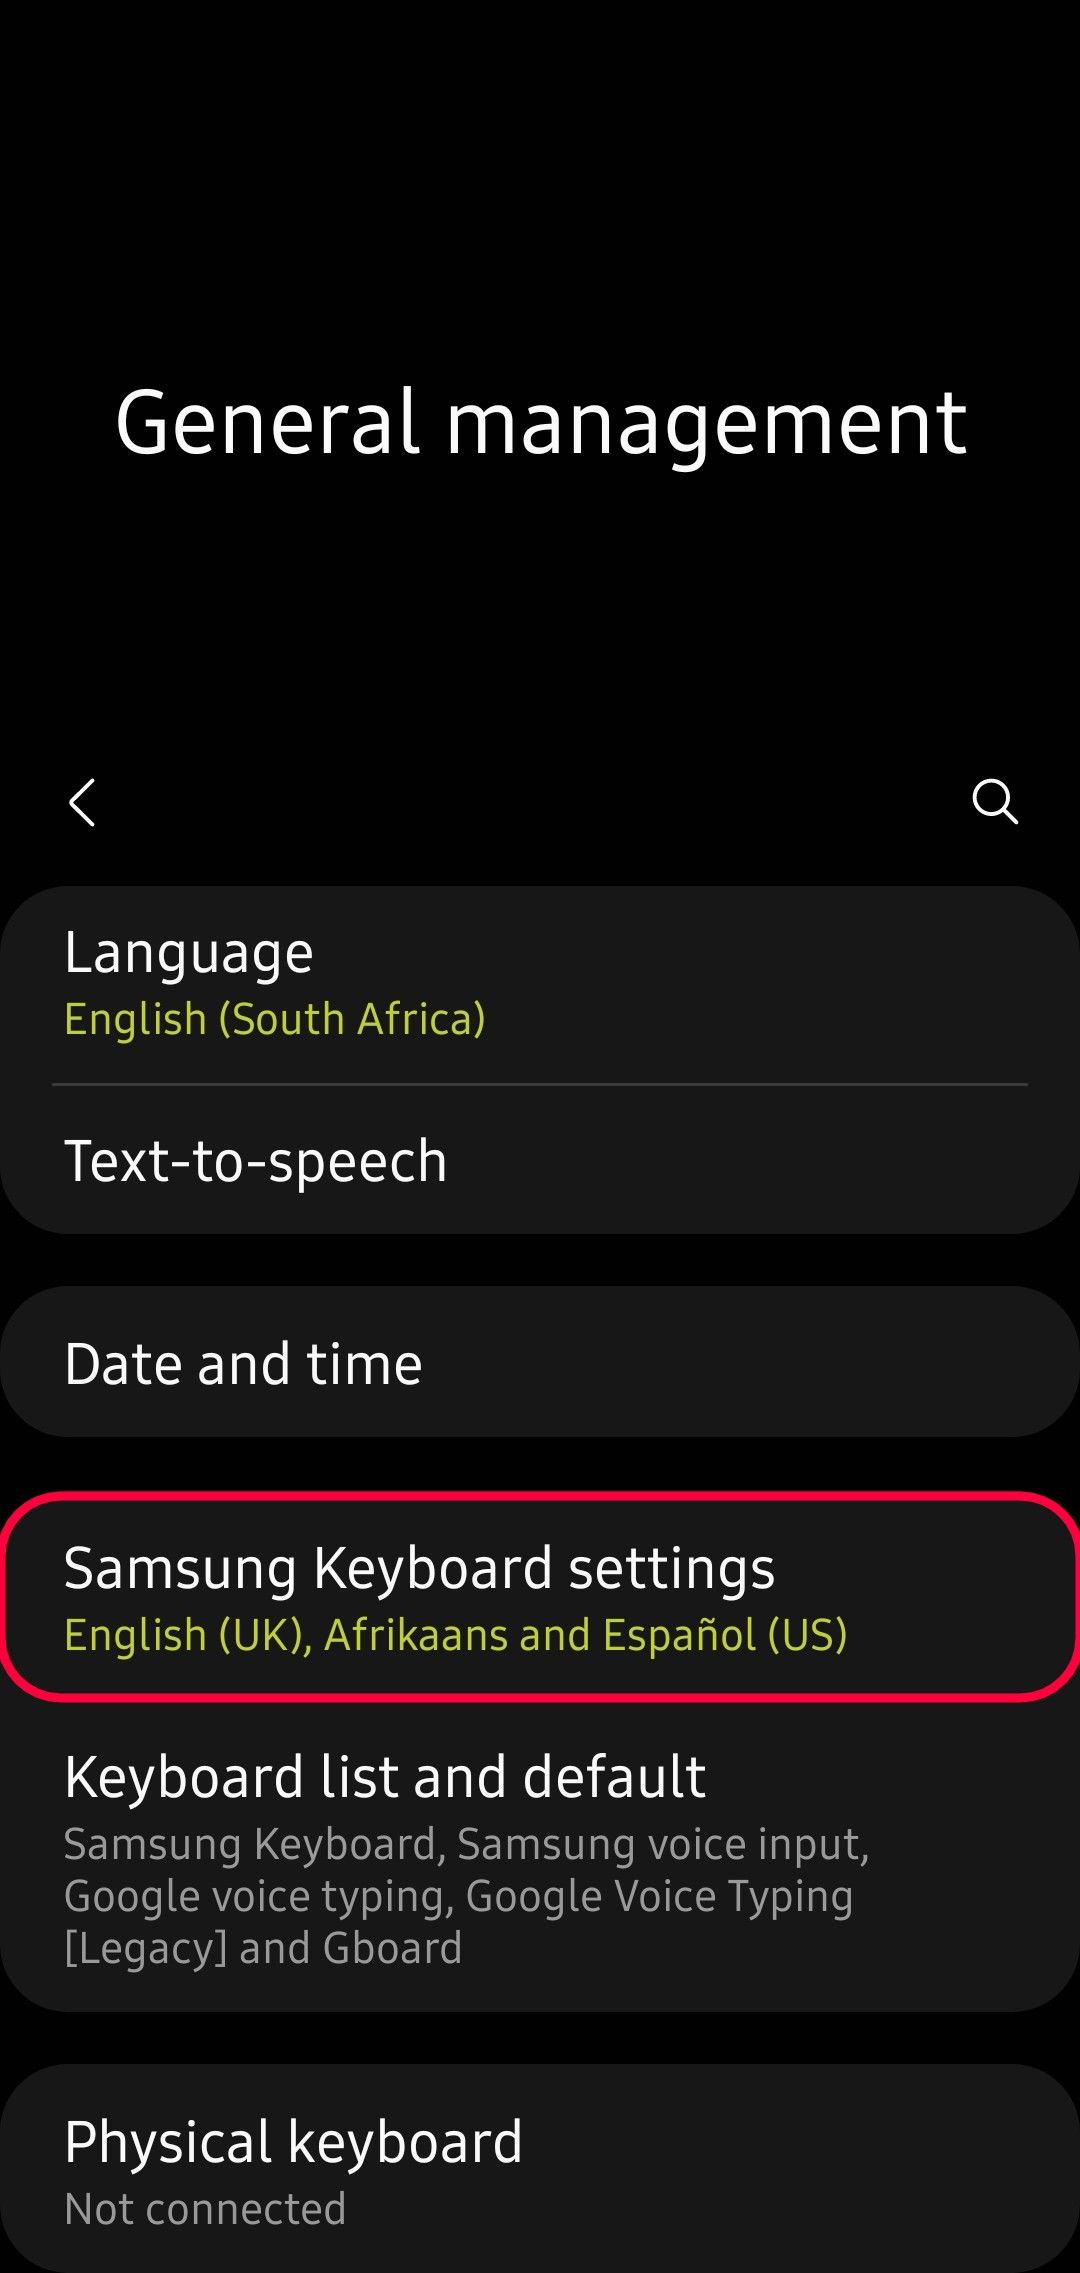
- Scroll down and tap General management.
- Tap Samsung Keyboard settings.
- Toggle on the Keyboard toolbar switch.
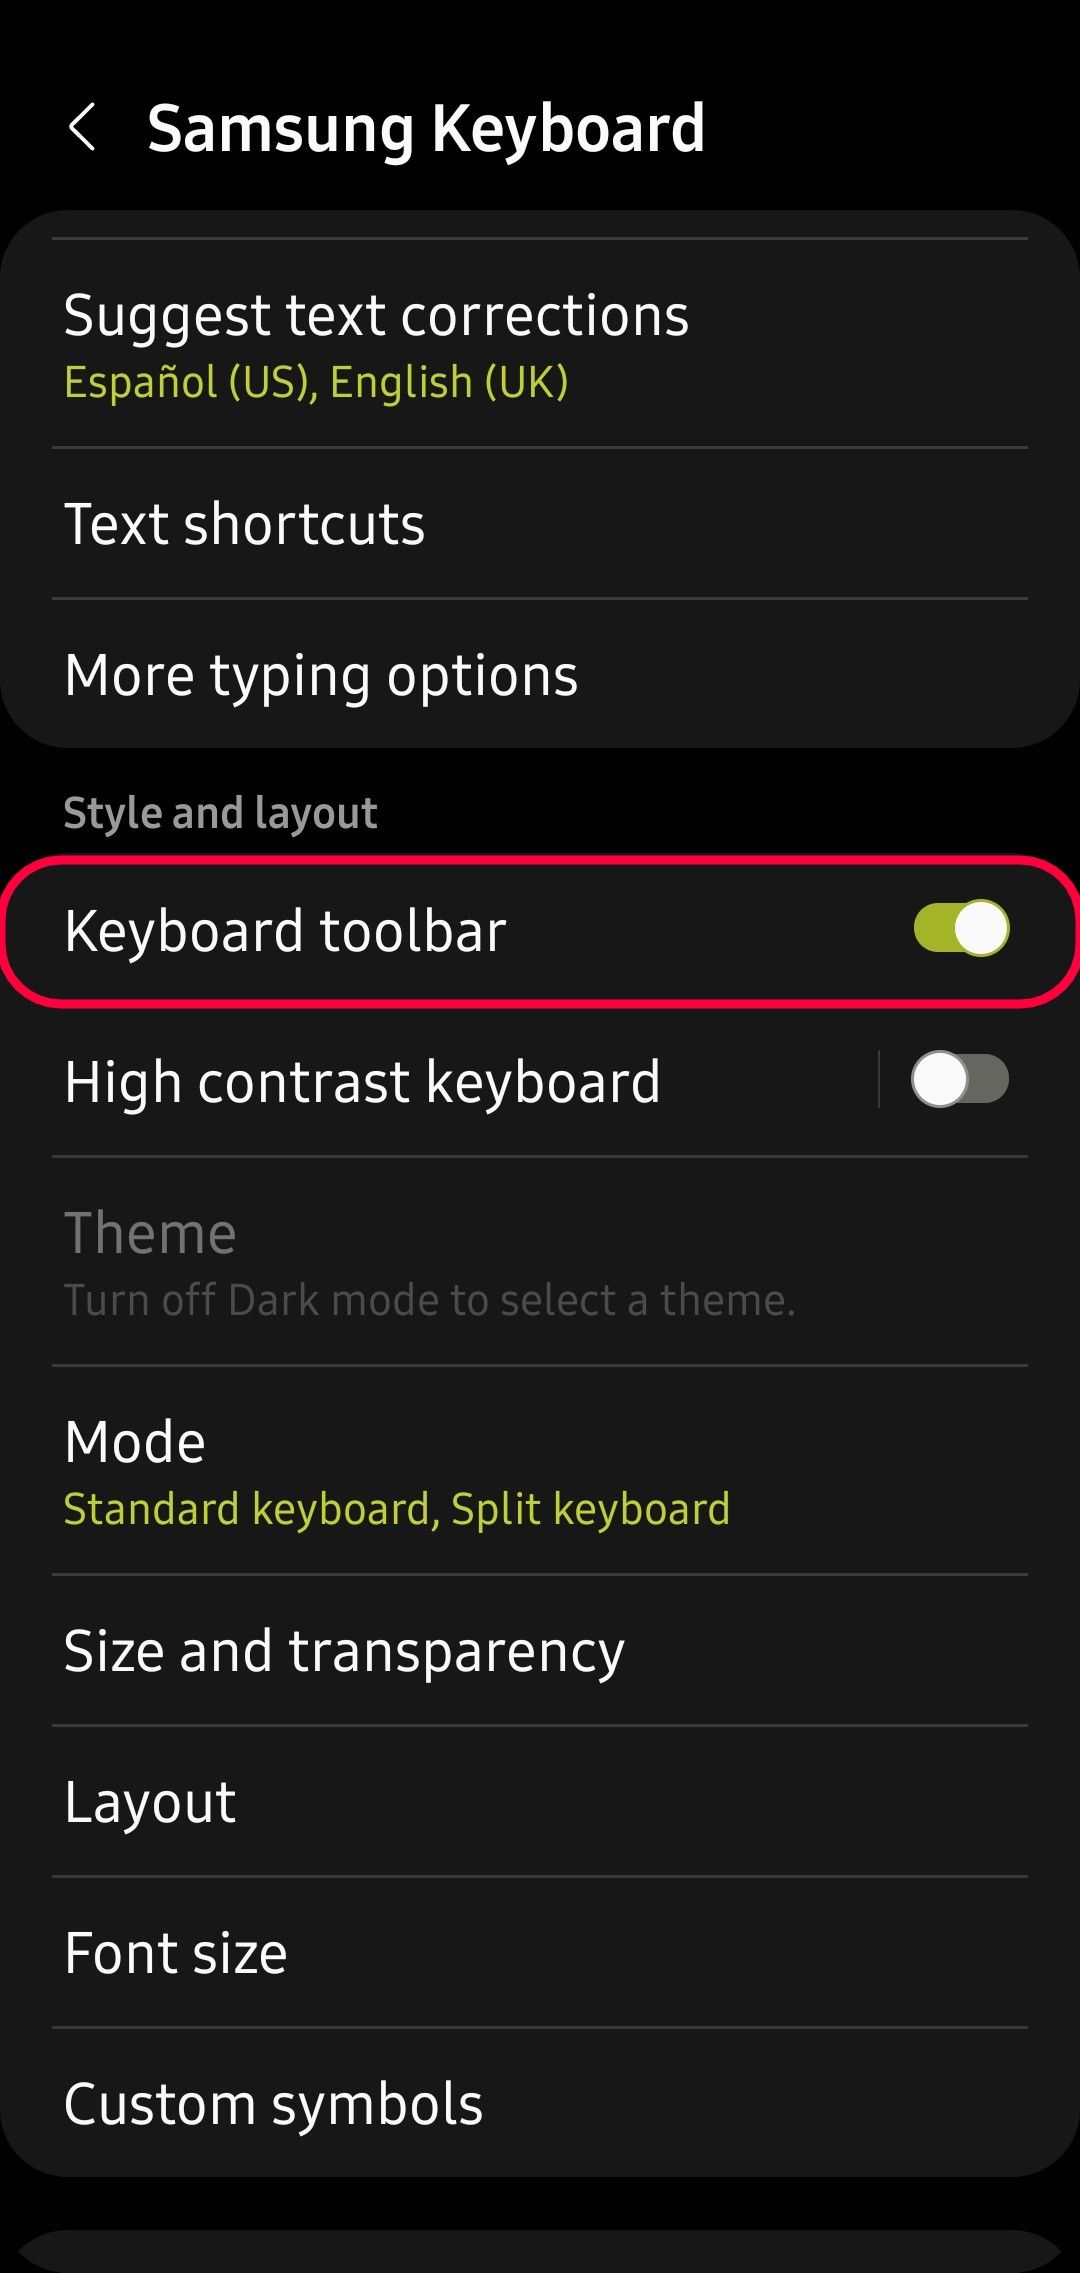
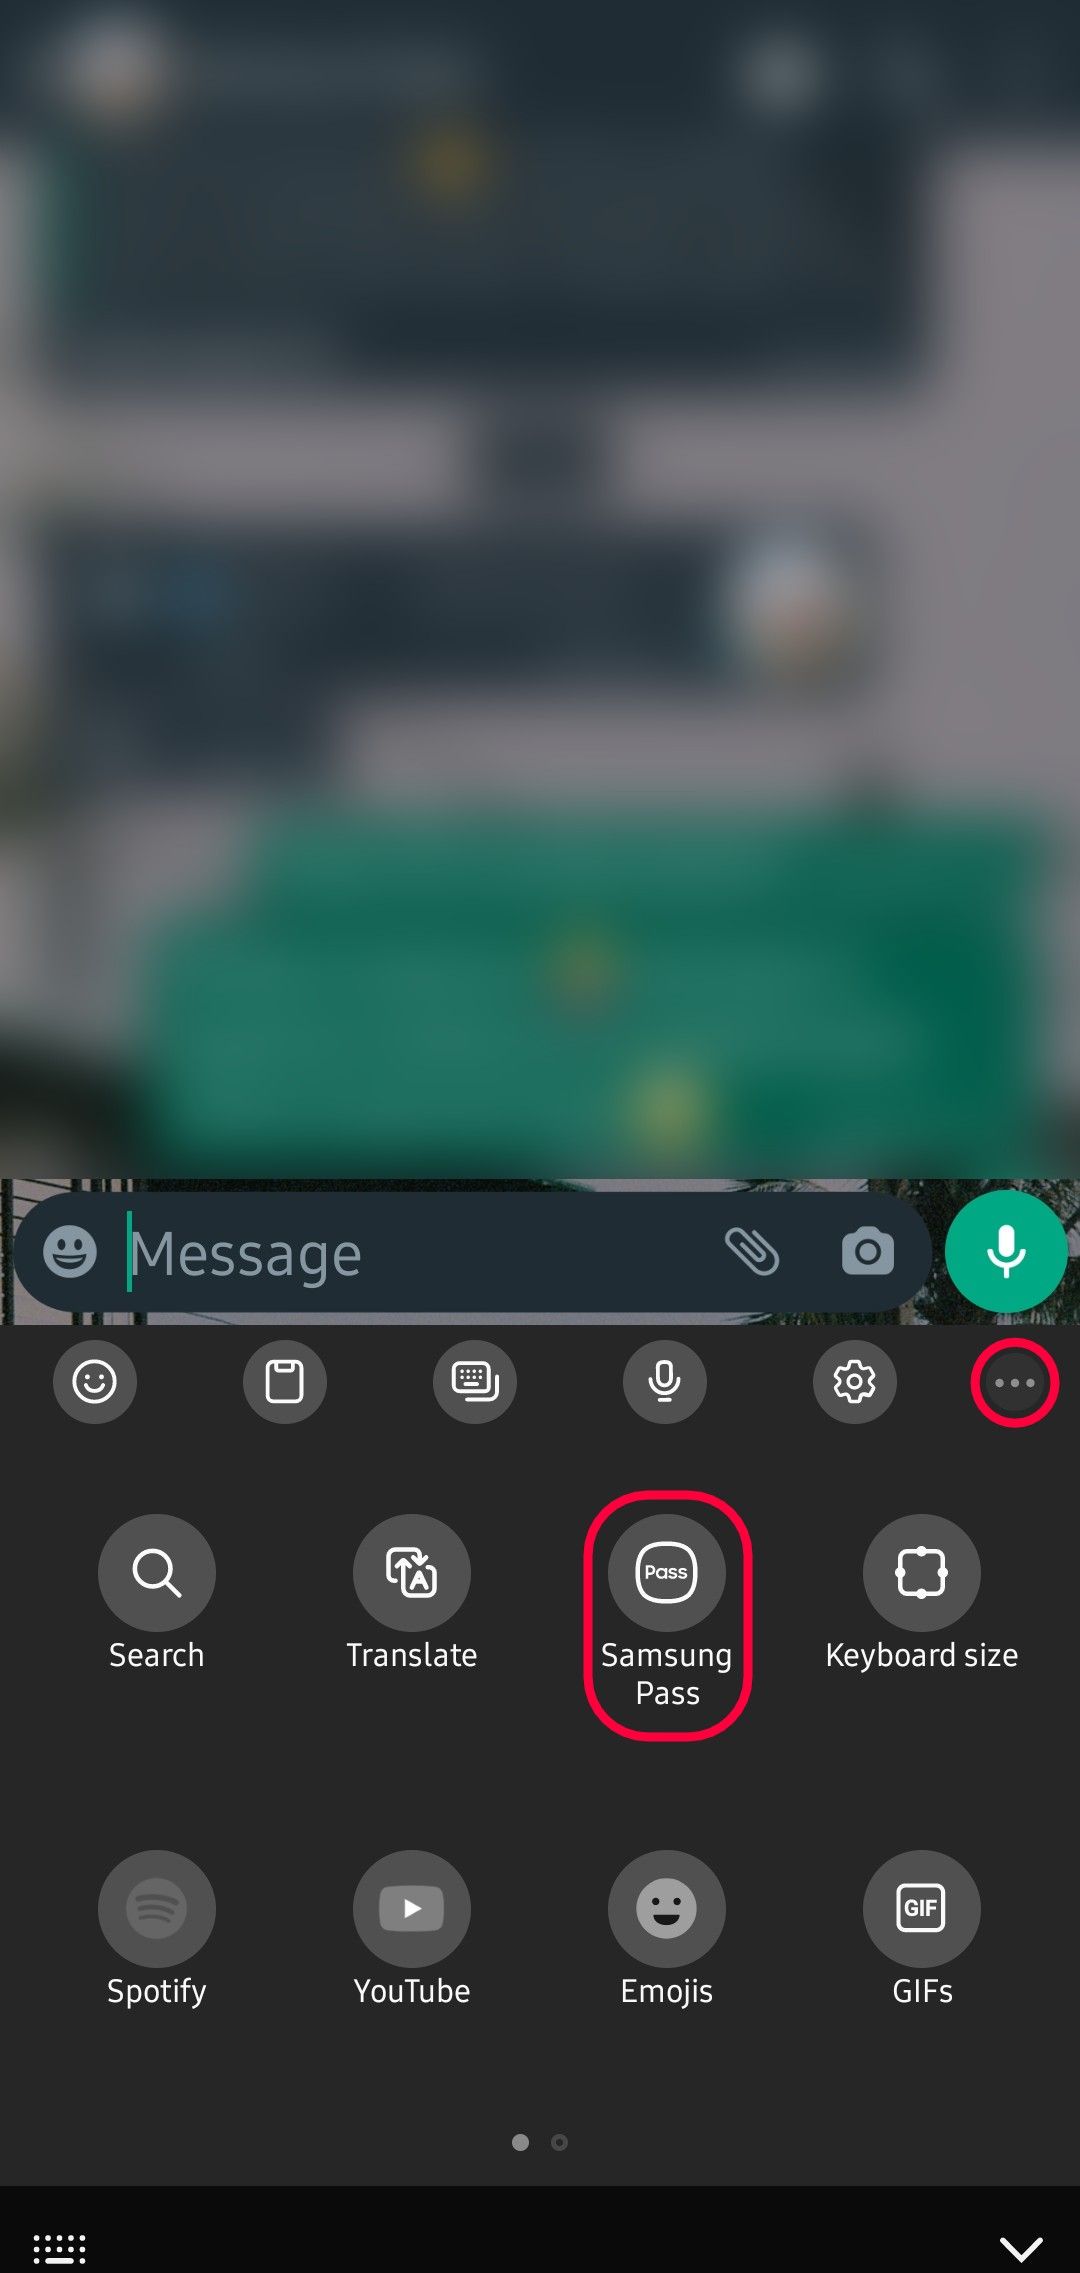
Samsung Pass is now activated on your keyboard. Open the keyboard from any text field to see the button. Here’s how to use Samsung Pass from your keyboard:
- Tap the Pass icon in the toolbar above the characters.
- Bometrically authenticate to see your saved credentials.
- Tap the username, password, address, or note in the Pass window to paste that information into the text field you are editing.

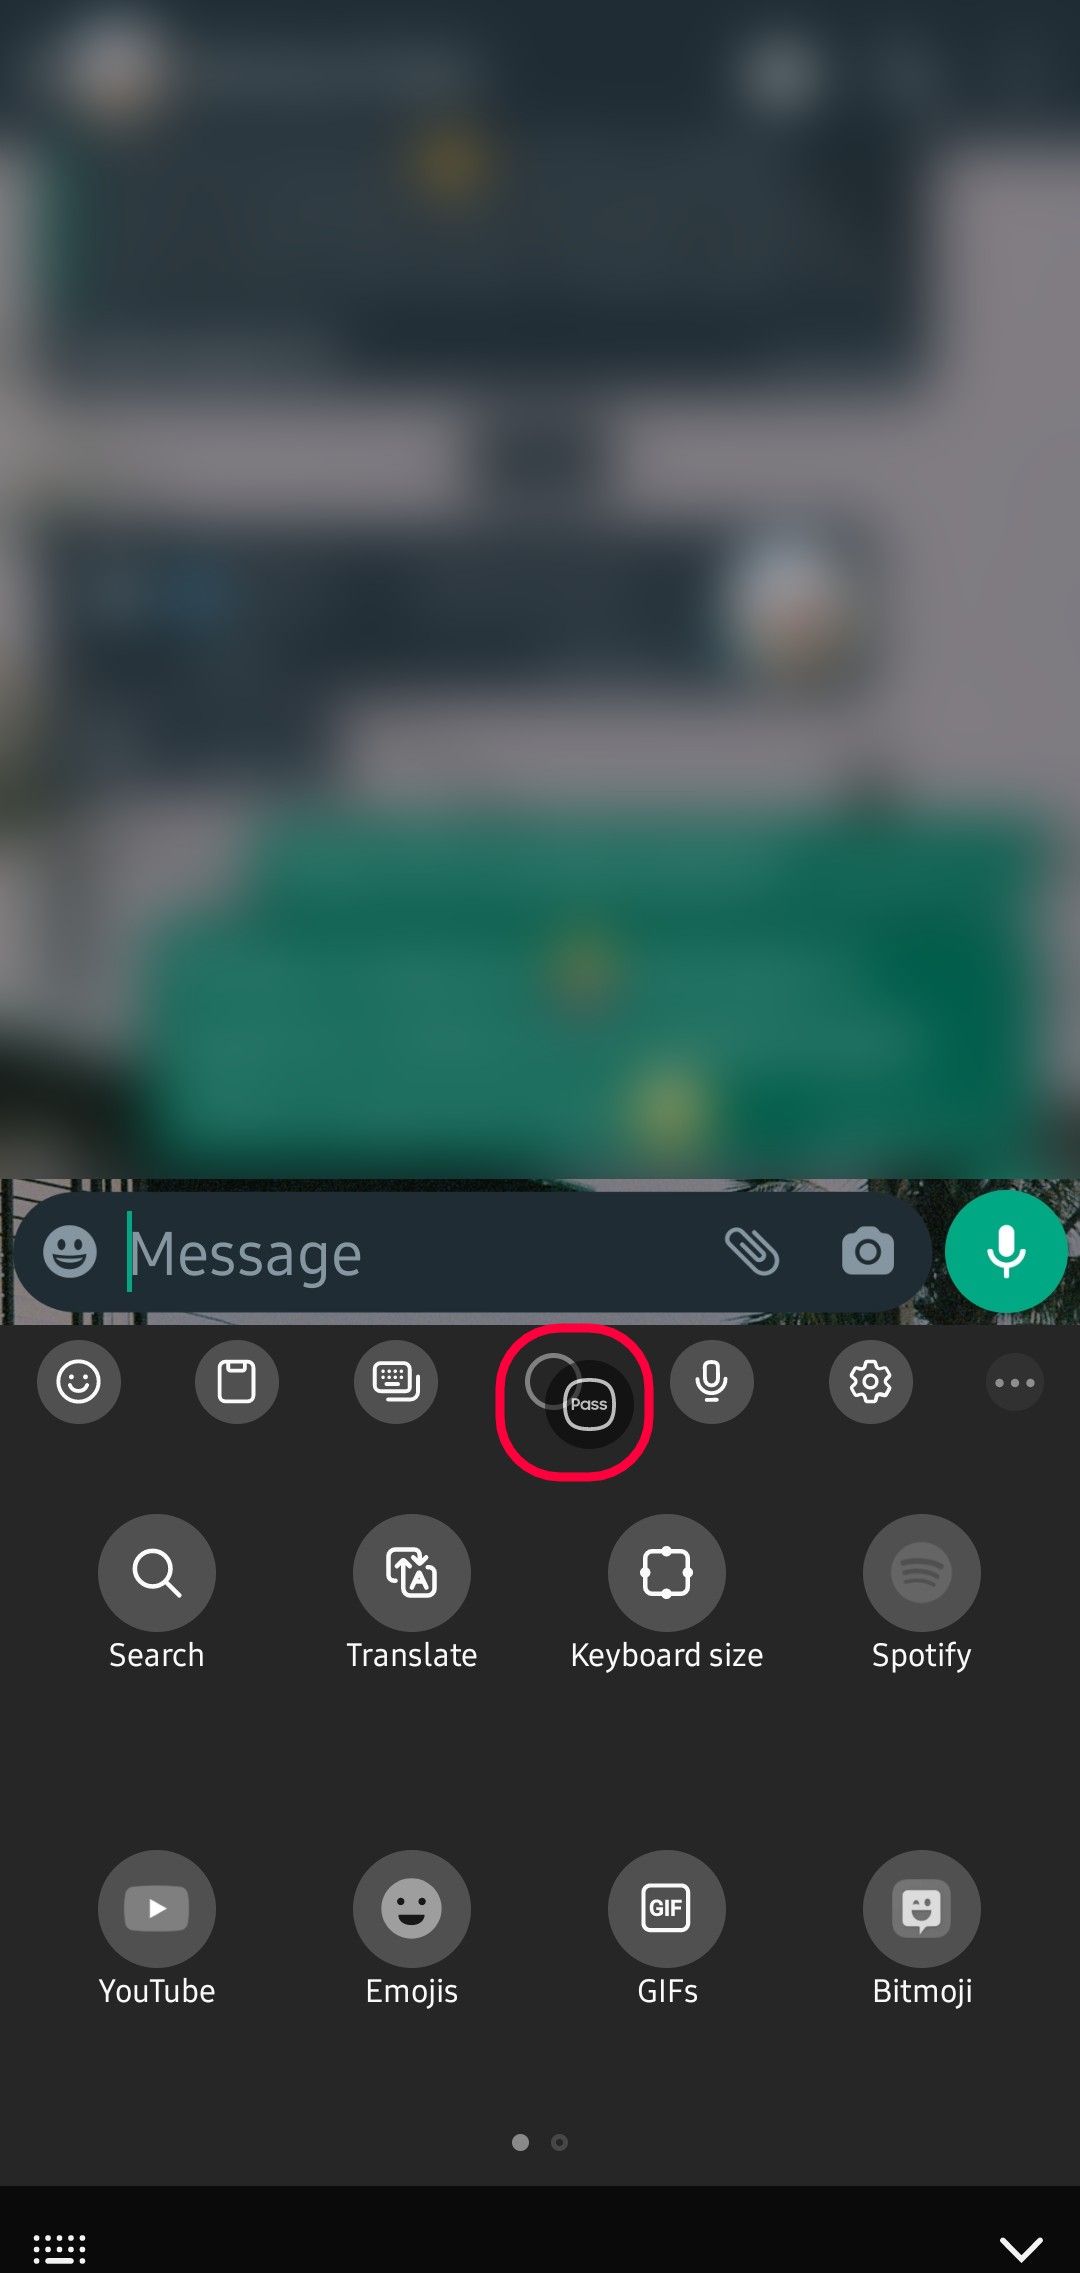
If the Pass icon is not there, tap the three dots on the right side of the toolbar and drag the Pass icon from beneath the toolbar into the main toolbar area.
A great password manager if you’re deeply rooted in Samsung’s ecosystem
Samsung Pass is a convenient password manager despite its limitations. Information stored in Samsung Pass syncs to other Samsung devices as long as you’re signed in with the same account. Use it with one of the latest Samsung Galaxy smartwatches to access this information securely without your phone.
Xem chi tiết và đăng kýXem chi tiết và đăng kýXem chi tiết và đăng ký

Khám phá thêm từ Phụ Kiện Đỉnh
Đăng ký để nhận các bài đăng mới nhất được gửi đến email của bạn.

