

Review sản phẩm
Thẻ Tín Dụng/Ghi Nợ Ảo: Tạo và Sử dụng như thế nào?

Th4
## Thẻ Tín Dụng/Ghi Nợ Ảo: Tạo và Sử dụng như thế nào?
Giới thiệu về Thẻ Tín Dụng/Ghi Nợ Ảo
Thẻ tín dụng/ghi nợ ảo là một công cụ tài chính hiện đại, mang lại sự tiện lợi và an toàn cho người dùng. Khác với thẻ vật lý, thẻ ảo tồn tại dưới dạng số và được lưu trữ điện tử. Bài viết này sẽ hướng dẫn bạn cách tạo và sử dụng thẻ tín dụng/ghi nợ ảo một cách hiệu quả.
(Nội dung chi tiết sẽ được bổ sung ở đây. Phần này cần bạn cung cấp thông tin cụ thể về cách tạo và sử dụng thẻ ảo, bao gồm các bước hướng dẫn, ví dụ minh họa, các lưu ý về bảo mật, và các ngân hàng/dịch vụ cung cấp loại thẻ này tại Việt Nam. Ví dụ: )
* Bước 1: Chọn ngân hàng hoặc nhà cung cấp dịch vụ. Nhiều ngân hàng lớn tại Việt Nam hiện nay đã tích hợp tính năng tạo thẻ ảo trên ứng dụng di động của họ. Bạn cần tìm hiểu các ngân hàng như Vietcombank, Techcombank, ACB,… để xem có hỗ trợ loại thẻ này không.
* Bước 2: Đăng ký và kích hoạt thẻ ảo. Sau khi chọn ngân hàng, bạn cần đăng nhập vào ứng dụng ngân hàng điện tử và làm theo hướng dẫn để tạo một thẻ ảo mới. Thông thường, bạn sẽ cần chọn loại thẻ (tín dụng hay ghi nợ), hạn mức (nếu là thẻ tín dụng), và đặt một mật khẩu riêng cho thẻ ảo.
* Bước 3: Sử dụng thẻ ảo để mua sắm trực tuyến. Sau khi kích hoạt, bạn có thể sử dụng thông tin thẻ ảo (số thẻ, ngày hết hạn, CVV) để thanh toán trực tuyến trên các trang web thương mại điện tử.
* Bước 4: Quản lý và hủy thẻ ảo. Bạn có thể dễ dàng theo dõi giao dịch, thay đổi hạn mức (nếu cần) và hủy thẻ ảo bất cứ lúc nào thông qua ứng dụng ngân hàng. Việc hủy thẻ ảo sẽ giúp bảo mật thông tin tài chính của bạn tốt hơn.
Lưu ý quan trọng: Luôn cập nhật ứng dụng ngân hàng lên phiên bản mới nhất và tuân thủ các quy định về bảo mật để tránh bị lừa đảo. Không chia sẻ thông tin thẻ ảo với bất kỳ ai.
(Phần này kết thúc phần hướng dẫn tạo và sử dụng thẻ ảo)
Mua ngay sản phẩm công nghệ tại Queen Mobile
Queen Mobile là địa điểm lý tưởng để bạn sở hữu những sản phẩm công nghệ hàng đầu như iPhone, iPad và Apple Watch. Hãy ghé thăm cửa hàng hoặc truy cập website của Queen Mobile để khám phá những ưu đãi hấp dẫn.
#theao #thetindungao #theghinheao #muaonline #antoan #congnghe #queenmobile #iphone #ipad #applewatch #muasamtructuyen #taichinh #nganhang
Giới thiệu How to create and use virtual credit and debit cards
: How to create and use virtual credit and debit cards
Hãy viết lại bài viết dài kèm hashtag về việc đánh giá sản phẩm và mua ngay tại Queen Mobile bằng tiếng VIệt: How to create and use virtual credit and debit cards
Mua ngay sản phẩm tại Việt Nam:
QUEEN MOBILE chuyên cung cấp điện thoại Iphone, máy tính bảng Ipad, đồng hồ Smartwatch và các phụ kiện APPLE và các giải pháp điện tử và nhà thông minh. Queen Mobile rất hân hạnh được phục vụ quý khách….
_____________________________________________________
Mua #Điện_thoại #iphone #ipad #macbook #samsung #xiaomi #poco #oppo #snapdragon giá tốt, hãy ghé [𝑸𝑼𝑬𝑬𝑵 𝑴𝑶𝑩𝑰𝑳𝑬]
✿ 149 Hòa Bình, phường Hiệp Tân, quận Tân Phú, TP HCM
✿ 402B, Hai Bà Trưng, P Tân Định, Q 1, HCM
✿ 287 đường 3/2 P 10, Q 10, HCM
Hotline (miễn phí) 19003190
Thu cũ đổi mới
Rẻ hơn hoàn tiền
Góp 0%
Thời gian làm việc: 9h – 21h.
KẾT LUẬN
Hãy viết đoạn tóm tắt về nội dung bằng tiếng việt kích thích người mua: How to create and use virtual credit and debit cards
Google’s virtual card feature is a safer way to make payments, both in-app and online. When you use this feature, a unique virtual card number replaces your physical card number. This way, when you check out, your actual payment details remain undisclosed, protecting against fraud and identity theft. Keep reading to learn how to create and use virtual cards on your go-to Chromebook or PC and phone.
How does Google’s virtual card work?
The virtual card feature gives you a new card number that overrides your physical card number when making online purchases. When you use this feature, the virtual card number, CVC, and expiration date may differ from the actual details on your physical card. For added security, your virtual card number or CVC might change for different transactions and merchants.
How to create a virtual card on your Android phone
As helpful as Google’s virtual card feature is, not everyone can use it. There are a few reasons for this. For starters, the feature is only available in the US. Additionally, your physical card needs to support the feature.
Here’s how to turn on and use a virtual card through the Chrome app:
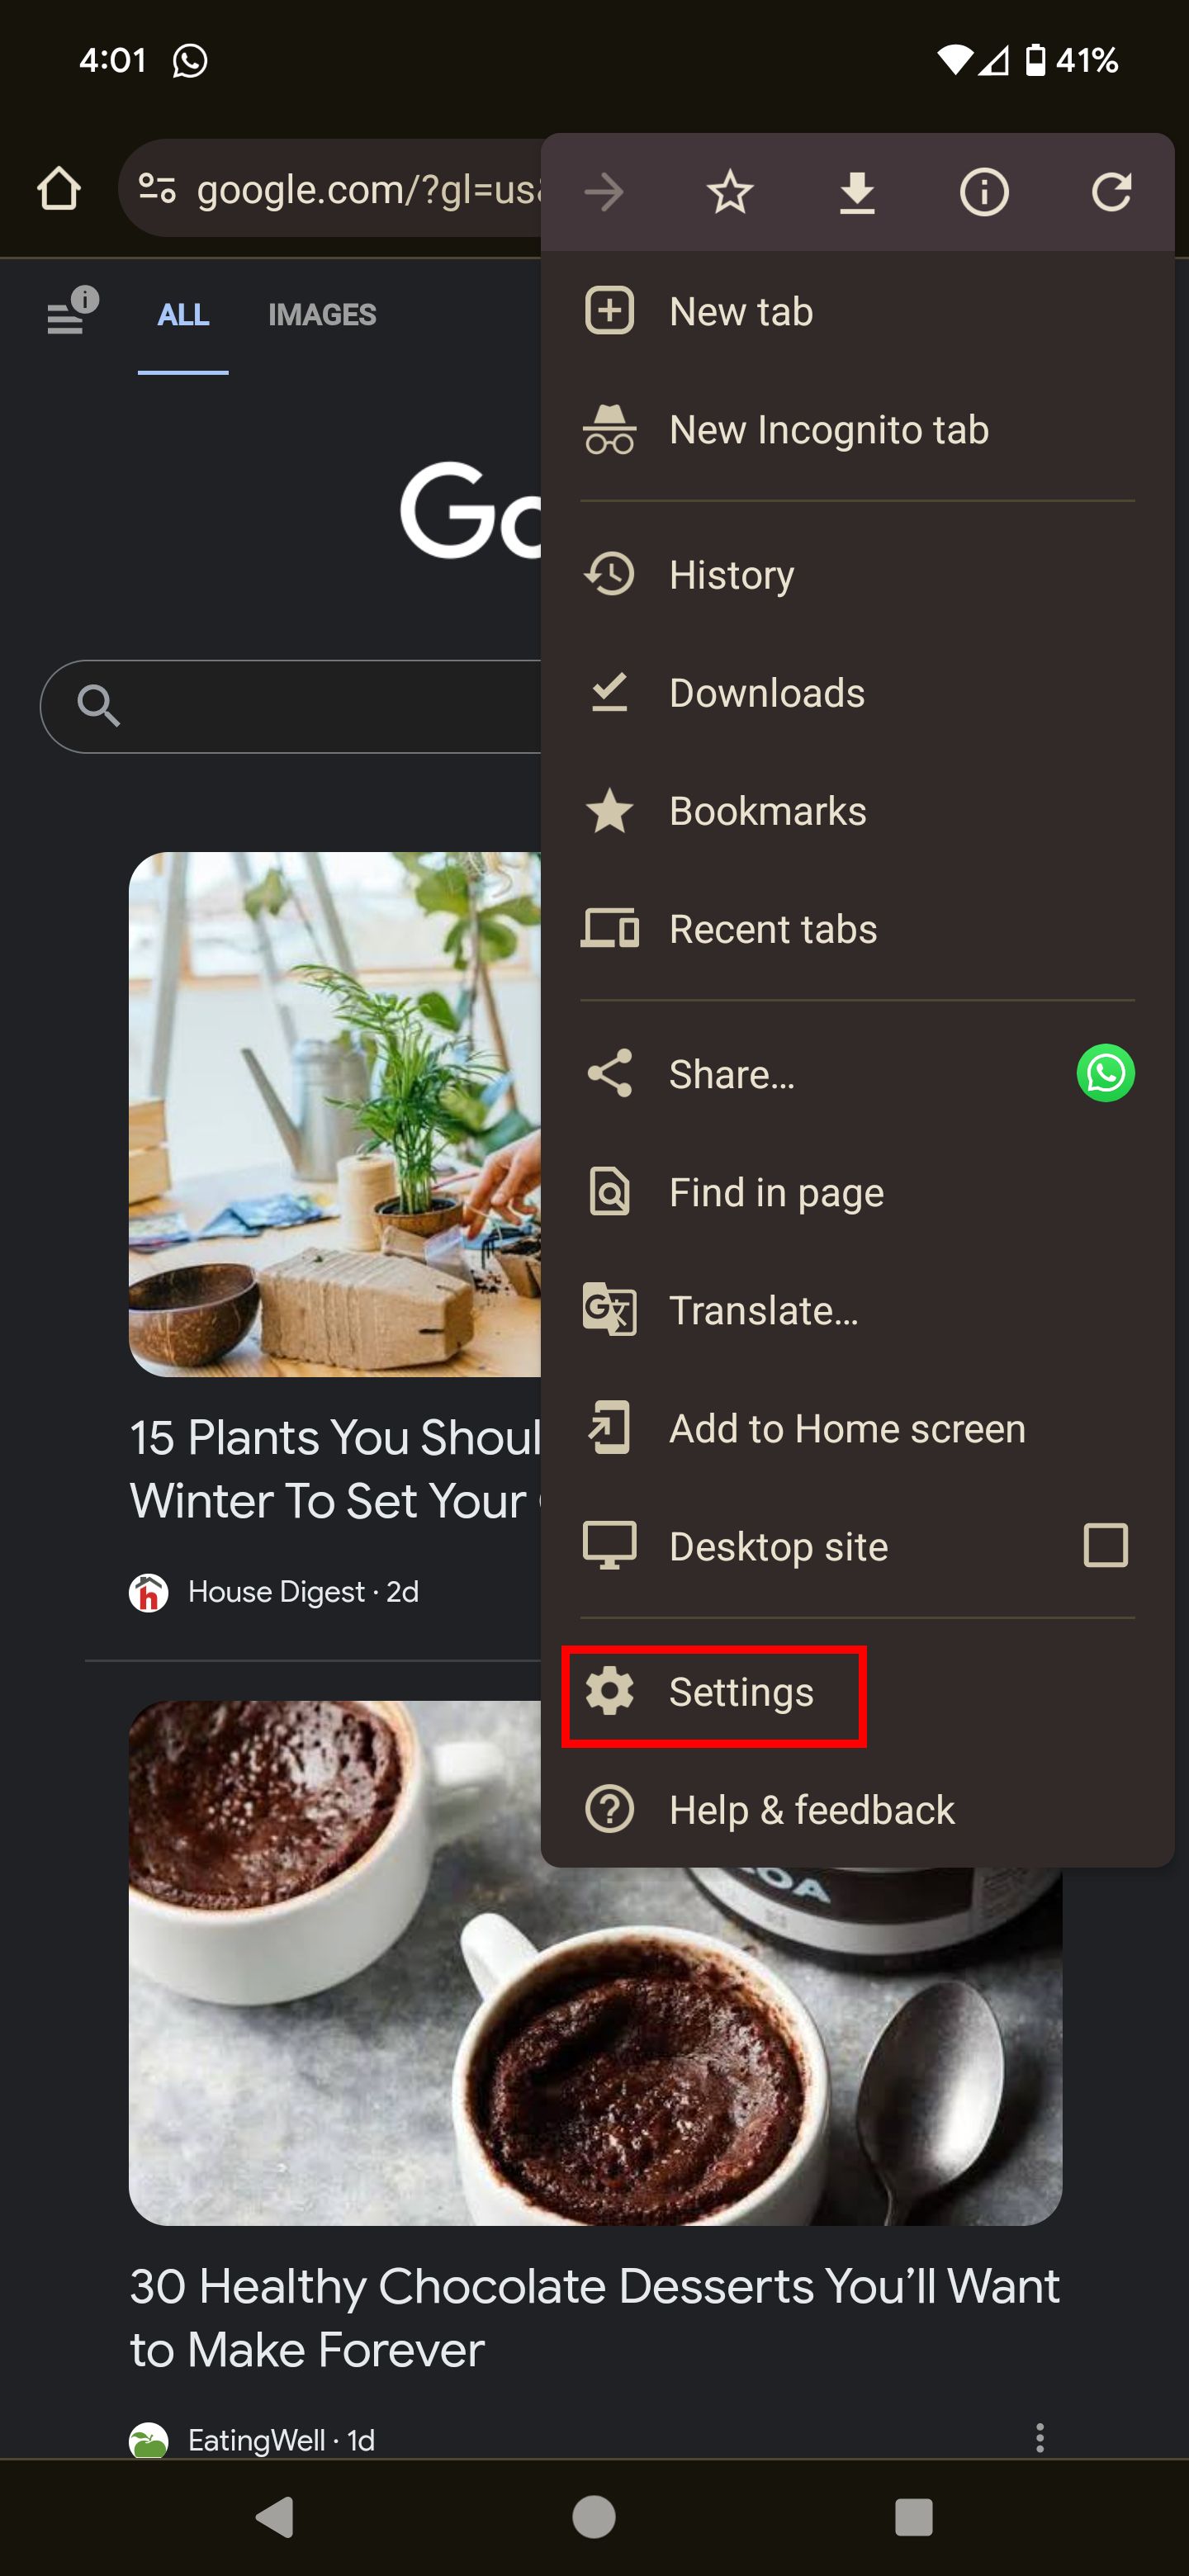
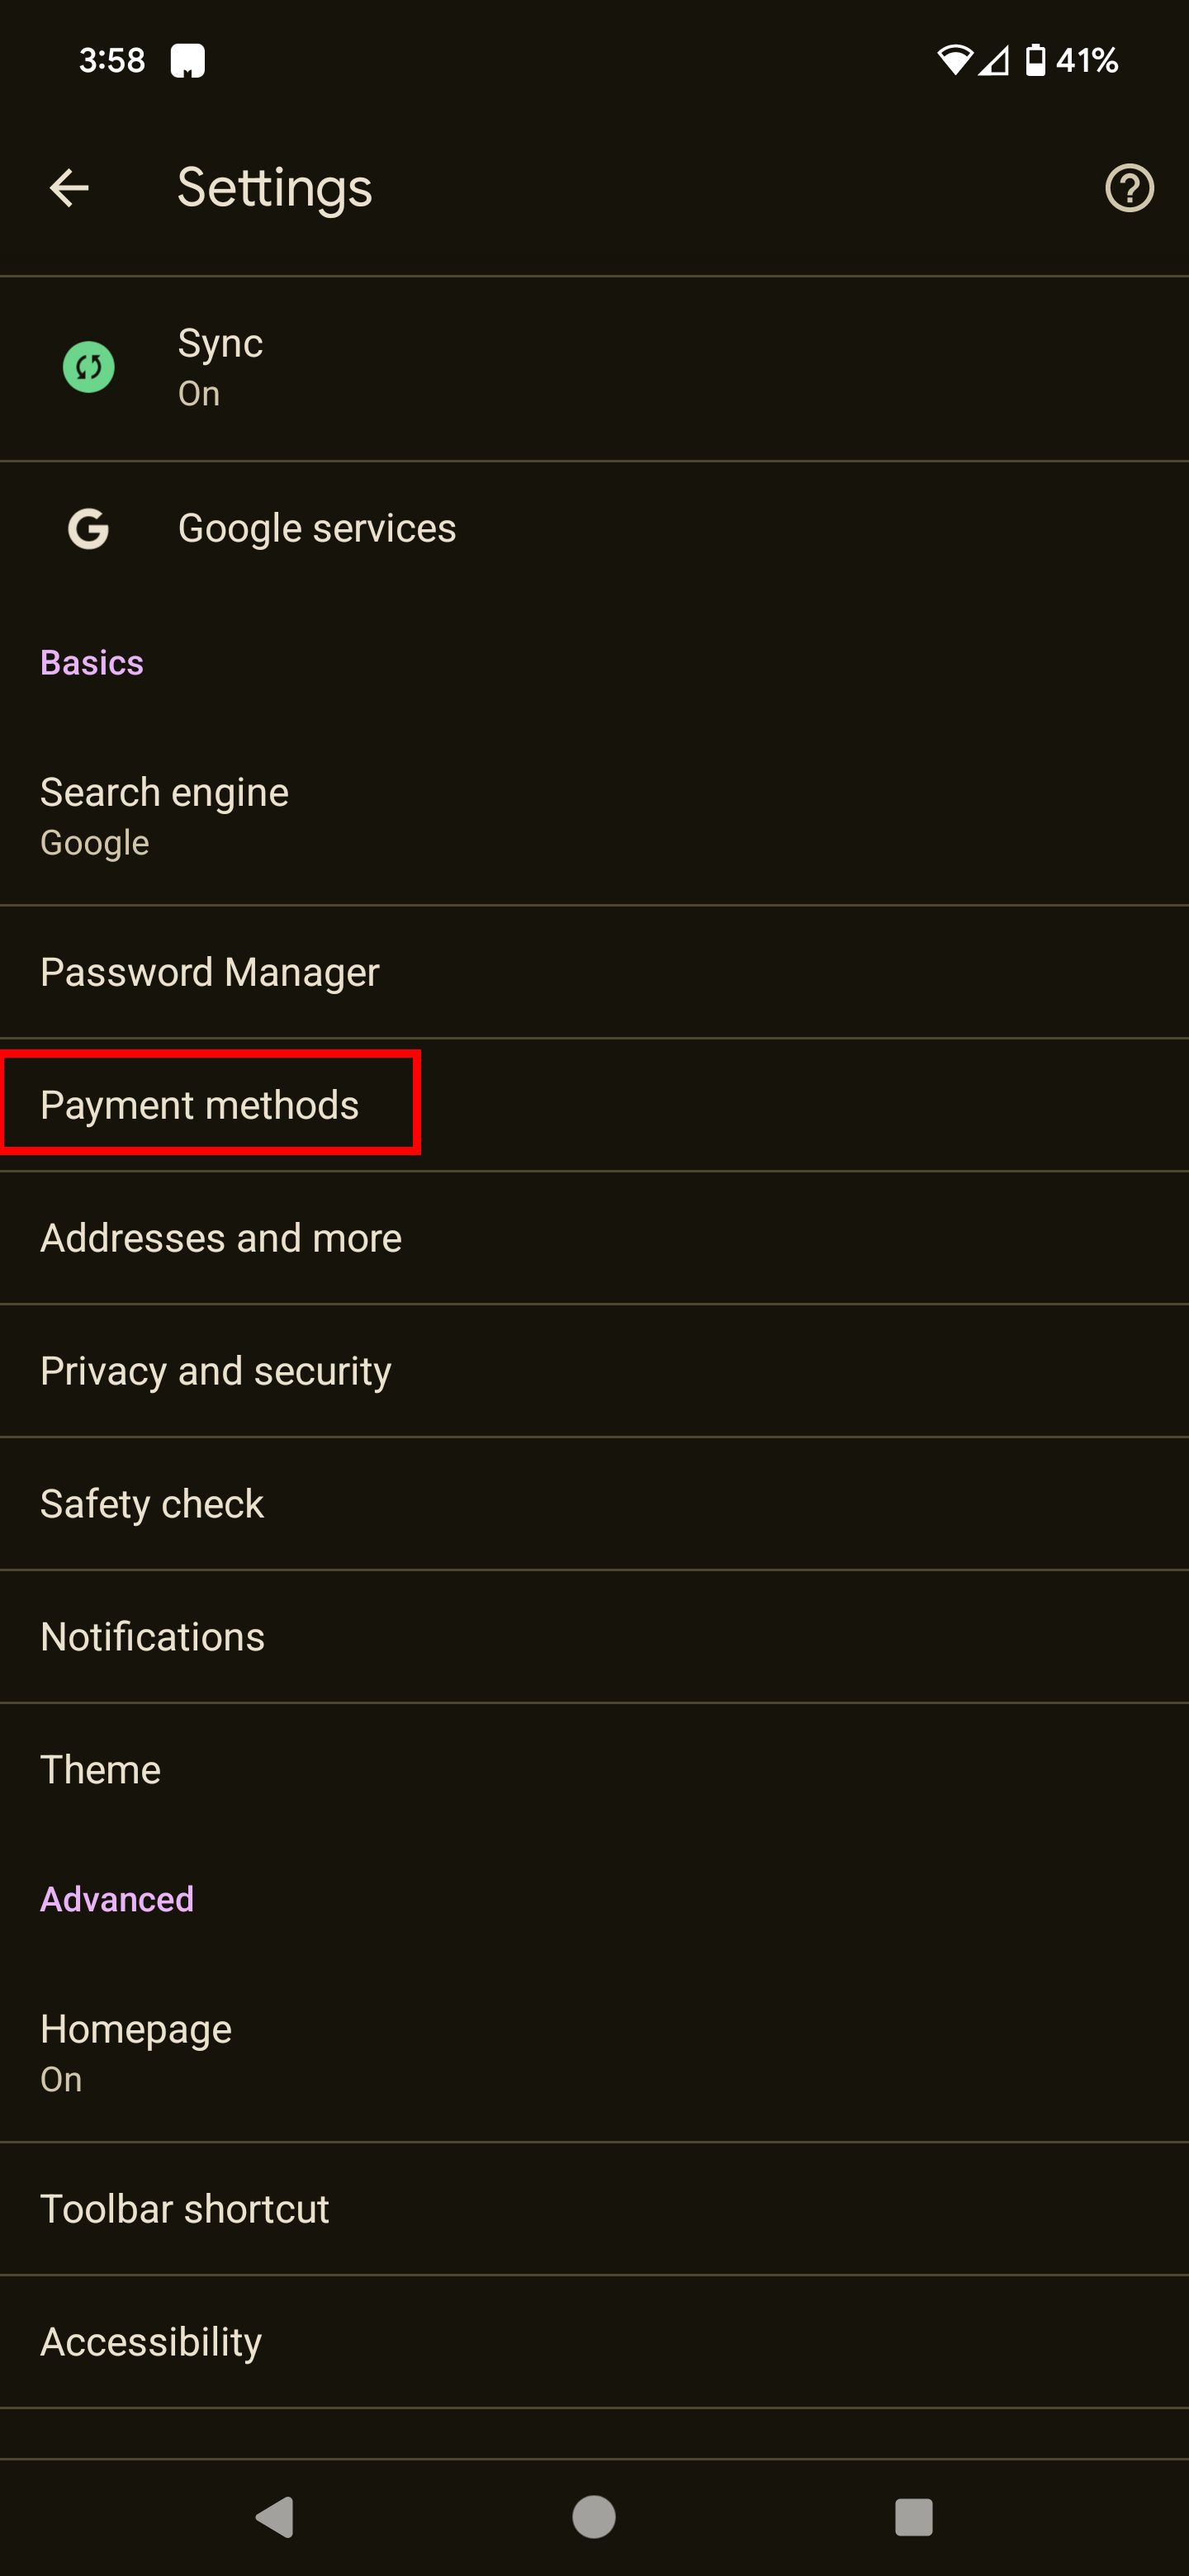
- Navigate to the Chrome app on your phone or tablet.
- Select the three-dot menu icon in the upper-right corner of the page.
- Select Settings from the drop-down menu.
- Tap Payment methods.
- Turn on Save and fill payment methods.
- Tap the card for which you’d like to create a virtual card.
- Select Virtual card and then tap Add.
- Read the terms of service and select Yes to proceed.
How to create a virtual card on your Chromebook or PC
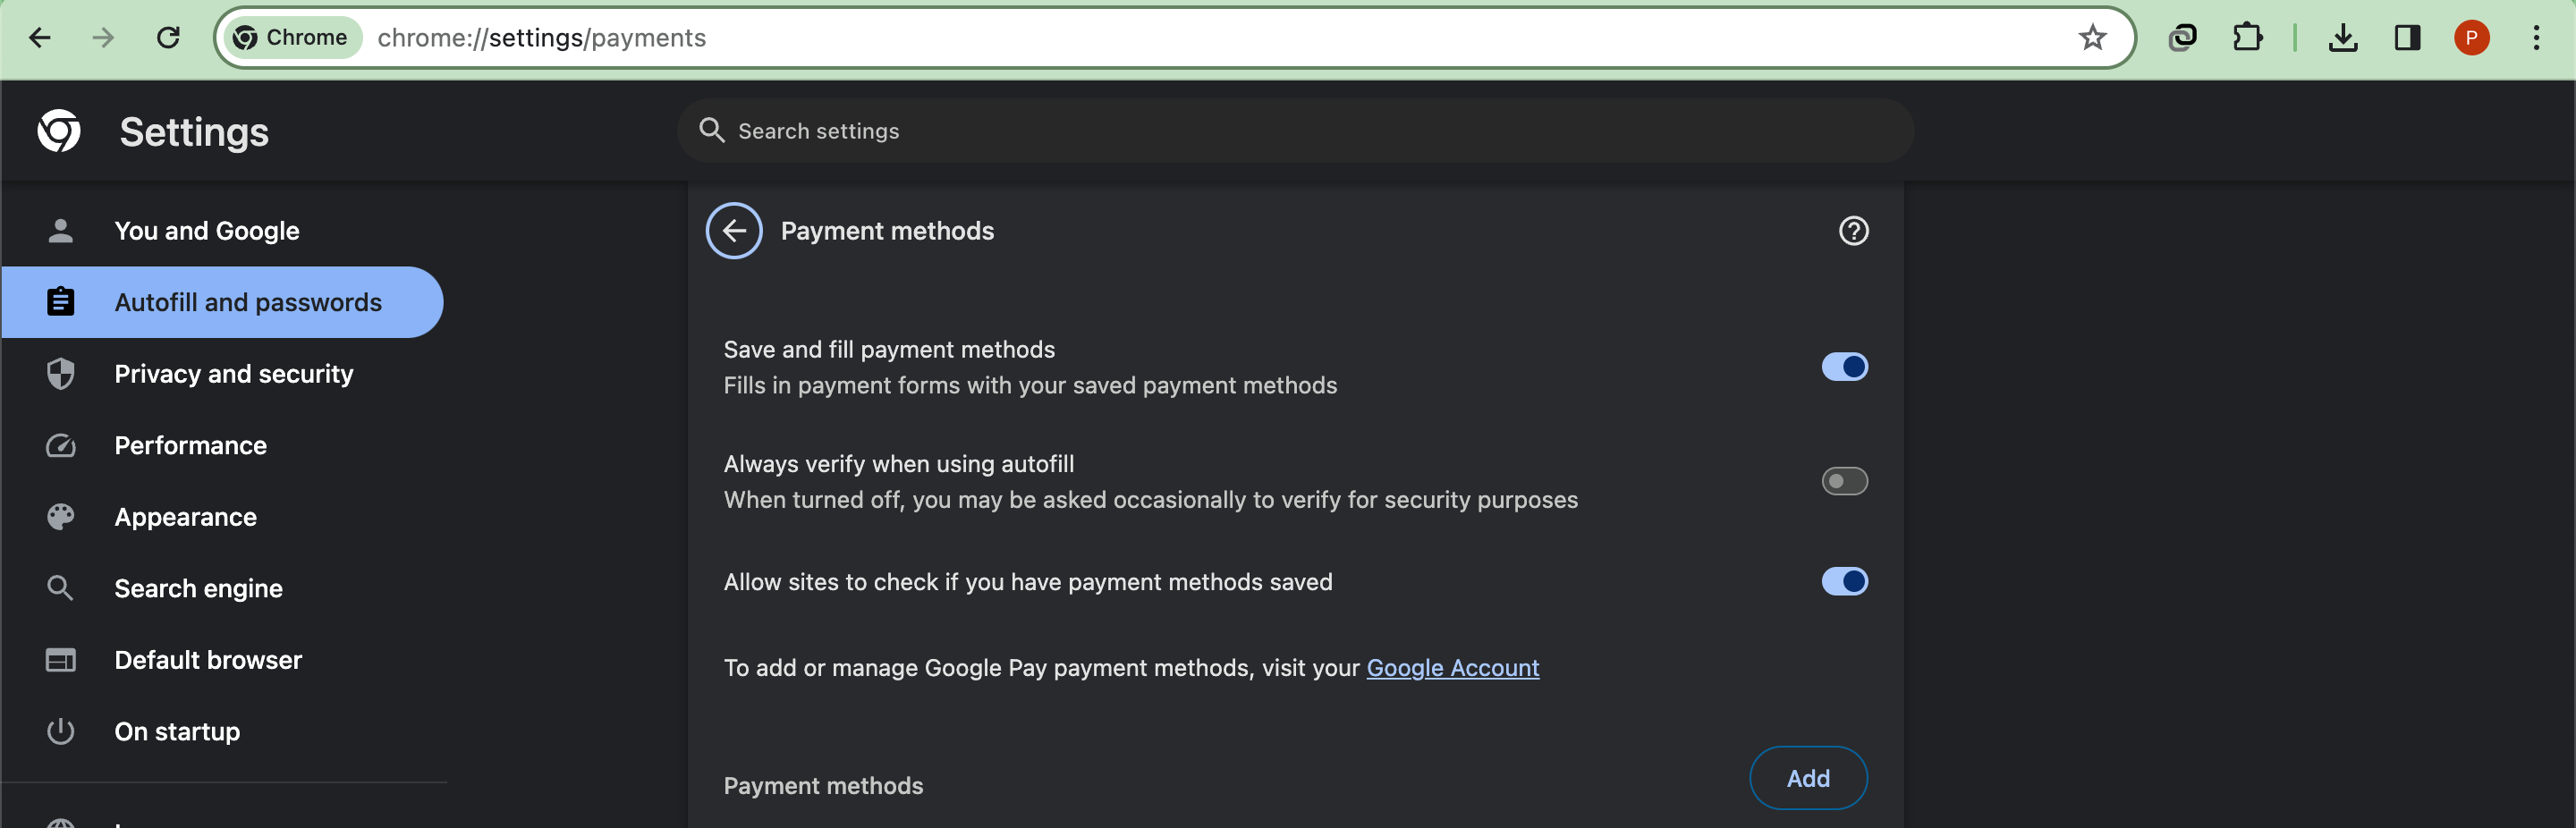
Here’s how to turn on the virtual card feature in Google Chrome:
- Open the Chrome browser.
- Navigate to chrome://settings/payments.
- Turn on Save and fill payment methods and Allow sites to check if you have payment methods saved.
- Find the card for which you want to create a virtual card and click More.
- Select Turn on virtual card.
- Read the terms of service and click Yes to proceed.
You can also create a virtual card through the Google Pay website. Here’s what you’ll do:
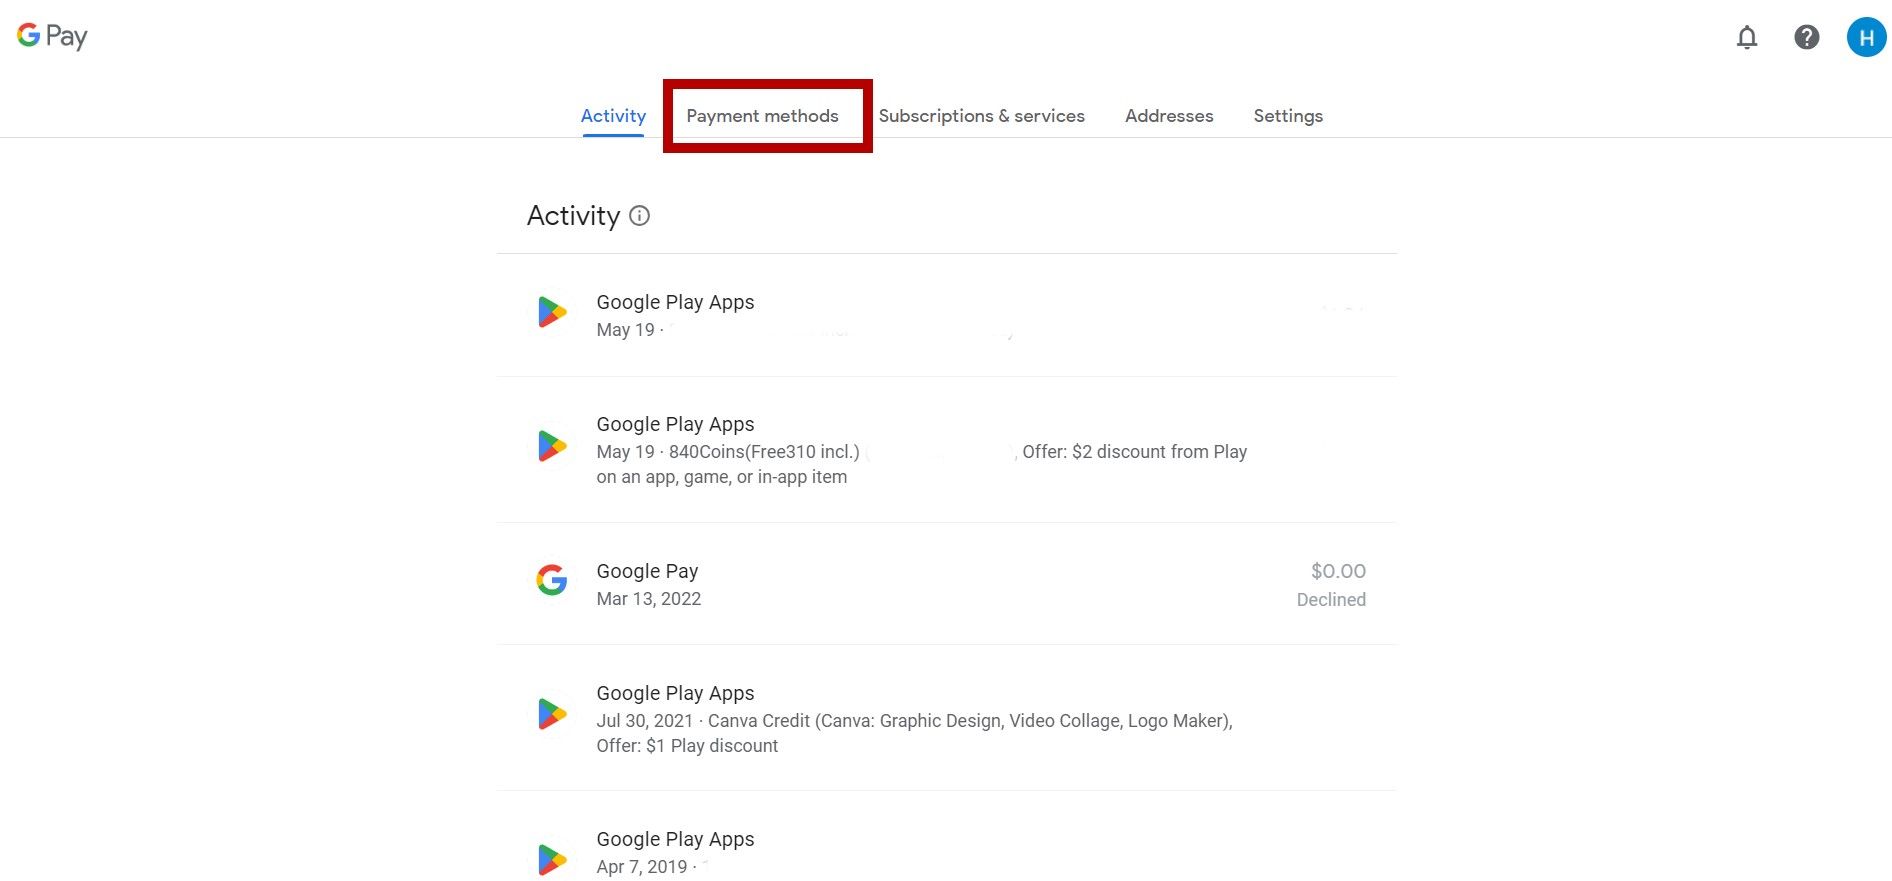
- Go to the Google Pay website at pay.google.com on your Chrome web browser.
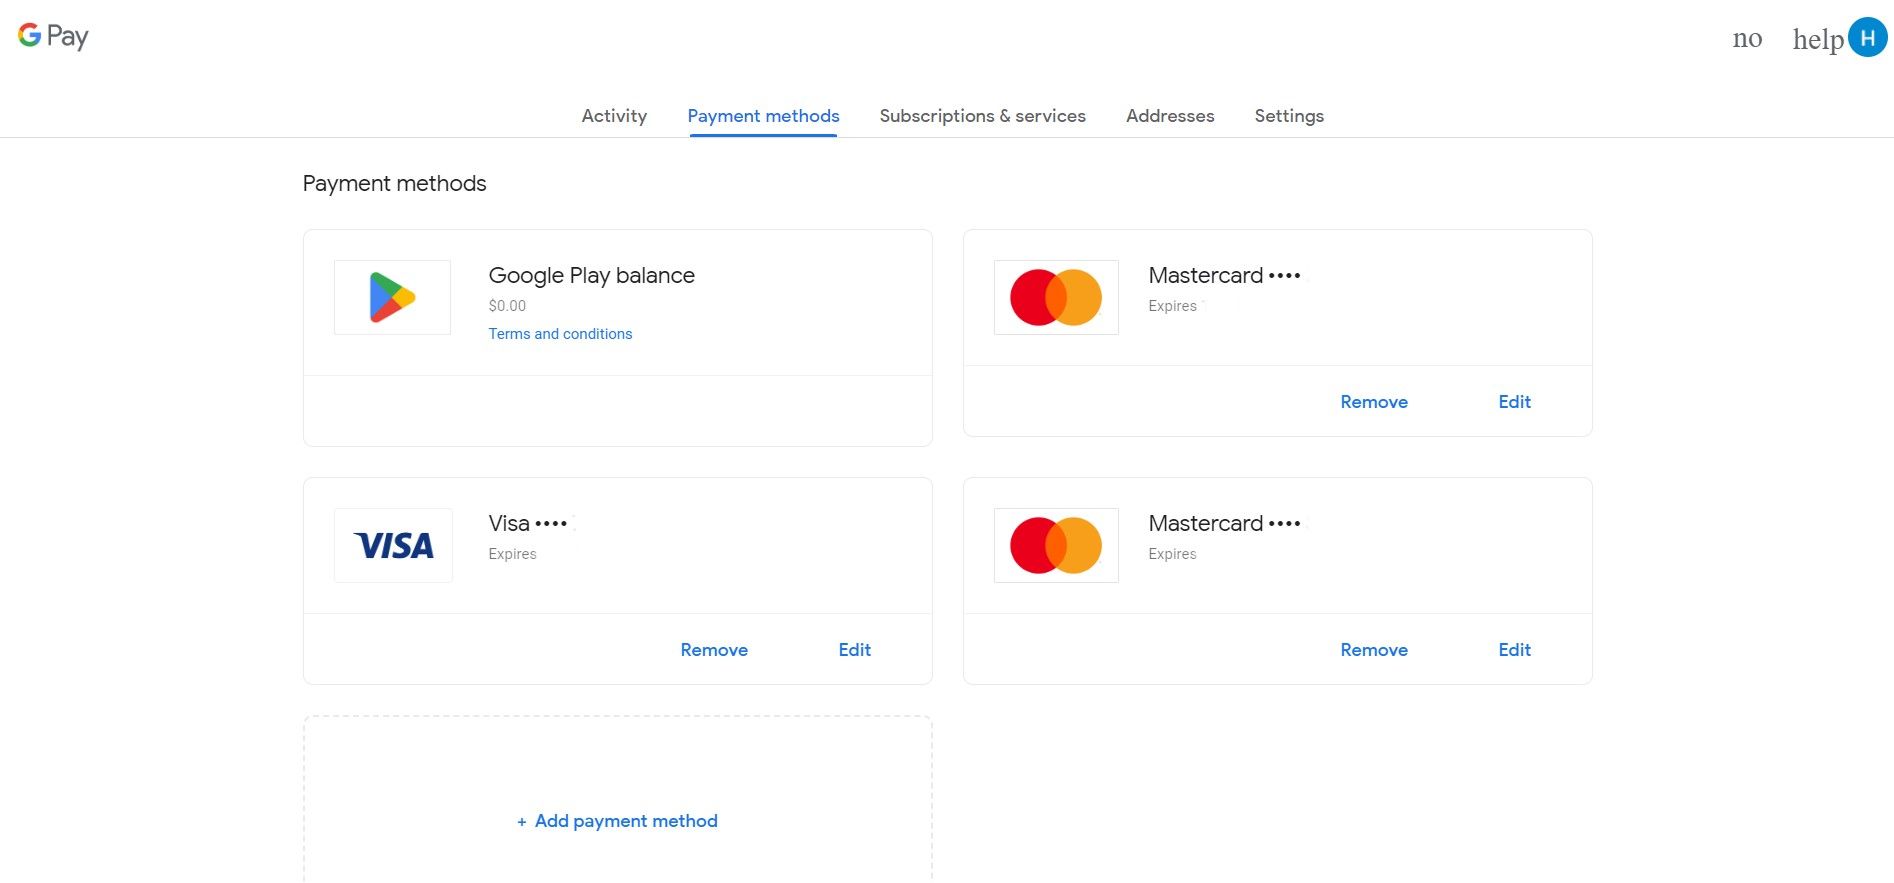
- Navigate to the Payment methods tab at the top of the screen.
- Find the card for which you want to create a virtual number. If the card is not available, add it.
- Select Turn on virtual card. This option is only available if the card supports the feature.
- Click Turn on.
- Click Got it.
Check the details of a virtual card
After you create a virtual card, you can use it for several transactions as long as your original physical card is valid. If you need to check the virtual card details for any reason, follow these steps:
- Visit pay.google.com.
- Go to the Payment methods tab. On Android, tap the three-dot menu icon and tap Payment methods. You’ll see a list of your added cards.
- Locate the card you want to view.
- Select Manage virtual card.
- Choose View and manage virtual cards. You’re taken to the issuer’s website, where you can manage the virtual card.
Using a virtual card with Google Pay
Related
How to add your ID to Google Wallet
Don’t worry, we’re sure the bar will accept it
After creating your virtual card, follow these steps to use it for different types of transactions.
Online purchases
You can make payments quickly, securely, and efficiently when shopping online with the Google Pay virtual card. The checkout page of a supported website brings up the option to autofill your virtual card for payment. If it doesn’t appear, follow the steps in the previous section to check the card information and input it manually.
In-app purchase
Many applications, including the Google Play Store, offer in-app purchases or subscription services. When buying on such platforms, the Google Pay option comes up. Use your virtual card to complete the process.
Google doesn’t charge fees for using its virtual card. Your bank or payment network — Mastercard, Visa, or American Express — may deduct regular transaction charges.
If you haven’t created a virtual card, checking out on a supported platform with your regular card may allow you to turn on the virtual card feature before you complete your purchase.
How to turn off a virtual card
If you choose to deactivate your card, follow these steps in the Google Chrome browser:
- Visit pay.google.com on Google Chrome.
- Select Payment methods.
- Locate the card you want to deactivate.
- Select Manage virtual card.
- Click Turn off at the bottom of the screen.
To deactivate a virtual card on your Android device, follow these steps:
- Open the Chrome app on your phone or tab.
- Navigate to Settings.
- Tap Payment methods.
- Find the virtual card you want to remove, tap More, and select Turn off virtual card.
Any virtual cards you use on Google are no longer available. You can re-add a virtual card or create a new one using the steps mentioned above.
Google says turning off a virtual card deactivates it on Google Pay, but it may be active on other platforms where you manually used it. Contact the issuer to cancel the card outside of Google Pay.
Google’s virtual cards offer a convenient and secure way to make online transactions without revealing sensitive personal information to merchants. You’ll add a physical credit or debit card that supports the feature to your account to use it.
Xem chi tiết và đăng kýXem chi tiết và đăng kýXem chi tiết và đăng ký

Khám phá thêm từ Phụ Kiện Đỉnh
Đăng ký để nhận các bài đăng mới nhất được gửi đến email của bạn.

