

Review sản phẩm
Tạo Tài Khoản iCloud: Hướng Dẫn Chi Tiết & Đơn Giản Nhất!

Th4
## Tạo Tài Khoản iCloud: Hướng Dẫn Chi Tiết & Đơn Giản Nhất!
Mở đầu:
Bạn muốn tận hưởng trọn vẹn hệ sinh thái Apple nhưng chưa biết bắt đầu từ đâu? Tài khoản iCloud chính là chìa khóa mở ra thế giới tiện ích của Apple, từ lưu trữ ảnh, dữ liệu đến đồng bộ hóa thiết bị. Bài viết này sẽ hướng dẫn bạn từng bước, một cách chi tiết và dễ hiểu nhất, cách tạo tài khoản iCloud của riêng mình. Dù bạn là người dùng Apple lâu năm hay mới bắt đầu, hãy cùng khám phá!
1. Chuẩn bị trước khi bắt đầu:
Trước khi bắt tay vào tạo tài khoản, hãy đảm bảo bạn có:
* Một thiết bị Apple: iPhone, iPad, Mac, hoặc máy tính chạy hệ điều hành Windows.
* Kết nối internet ổn định: Việc tạo tài khoản cần kết nối mạng để hoàn tất quá trình.
* Địa chỉ email hợp lệ: Bạn sẽ cần địa chỉ email để đăng ký và xác minh tài khoản. Lưu ý rằng đây không nhất thiết phải là địa chỉ iCloud.com.
* Thông tin cá nhân: Tên đầy đủ, ngày sinh và các thông tin khác sẽ được yêu cầu trong quá trình đăng ký.
2. Các bước tạo tài khoản iCloud:
Trên thiết bị Apple:
* Bước 1: Truy cập Cài đặt (Settings): Tìm biểu tượng hình bánh răng cưa trên màn hình chính.
* Bước 2: Chọn [Tên của bạn] (Your Name): Đây thường là hình đại diện của bạn. Nếu chưa đăng nhập, bạn sẽ thấy tùy chọn “Đăng nhập vào iPhone” (Sign in to your iPhone) hoặc tương tự.
* Bước 3: Chọn “Tạo ID Apple mới” (Create new Apple ID): Theo hướng dẫn trên màn hình.
* Bước 4: Nhập thông tin cá nhân: Điền đầy đủ và chính xác các thông tin được yêu cầu, bao gồm địa chỉ email, mật khẩu, ngày sinh, v.v.
* Bước 5: Xác minh địa chỉ email: Bạn sẽ nhận được email xác minh. Hãy mở email và làm theo hướng dẫn để kích hoạt tài khoản.
* Bước 6: Đăng nhập và tùy chỉnh: Sau khi xác minh thành công, bạn có thể đăng nhập và bắt đầu tùy chỉnh iCloud của mình.
Trên máy tính (Windows hoặc Mac):
* Bước 1: Truy cập icloud.com: Mở trình duyệt web và truy cập vào trang web chính thức của iCloud.
* Bước 2: Chọn “Tạo ID Apple” (Create Apple ID): Tìm nút này trên trang web.
* Bước 3: Làm theo hướng dẫn trên màn hình: Quá trình này tương tự như trên thiết bị Apple, yêu cầu bạn nhập thông tin cá nhân và xác minh email.
3. Quản lý tài khoản iCloud của bạn:
Sau khi tạo tài khoản, bạn có thể quản lý các cài đặt iCloud của mình, bao gồm:
* Lưu trữ iCloud: Xem dung lượng lưu trữ hiện tại và quản lý gói lưu trữ.
* Tìm iPhone/iPad/Mac: Định vị thiết bị Apple bị mất hoặc bị đánh cắp.
* iCloud Drive: Truy cập và quản lý các tệp tin được lưu trữ trên iCloud.
* Ảnh iCloud: Sao lưu và đồng bộ ảnh từ thiết bị của bạn lên iCloud.
4. Những lưu ý quan trọng:
* Mật khẩu mạnh: Hãy tạo một mật khẩu mạnh và khó đoán để bảo mật tài khoản của bạn.
* Bảo mật thông tin: Không chia sẻ thông tin tài khoản của bạn với người khác.
* Cập nhật thông tin: Đảm bảo thông tin cá nhân của bạn luôn được cập nhật.
Kết luận:
Việc tạo tài khoản iCloud đơn giản hơn bạn tưởng! Hãy làm theo các bước hướng dẫn trên để tận hưởng những tiện ích tuyệt vời mà iCloud mang lại. Chúc bạn thành công!
#iCloud #TạoTàiKhoản #Apple #HướngDẫn #CôngNghệ #iPhone #iPad #Mac #LưuTrữDữLiệu #ĐồngBộThiếtBị #AppleID
Giới thiệu How to create an iCloud account
: How to create an iCloud account
Hãy viết lại bài viết dài kèm hashtag về việc đánh giá sản phẩm và mua ngay tại Queen Mobile bằng tiếng VIệt: How to create an iCloud account
Mua ngay sản phẩm tại Việt Nam:
QUEEN MOBILE chuyên cung cấp điện thoại Iphone, máy tính bảng Ipad, đồng hồ Smartwatch và các phụ kiện APPLE và các giải pháp điện tử và nhà thông minh. Queen Mobile rất hân hạnh được phục vụ quý khách….
_____________________________________________________
Mua #Điện_thoại #iphone #ipad #macbook #samsung #xiaomi #poco #oppo #snapdragon giá tốt, hãy ghé [𝑸𝑼𝑬𝑬𝑵 𝑴𝑶𝑩𝑰𝑳𝑬]
✿ 149 Hòa Bình, phường Hiệp Tân, quận Tân Phú, TP HCM
✿ 402B, Hai Bà Trưng, P Tân Định, Q 1, HCM
✿ 287 đường 3/2 P 10, Q 10, HCM
Hotline (miễn phí) 19003190
Thu cũ đổi mới
Rẻ hơn hoàn tiền
Góp 0%
Thời gian làm việc: 9h – 21h.
KẾT LUẬN
Hãy viết đoạn tóm tắt về nội dung bằng tiếng việt kích thích người mua: How to create an iCloud account
While we’re Android devotees here at AP, we still acknowledge great products and services in Apple’s catalog (consider our guide on how to download movies and shows from Apple TV+). iCloud is an example of how Apple got it right. The iCloud cloud storage service is user-friendly and easy to use. It also includes many features and extras. It even comes with 5GB of data free of charge, with the option to upgrade to their paid alternative, iCloud+, for additional storage.
We put together a comprehensive guide to get you started. You’ll create an iCloud account on some of the most popular Apple devices and PCs. This is handy if you use one of the best Chromebooks, which don’t have large amounts of onboard storage.
What is iCloud?
Apple’s iCloud service is the cloud storage and computing tool attached to iOS. It allows you to store data securely in the cloud. That data can include photos, videos, documents, contacts, and more. iCloud also allows you to merge data across all Apple devices seamlessly. This means you can access your files, photos, and other information from anywhere as long as you have a connection to the internet. It also helps you share files with others, collaborate on documents, and locate lost or stolen devices using the Find My iPhone tool.
If you have an Apple device or are thinking about purchasing one, you’ll want to be familiar with this tool. You can choose to turn off iCloud services if you decide you don’t need it.

Source: Apple
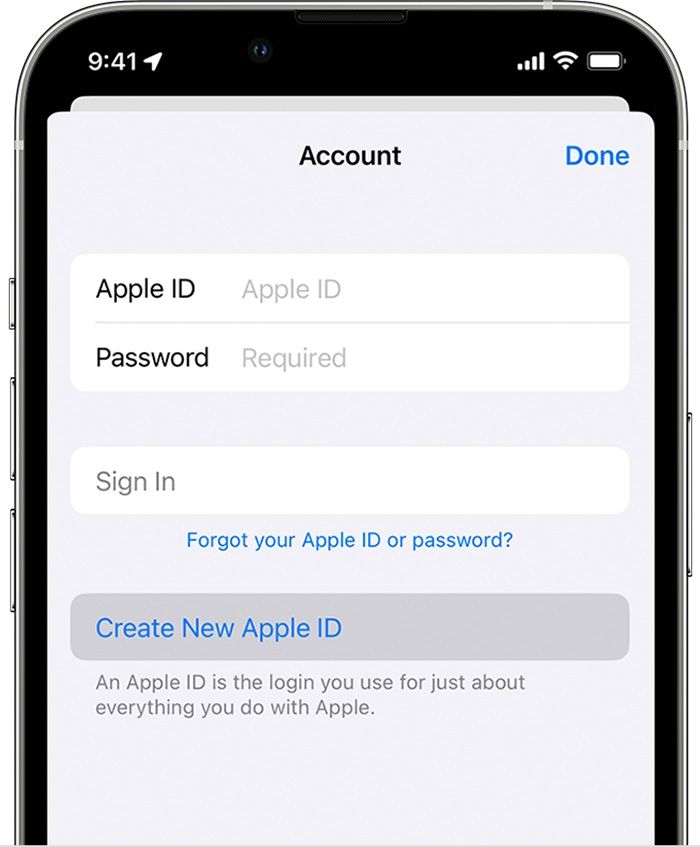
How to make an iCloud account on an iPhone, iPad, or iPod
Creating a new iCloud account is the same as creating an Apple ID, as the two are tied together. You may have an existing Apple ID account. If so, sign in with that Apple ID in your settings app or on the iCloud website. You can also sign out of an existing account to use a different email address. Follow these steps to create a new Apple ID on your iPhone or iPad.
- Open the App Store app from your homescreen.
- Tap the sign-in button.
- Tap Create New Apple ID.
- Follow the on-screen instructions to set your password, date of birth, region, phone number, payment method, and iCloud email address.
- Verify your email address using the confirmation email sent to your inbox.
After you complete the email authentication, your Apple ID is created. You can use that iCloud email account to sign in and use iCloud storage features. If you have an existing Apple ID, key features of iCloud, like iCloud Photos and iCloud Drive, are set up automatically and available when you sign in.
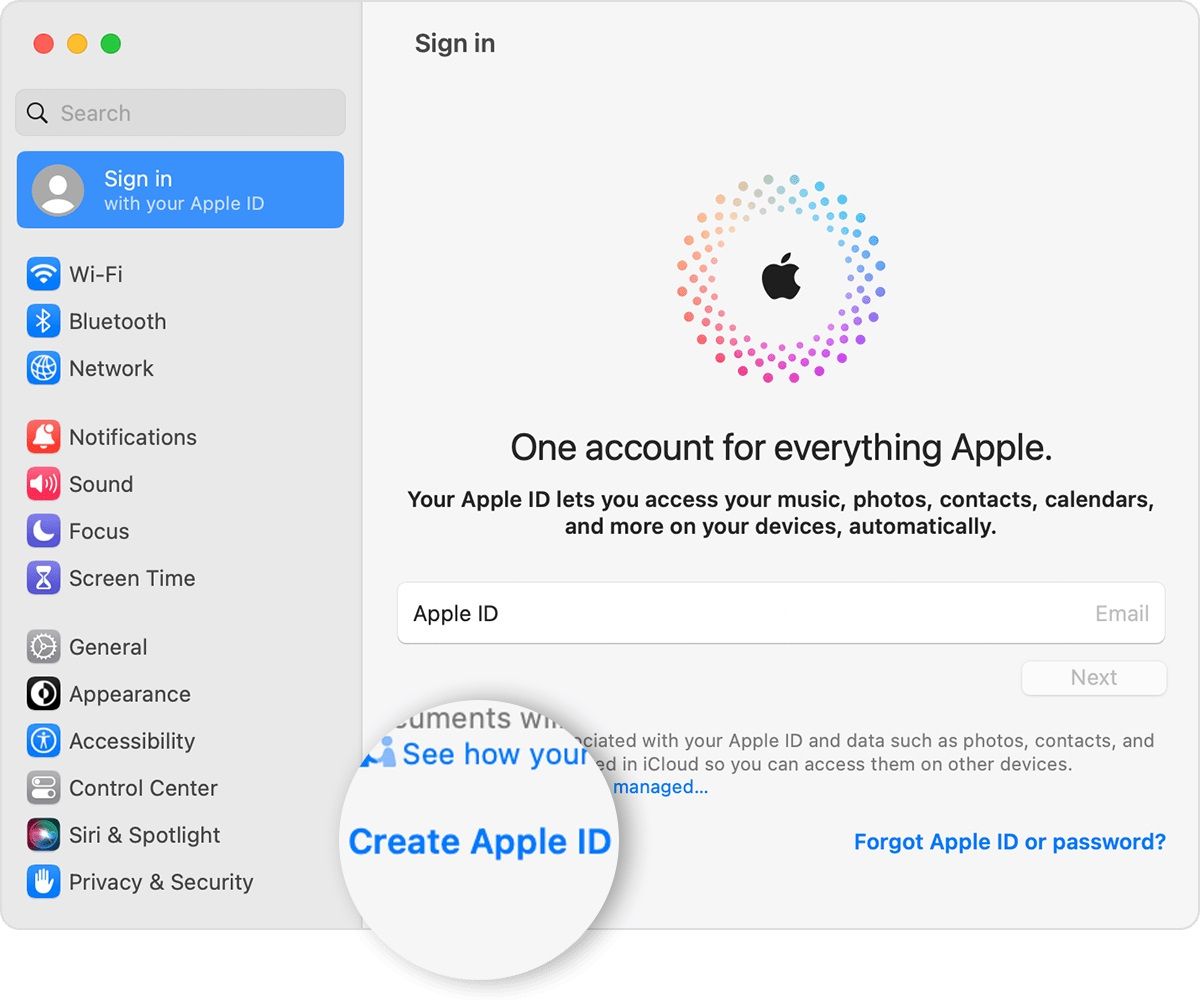
How to make an iCloud account on a Mac
Creating an Apple ID and iCloud account on macOS is also possible. Using your computer is a good idea if you want a holistic look at your iCloud account and preferences. Here’s how to create an iCloud account on your Mac.
- Navigate to Apple menu > System Settings (or System Preferences in older versions).
- Click Sign in, located at the top of the left sidebar.
- Click Create Apple ID.
- Follow the on-screen instructions to set your password, date of birth, region, phone number, payment method, and iCloud email address.
- Verify your email address using the confirmation email sent to your inbox.
Your Apple ID is ready for use. You can use this Apple ID to access iCloud services across all your iOS devices.
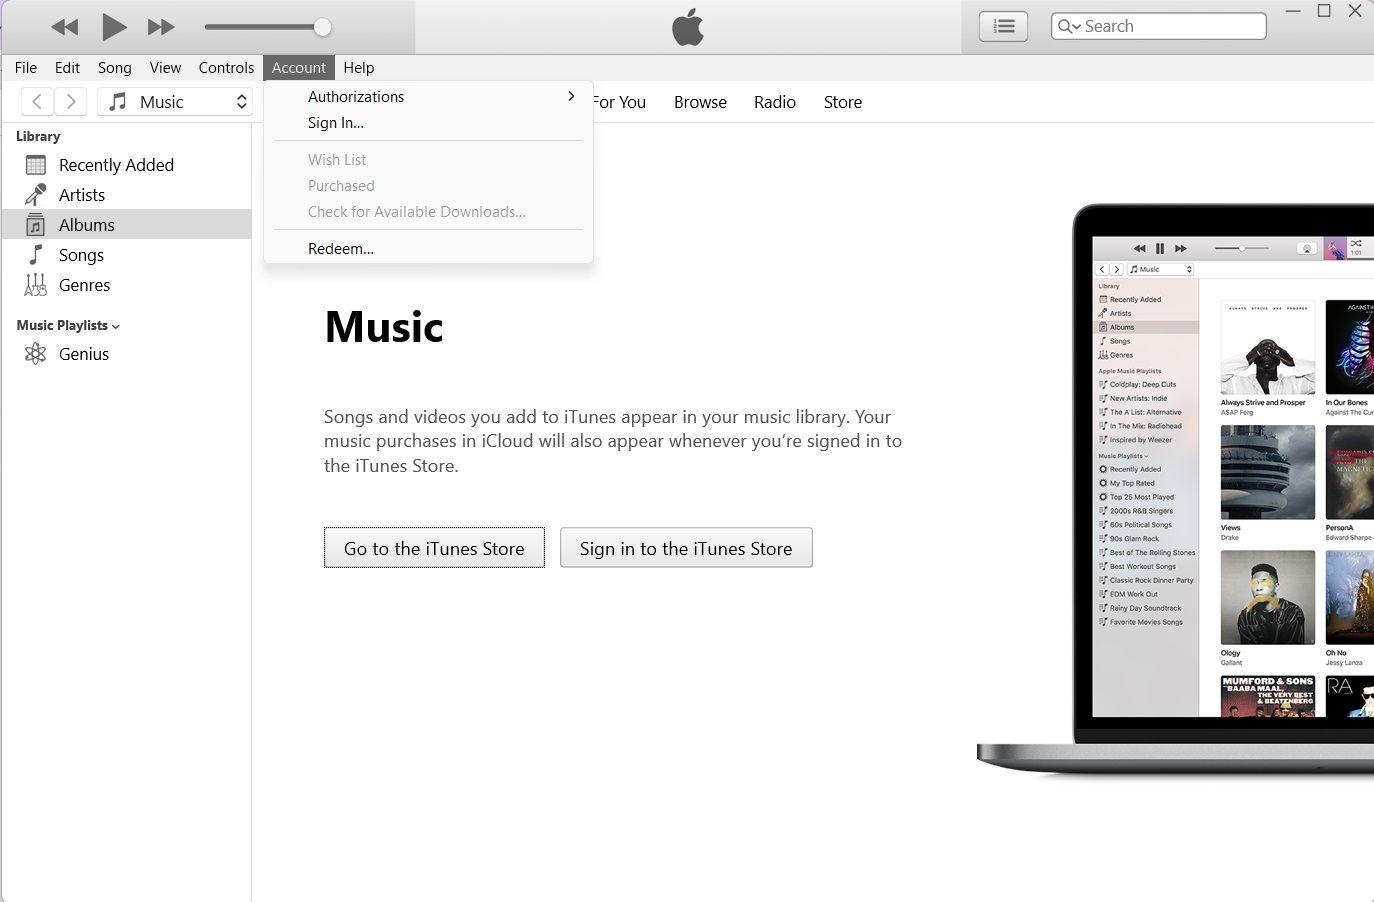
How to make an iCloud account on a PC
If you have devices from various manufacturers, you can create an iCloud account on your Windows PC. Make sure you have the latest version of the iTunes store for Windows downloaded on your computer.
- Navigate to Account > Sign in at the top of the iTunes pop-up window.
- Click Create New Apple ID.
- Follow the on-screen instructions to set your password, date of birth, region, phone number, payment method, and iCloud email address.
- Verify your email address using the confirmation email sent to your inbox.
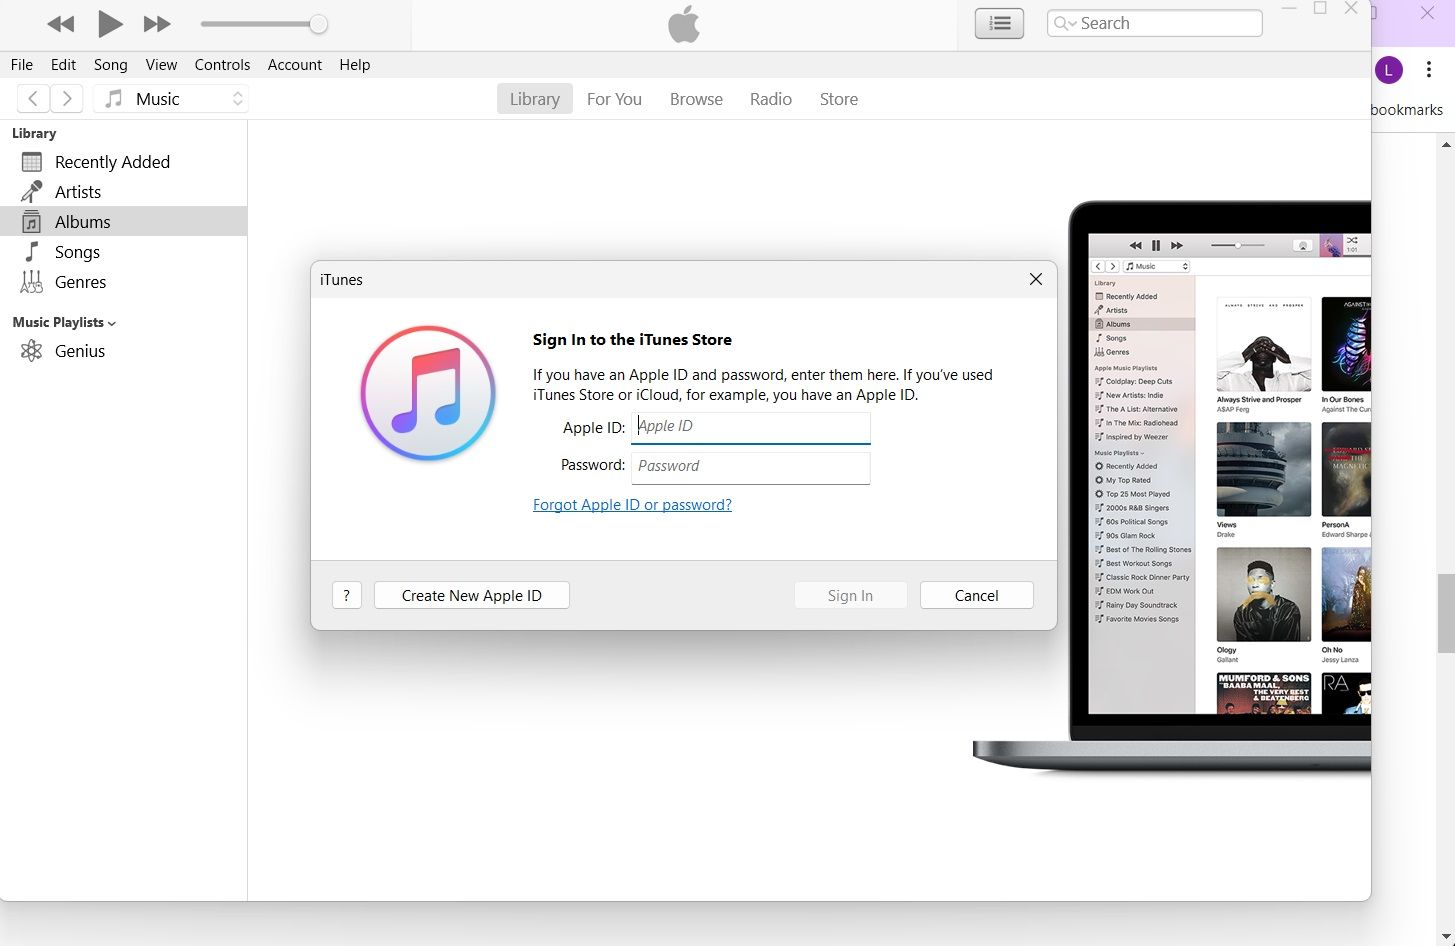
Your new Apple ID will be ready after you confirm your email address. You can use this Apple ID to sign in to iTunes and your iCloud account at iCloud.com using any device.
Protect your data with Apple’s iCloud service
Getting started with iCloud is a breeze. In most cases, it’s as simple as creating an Apple ID. If you own an Apple device or are part of the Apple ecosystem, you may have an Apple ID and access to iCloud. Even the free storage tier available by default, 5GB, is generous if you primarily store photos and get a free email account.
Android users aren’t left out. If you have an Android device and want to take advantage of Apple’s cloud storage, check out our guide on how to access iCloud from your Android phone or tablet.

Khám phá thêm từ Phụ Kiện Đỉnh
Đăng ký để nhận các bài đăng mới nhất được gửi đến email của bạn.

