

Review sản phẩm
Cách Thiết Lập Tự Động Hóa Ngôi Nhà Thông Minh: Hướng Dẫn Chi Tiết Từ A Đến Z

Th4
Cách Thiết Lập Tự Động Hóa Ngôi Nhà Thông Minh: Hướng Dẫn Chi Tiết Từ A Đến Z
Trong thời đại công nghệ phát triển, việc biến ngôi nhà của bạn thành một “ngôi nhà thông minh” không còn là điều xa vời. Với các thiết bị và ứng dụng hiện đại, bạn có thể dễ dàng thiết lập các quy trình tự động hóa để tối ưu hóa cuộc sống hàng ngày. Bài viết này sẽ hướng dẫn bạn từng bước để thiết lập hệ thống tự động hóa ngôi nhà thông minh một cách chuyên nghiệp và hiệu quả.
### 1. Lựa Chọn Hệ Sinh Thái Thông Minh
Đầu tiên, bạn cần quyết định hệ sinh thái thông minh mà bạn muốn sử dụng. Các lựa chọn phổ biến bao gồm:
– Apple HomeKit: Phù hợp với người dùng iPhone, iPad và các thiết bị Apple.
– Google Home: Tương thích với Android và các thiết bị Google Nest.
– Amazon Alexa: Lý tưởng cho người dùng Echo và các thiết bị hỗ trợ Alexa.
### 2. Đầu Tư Các Thiết Bị Thông Minh Cơ Bản
Để bắt đầu, bạn cần trang bị các thiết bị thông minh cơ bản như:
– Bóng đèn thông minh: Điều khiển ánh sáng từ xa hoặc theo lịch trình.
– Công tắc thông minh: Tự động bật/tắt các thiết bị điện.
– Cảm biến chuyển động: Kích hoạt các hành động khi phát hiện chuyển động.
– Trung tâm điều khiển: Kết nối và quản lý tất cả thiết bị trong một ứng dụng duy nhất.
### 3. Thiết Lập Các Kịch Bản Tự Động
Sau khi kết nối các thiết bị, bạn có thể tạo các kịch bản tự động (automation) để chúng hoạt động theo ý muốn. Ví dụ:
– Kịch bản “Chào buổi sáng”: Tự động bật đèn, pha cà phê và phát nhạc khi bạn thức dậy.
– Kịch bản “An toàn”: Tự động khóa cửa, tắt đèn và bật camera an ninh khi bạn rời khỏi nhà.
– Kịch bản “Thư giãn”: Điều chỉnh ánh sáng, nhiệt độ và phát nhạc nhẹ khi bạn về nhà sau một ngày dài.
### 4. Tối Ưu Hóa Với Các Ứng Dụng Điều Khiển
Sử dụng các ứng dụng điều khiển như Apple Home, Google Home hoặc Alexa để quản lý và tối ưu hóa hệ thống. Bạn có thể tạo các lệnh thoại, lịch trình và thậm chí tích hợp với các dịch vụ bên thứ ba như Spotify hoặc IFTTT.
### 5. Đảm Bảo An Toàn Và Bảo Mật
Khi thiết lập ngôi nhà thông minh, hãy chú ý đến vấn đề bảo mật:
– Sử dụng mật khẩu mạnh và bật xác thực hai yếu tố.
– Cập nhật firmware thường xuyên cho các thiết bị.
– Chỉ kết nối với mạng Wi-Fi an toàn và riêng tư.
### Mua Ngay Sản Phẩm Tại Queen Mobile
Nếu bạn đang tìm kiếm các thiết bị thông minh chất lượng cao để bắt đầu hành trình tự động hóa ngôi nhà, hãy ghé thăm Queen Mobile – địa chỉ uy tín chuyên cung cấp điện thoại iPhone, máy tính bảng iPad, đồng hồ Smartwatch và các phụ kiện Apple chính hãng tại Việt Nam. Với cam kết về chất lượng và dịch vụ, Queen Mobile sẽ giúp bạn xây dựng ngôi nhà thông minh một cách dễ dàng và hiệu quả.
#NhàThôngMinh #TựĐộngHóa #CôngNghệHiệnĐại #QueenMobile #Apple #SmartHome #TiệnÍchCuộcSống
Hãy bắt đầu ngay hôm nay để tận hưởng cuộc sống tiện nghi và hiện đại với ngôi nhà thông minh của bạn!
Giới thiệu How to set up smart home automations
: How to set up smart home automations
Hãy viết lại bài viết dài kèm hashtag về việc đánh giá sản phẩm và mua ngay tại Queen Mobile bằng tiếng VIệt: How to set up smart home automations
Mua ngay sản phẩm tại Việt Nam:
QUEEN MOBILE chuyên cung cấp điện thoại Iphone, máy tính bảng Ipad, đồng hồ Smartwatch và các phụ kiện APPLE và các giải pháp điện tử và nhà thông minh. Queen Mobile rất hân hạnh được phục vụ quý khách….
_____________________________________________________
Mua #Điện_thoại #iphone #ipad #macbook #samsung #xiaomi #poco #oppo #snapdragon giá tốt, hãy ghé [𝑸𝑼𝑬𝑬𝑵 𝑴𝑶𝑩𝑰𝑳𝑬]
✿ 149 Hòa Bình, phường Hiệp Tân, quận Tân Phú, TP HCM
✿ 402B, Hai Bà Trưng, P Tân Định, Q 1, HCM
✿ 287 đường 3/2 P 10, Q 10, HCM
Hotline (miễn phí) 19003190
Thu cũ đổi mới
Rẻ hơn hoàn tiền
Góp 0%
Thời gian làm việc: 9h – 21h.
KẾT LUẬN
Hãy viết đoạn tóm tắt về nội dung bằng tiếng việt kích thích người mua: How to set up smart home automations
We invest in smart home devices to make our lives easier. You can dim your smart lights or adjust the thermostat on your smartphone or compatible smart display. But what if these actions can start on their own or when something happens? That’s where Nest smart home automation comes in.
Nest automation runs a string of actions on a single command. You can trigger routines with your voice, at a scheduled time, or when a device does something. This guide walks you through how to set up Nest smart home automation and why it’s worth your time.
Getting started with Nest smart home automation
Setting up a smart home automation system can save time by running tasks for you. There’s an endless number of things to automate. The limiting factor is the number of compatible devices in your smart home setup.
For instance, you can save energy by scheduling your Google Nest Thermostat or Nest Learning Thermostat to turn down when no one is home. Another automation could set your light bulbs to a certain brightness and color temperature and start the amplifier when you turn on the TV with a voice command. These actions run on a single command, so you don’t have to control each device manually.
The Google Home app is where you manage and automate your Nest devices. Automation is the same as routines in the app. The setup isn’t much different from using Google Assistant routines. Google categorizes them into personal and household routines.
Personal routines
Personal routines apply only to you. Use them to automate your daily life, such as turning up the lights, reading your calendar events and tasks, and playing your favorite podcast when you say “Good morning.” Only you can manage these routines. Google Assistant hides your activities and personal results from other household members.
Household routines
Automations in this category are shared among your home members. Members can start or see when routines run, but only those with manager access can create or edit routines. Household routines never give personal results, like reading a member’s tasks or calendar events.
How to set up Nest automations for your smart home
Before starting, configure your Google Nest products in the Home app on your Android phone or Apple iPhone. Also, ensure you have a strong Wi-Fi network to keep connected devices in sync and make automation run smoothly. When everything is in sync, create your first routine or modify an existing one.
How to create a new personal or household routine
Creating custom routines is where Nest home automation shines. The steps below show how to turn on a smart light bulb with a voice command. The process is the same for adding other actions.
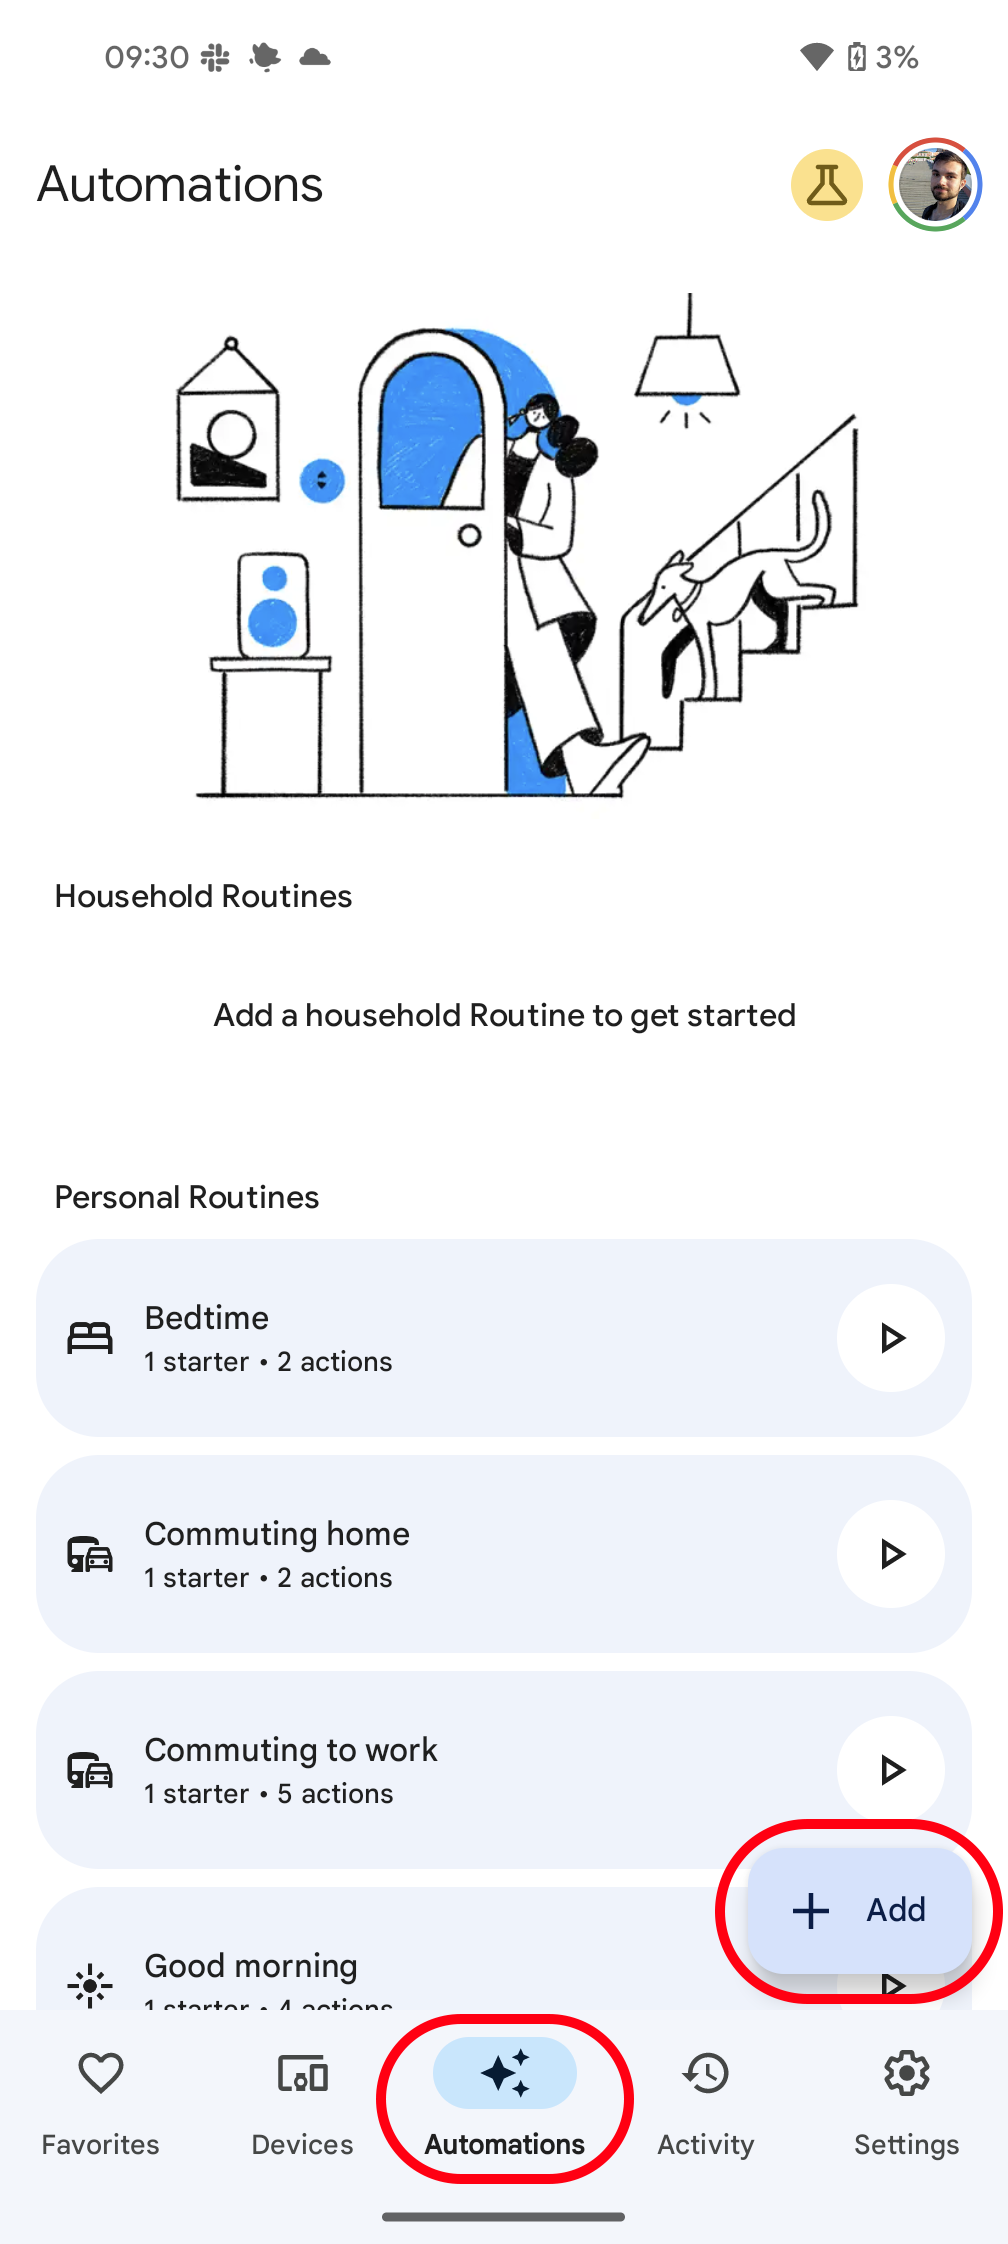
- Open the Google Home app.
- Tap Automations in the bottom navigation bar.
- Click Add in the lower-right corner.
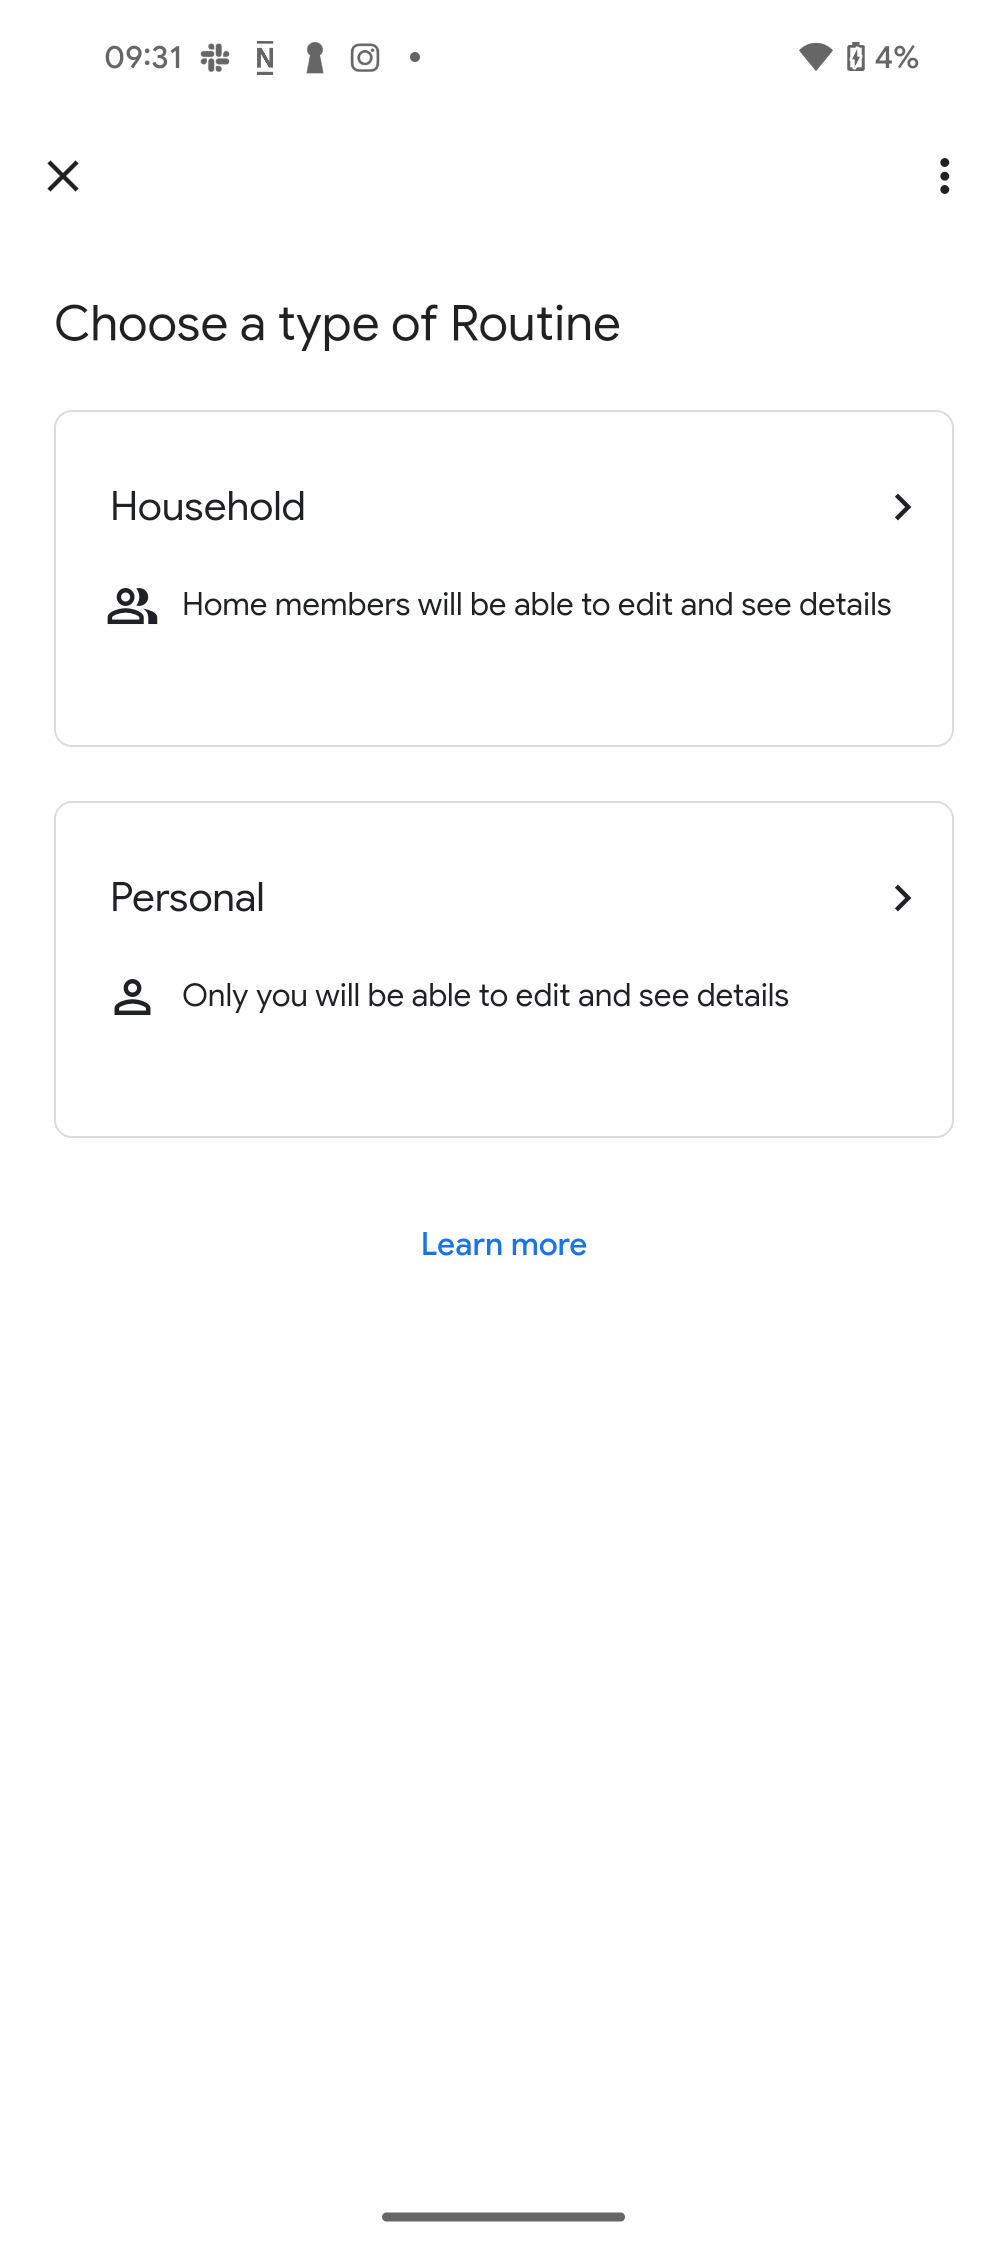
- On the Choose a type of Routine screen, select Household or Personal.
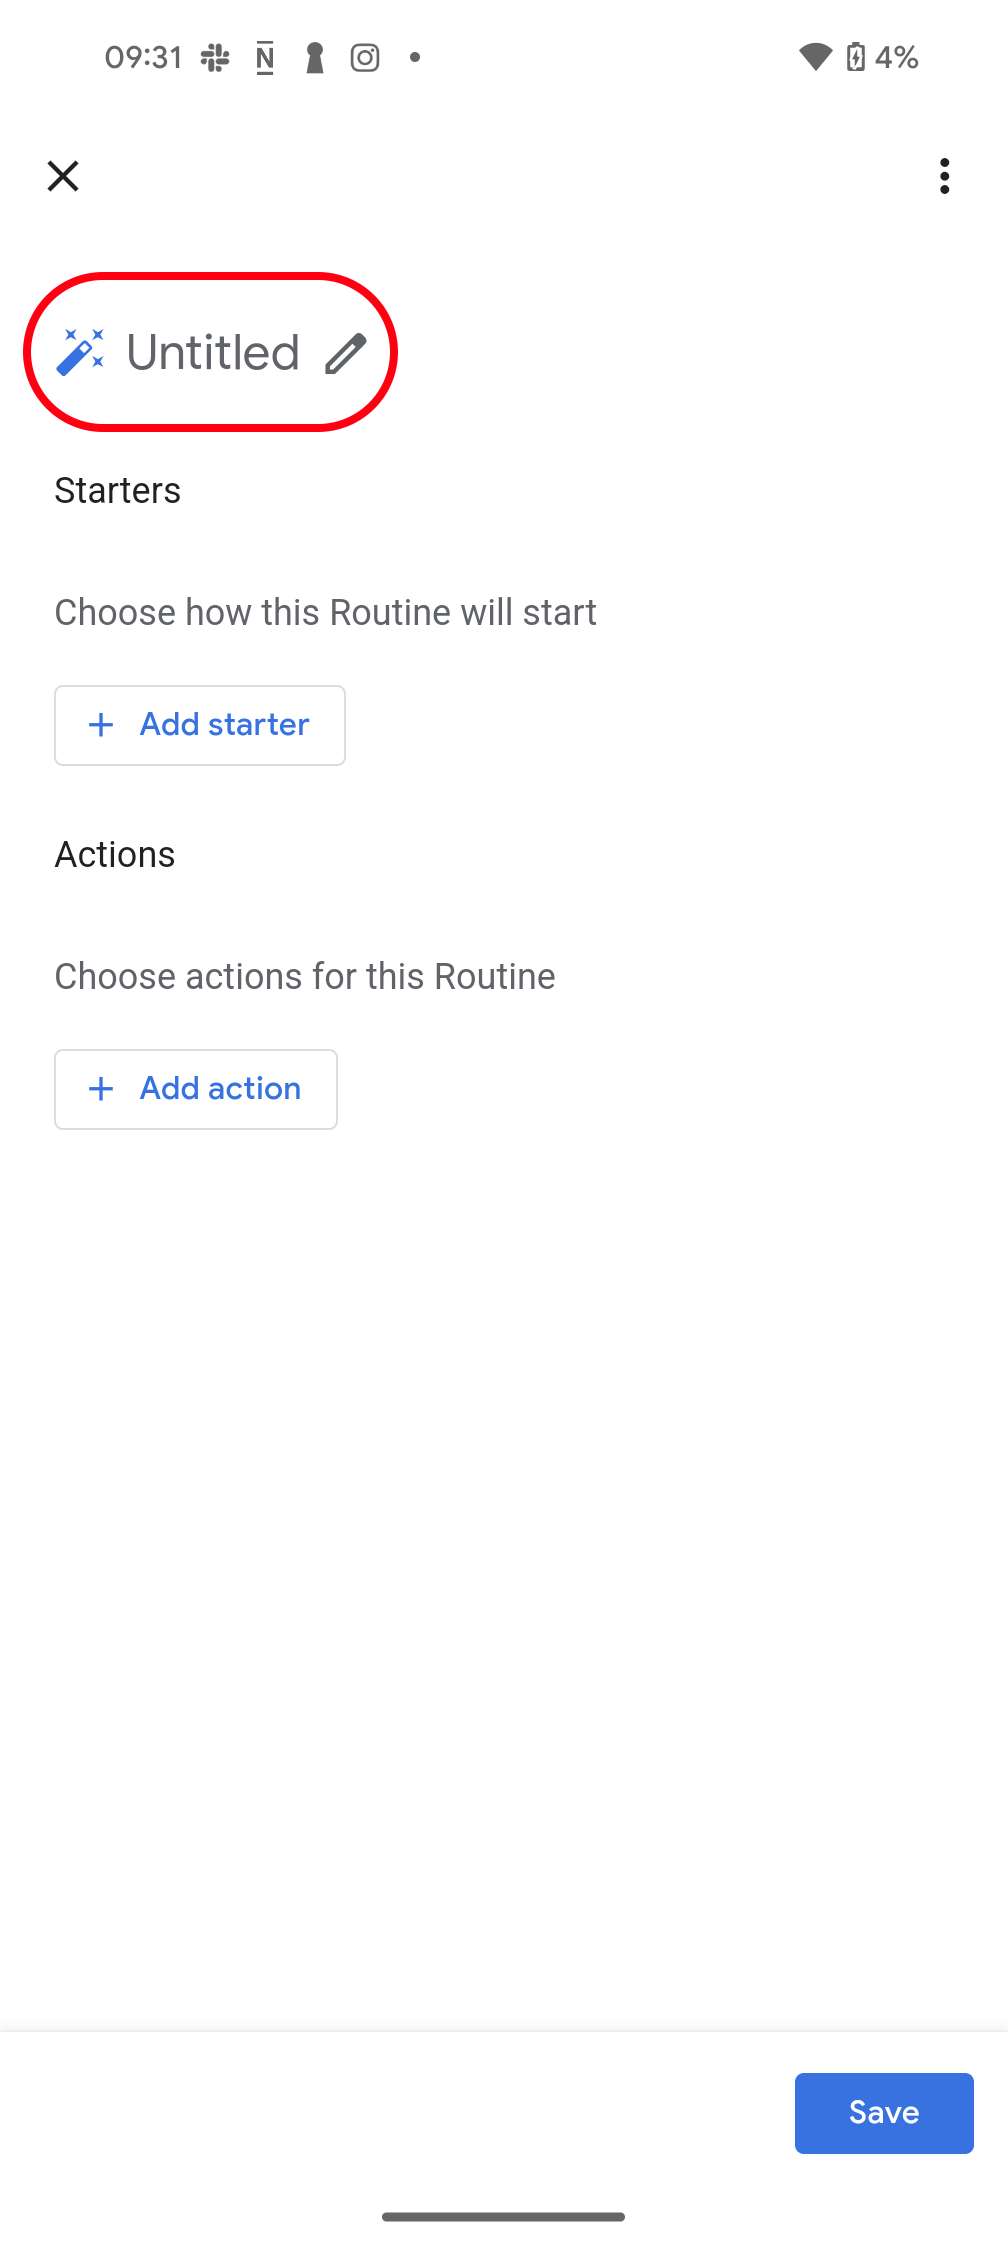
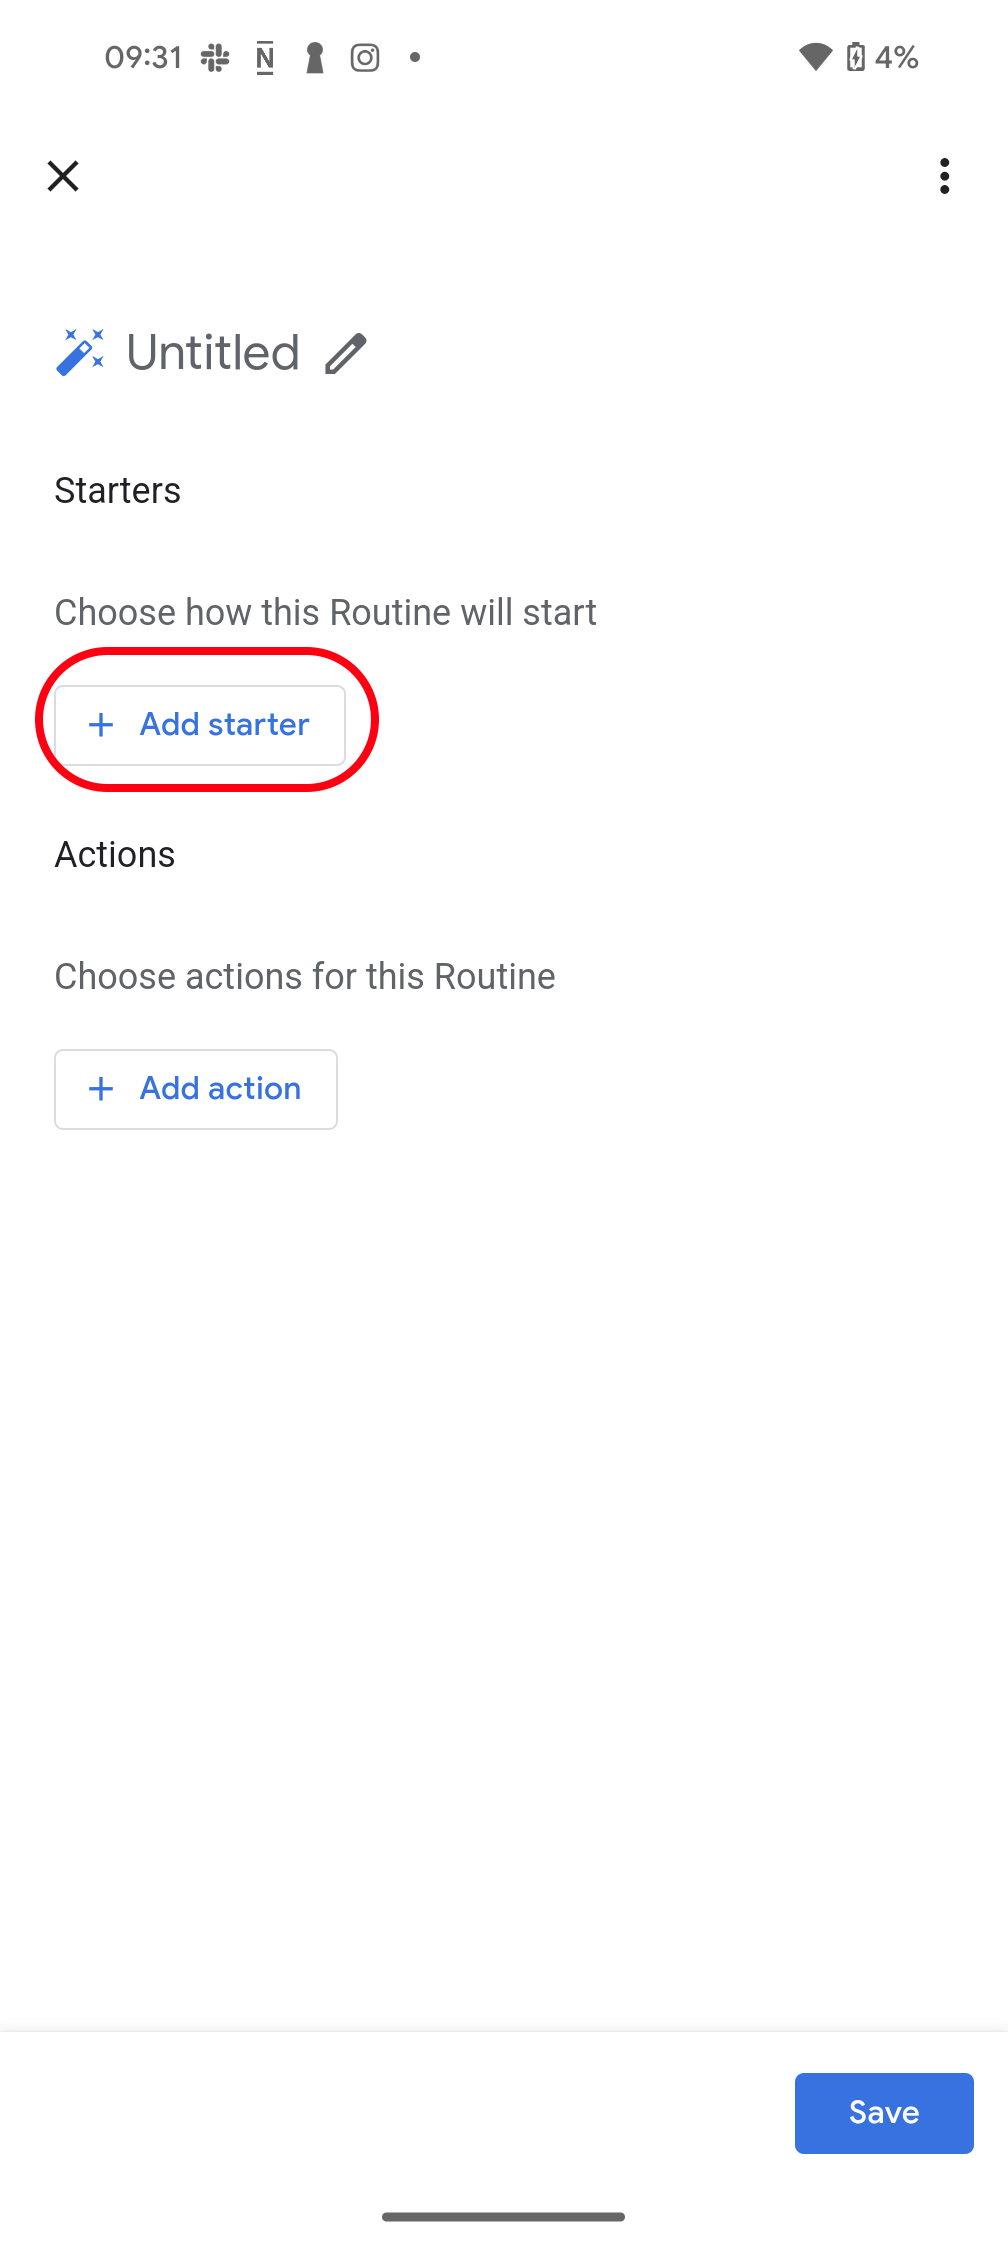
- Click Untitled at the top.
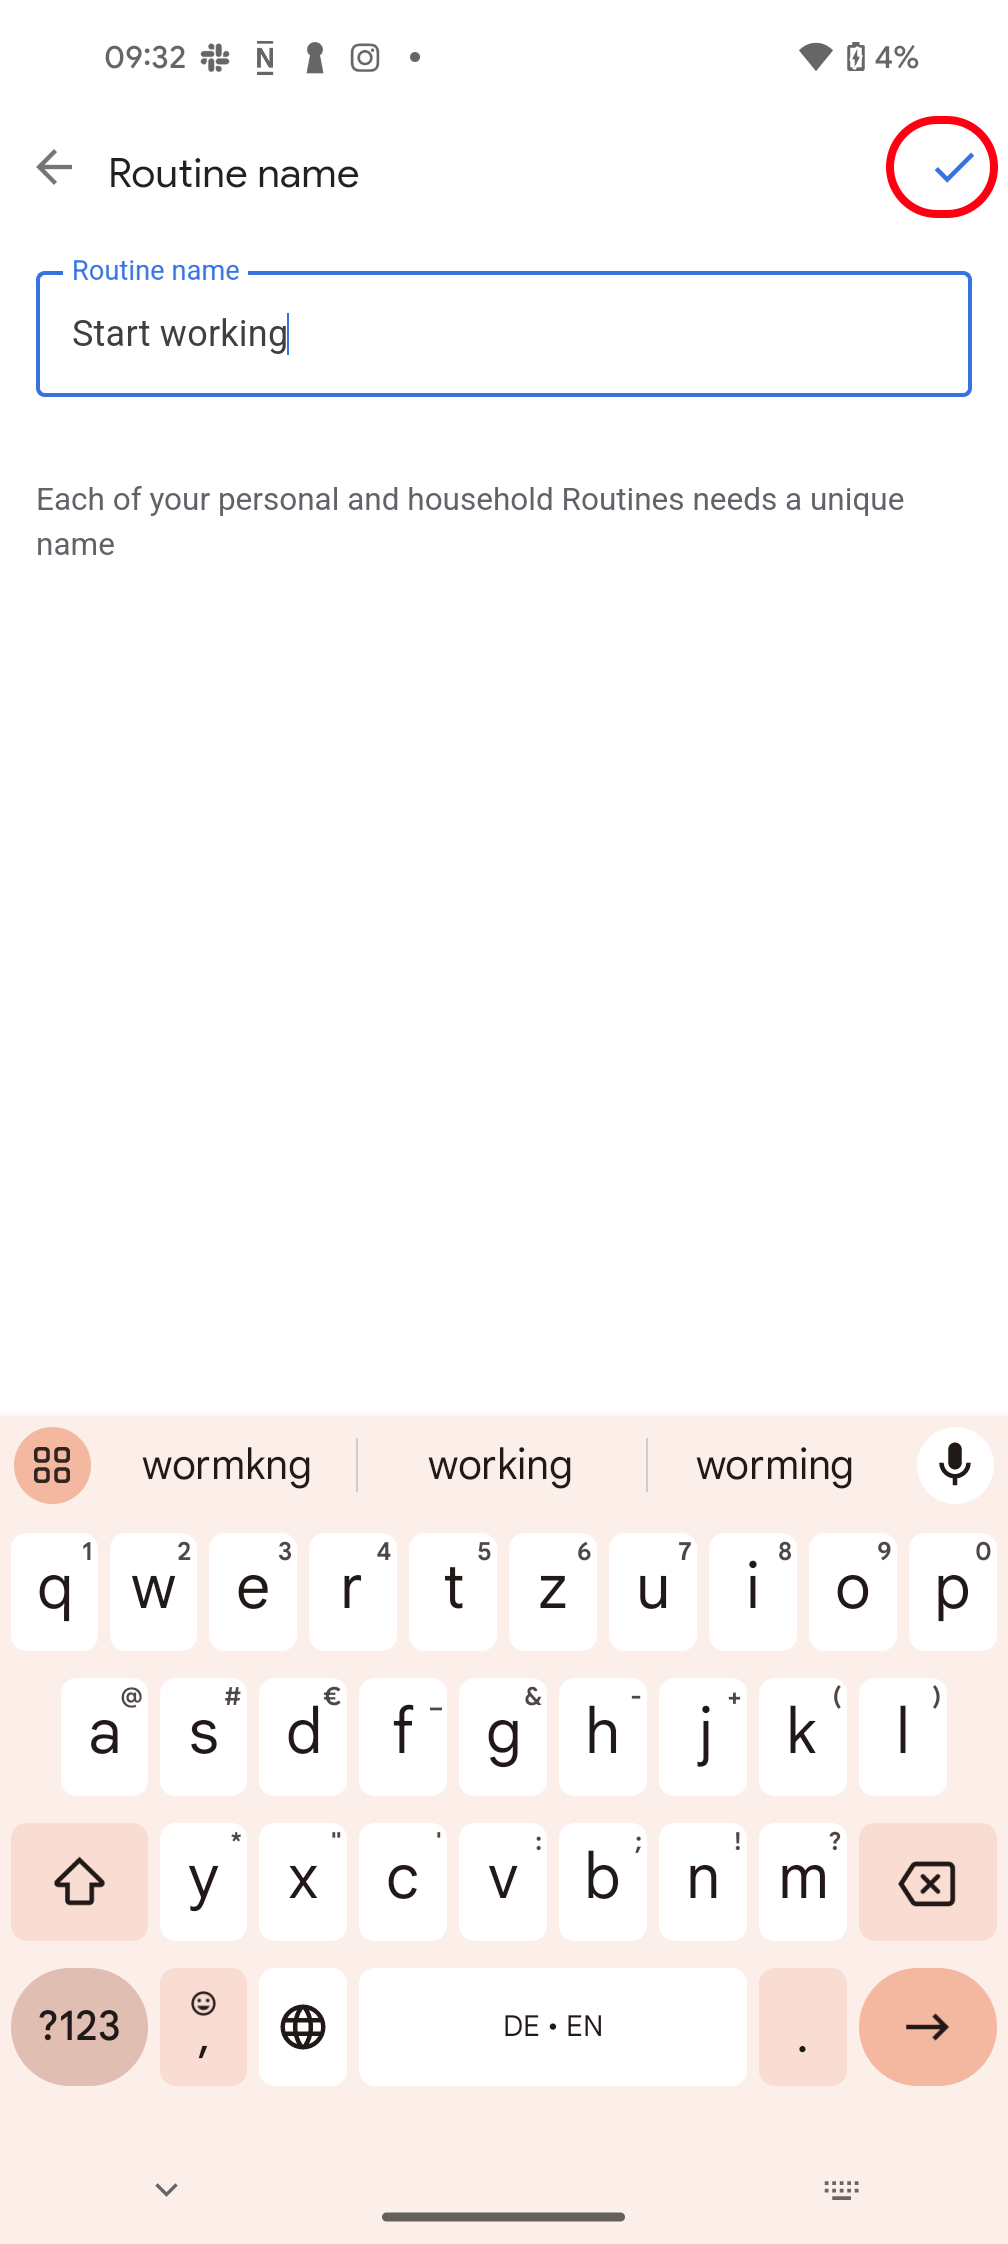
- Enter a unique name for the routine.
- Click the checkmark in the upper-right corner.
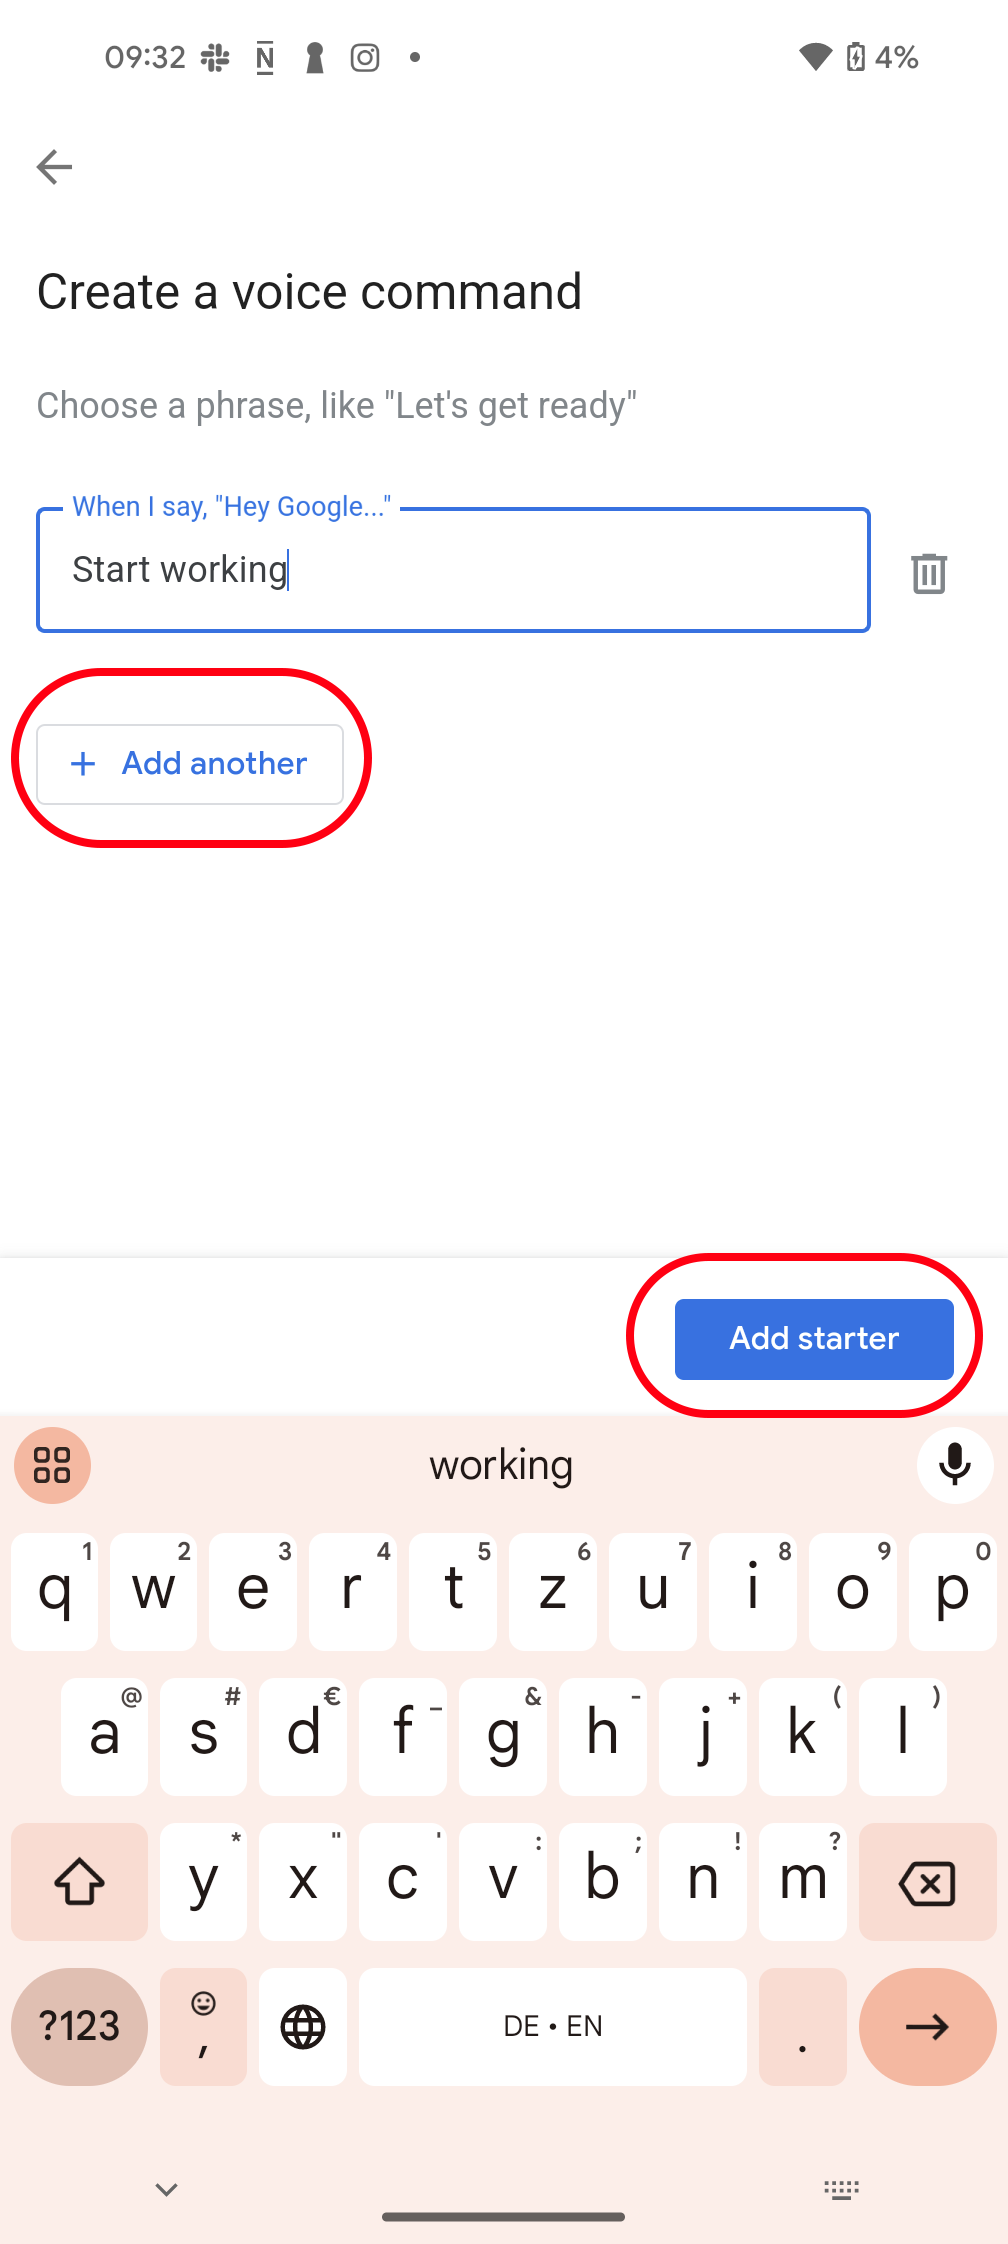
- Tap Add starter to set a trigger for the automation. This could be any option, depending on the automation type. For instance, if you want it to turn on your desk lamp when you say “Start working,” select When I say to Google Assistant as your starter.
- Type your preferred voice command.
- Tap Add another to add multiple commands.
- After you’re done, tap Add starter to continue.
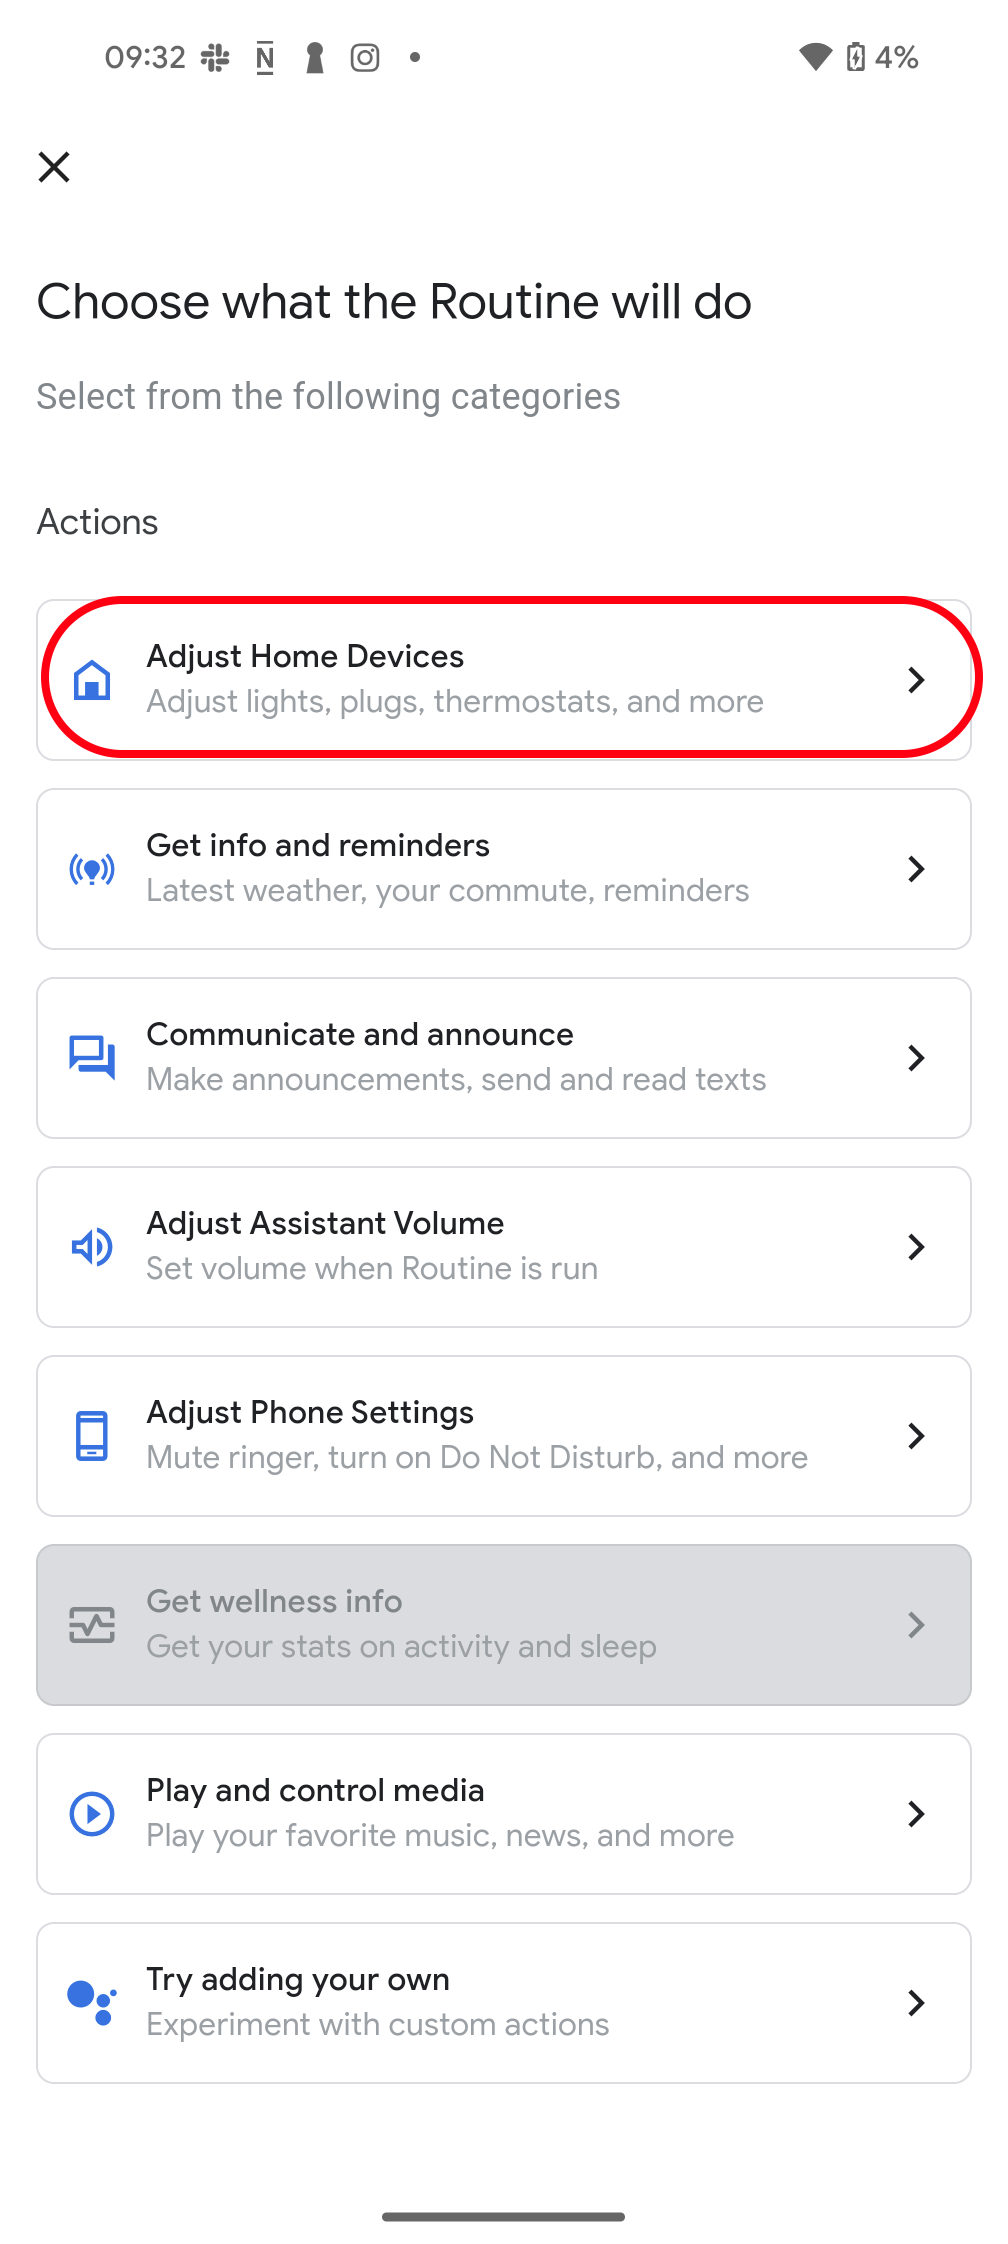
- The app takes you back to the starters and actions screen. Tap Add action to set what the automation does.
- Select Adjust Home Devices.
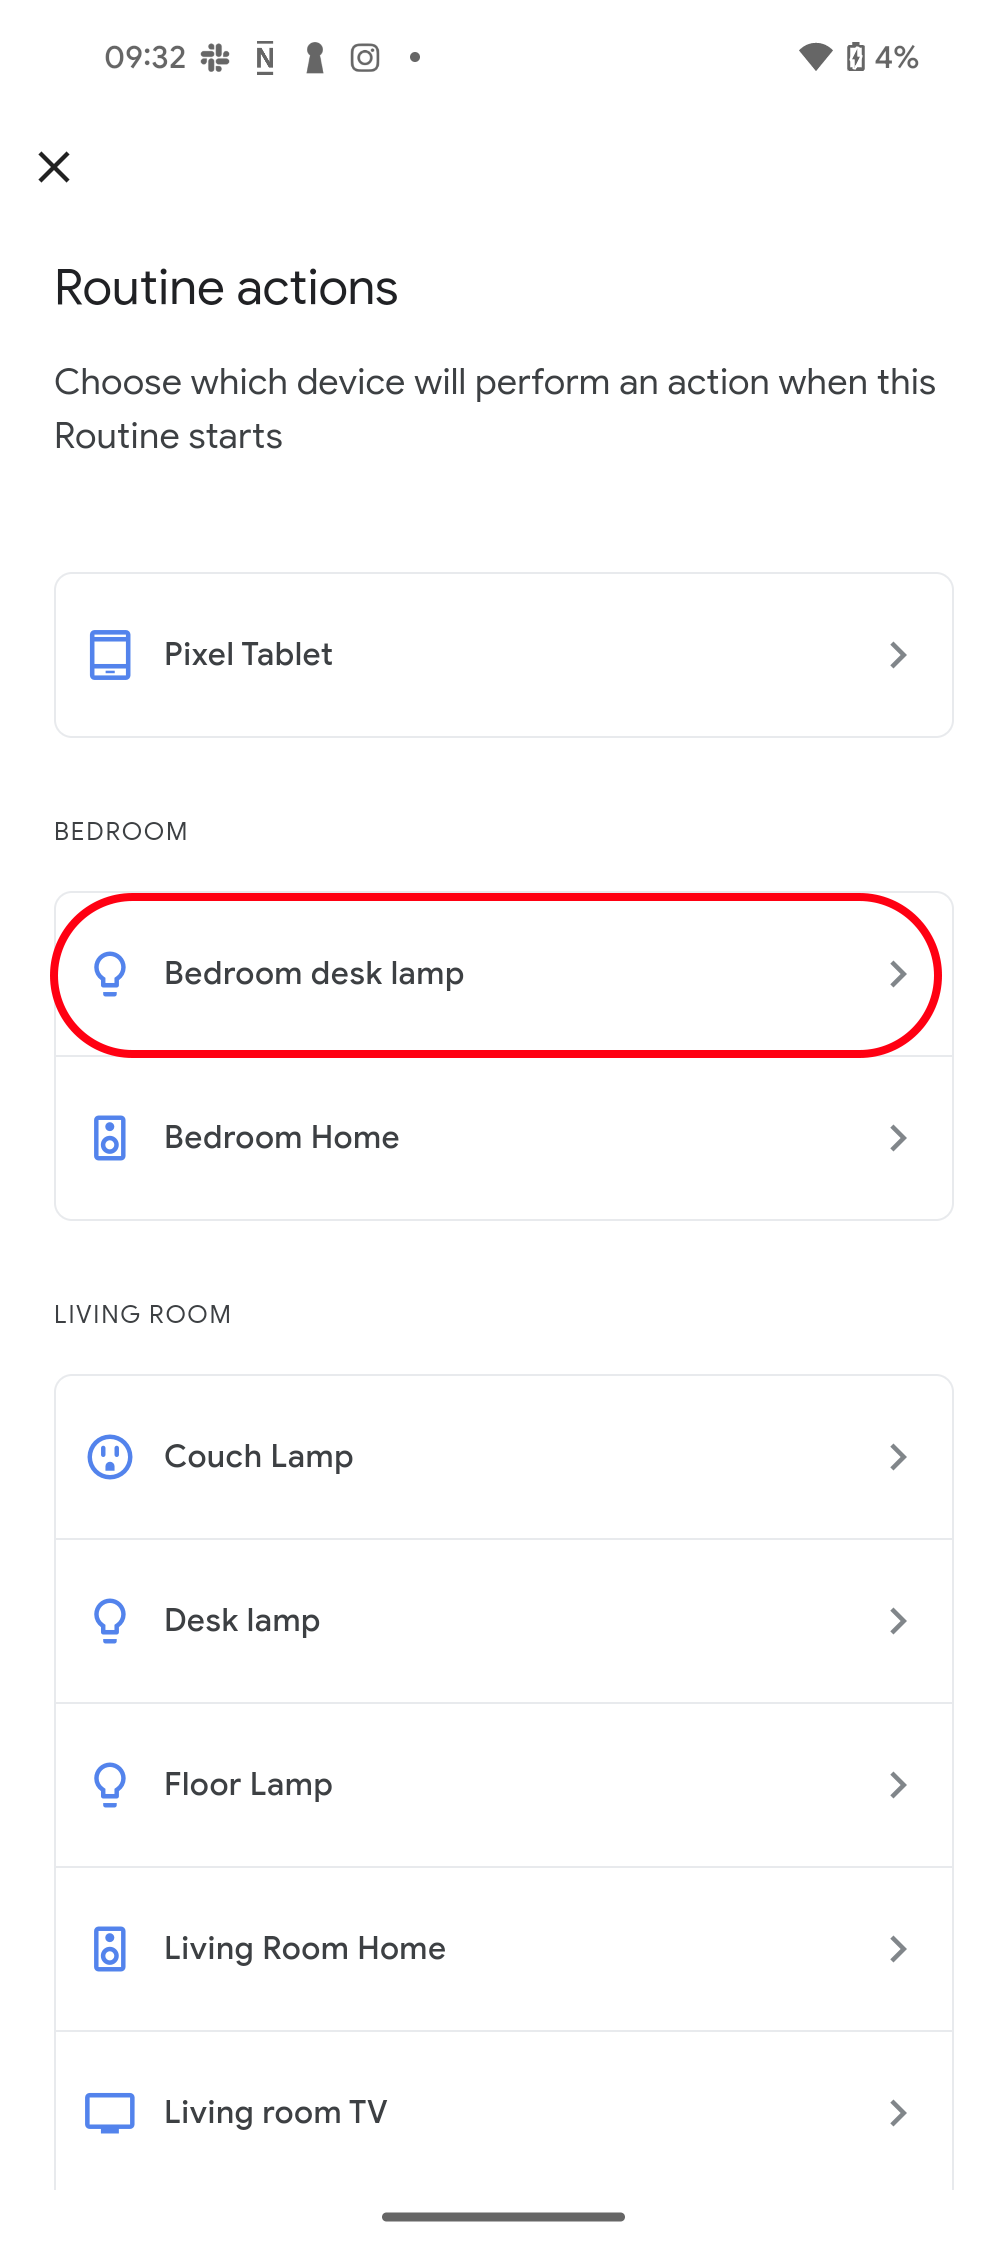
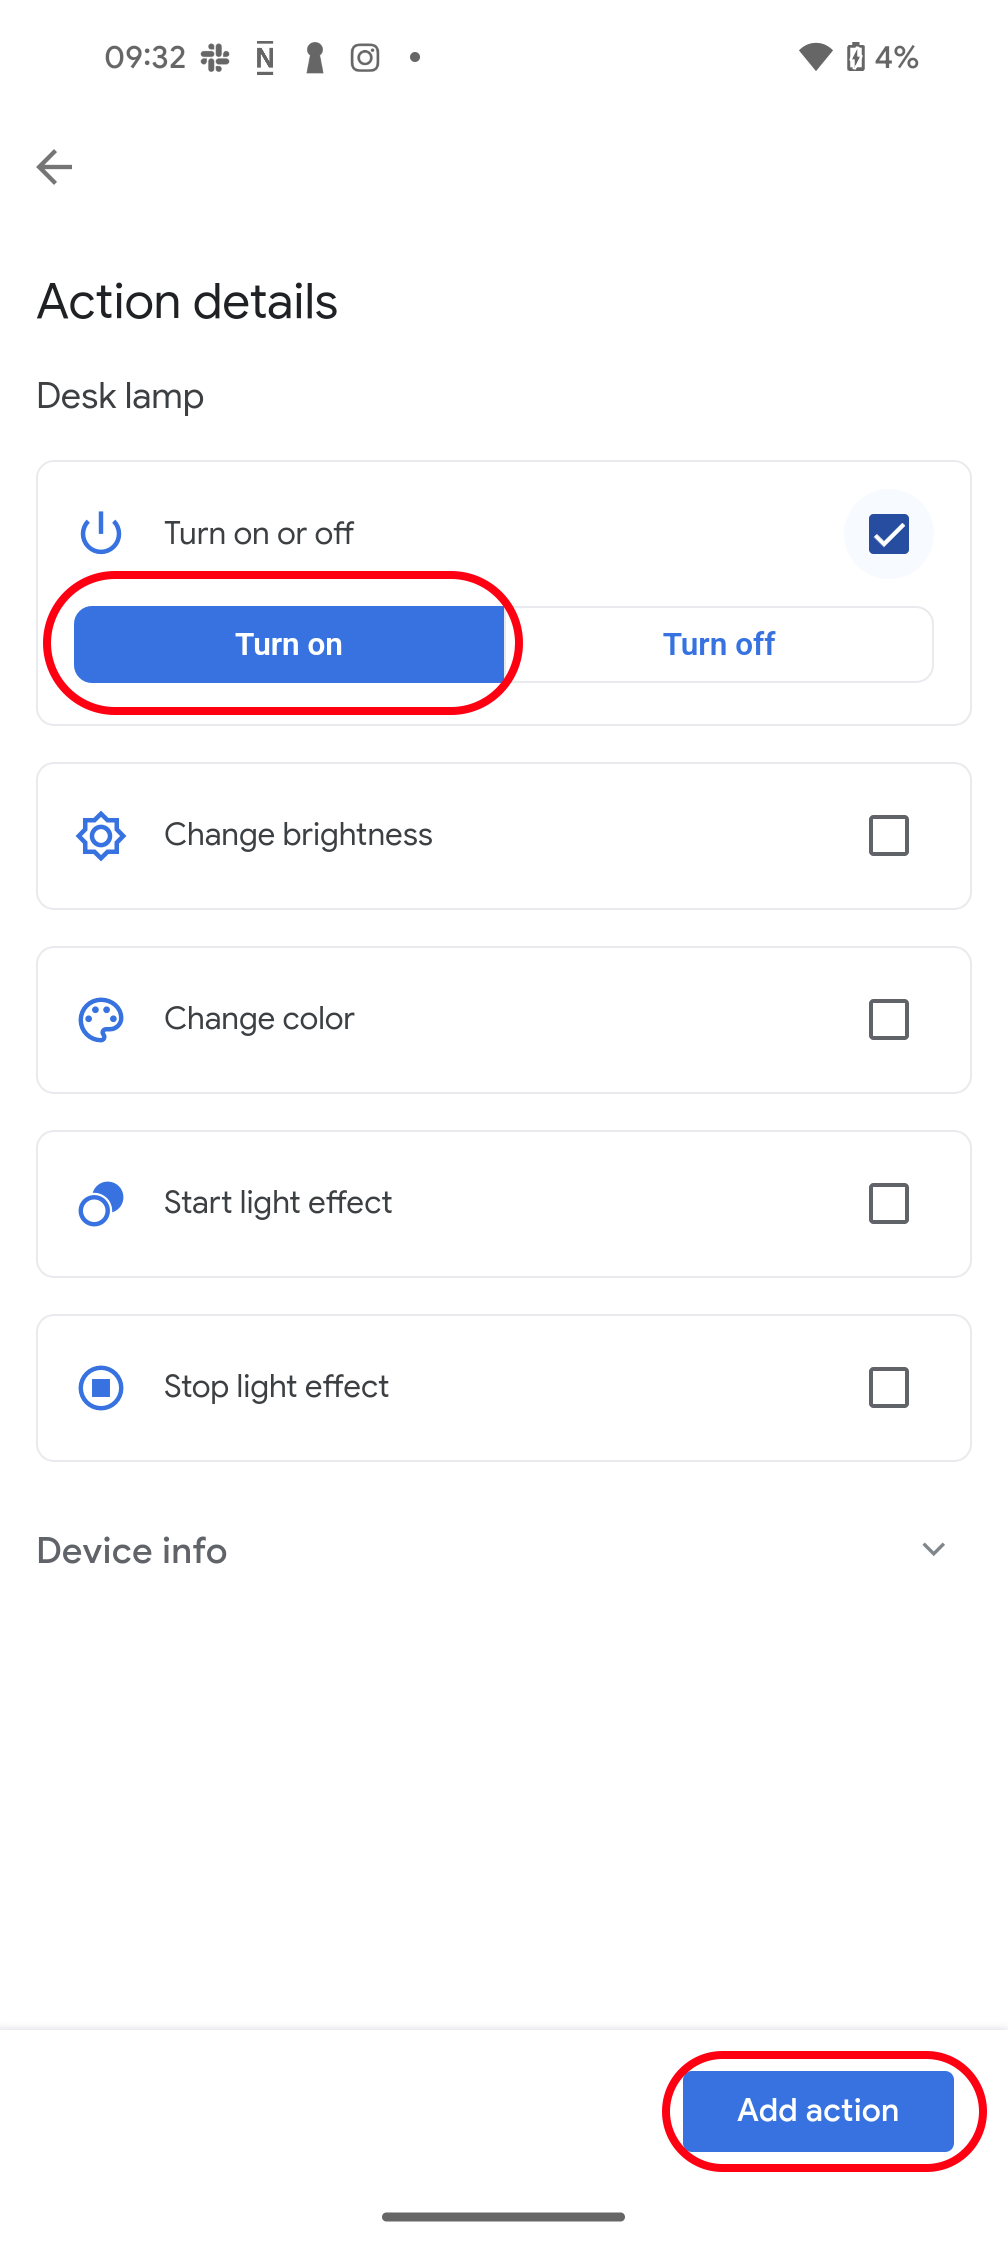
- Choose a device to act on when the routine starts. We chose the Desk lamp.
- Configure the actions to perform when the routine starts, then tap Add action in the lower-right corner. For instance, we set the desk lamp to turn on. You can add more actions, like changing its brightness or color.
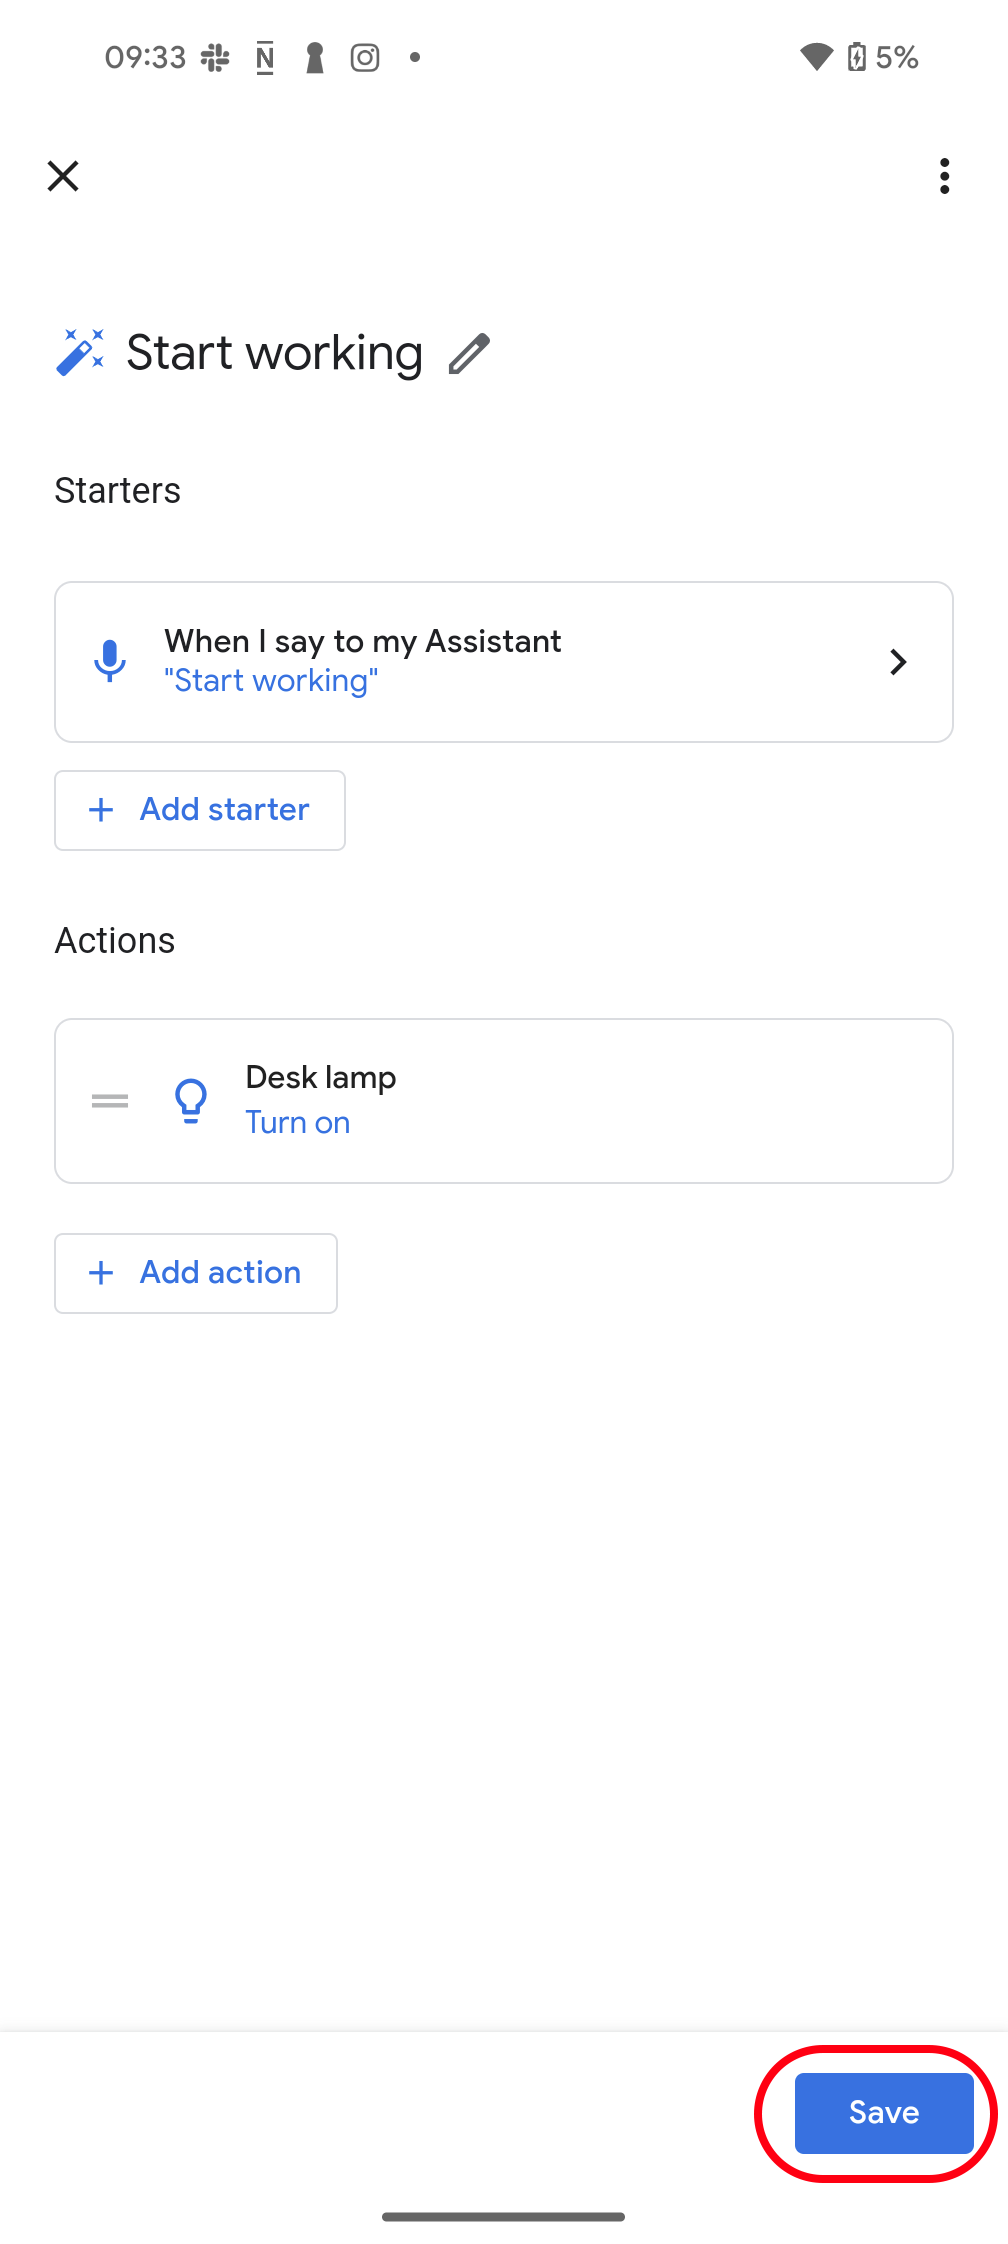
- On the starters and actions screen, tap Add action to add more tasks to the routine.
- When it’s all clicked, tap Save in the lower-right corner.
How to customize an existing routine
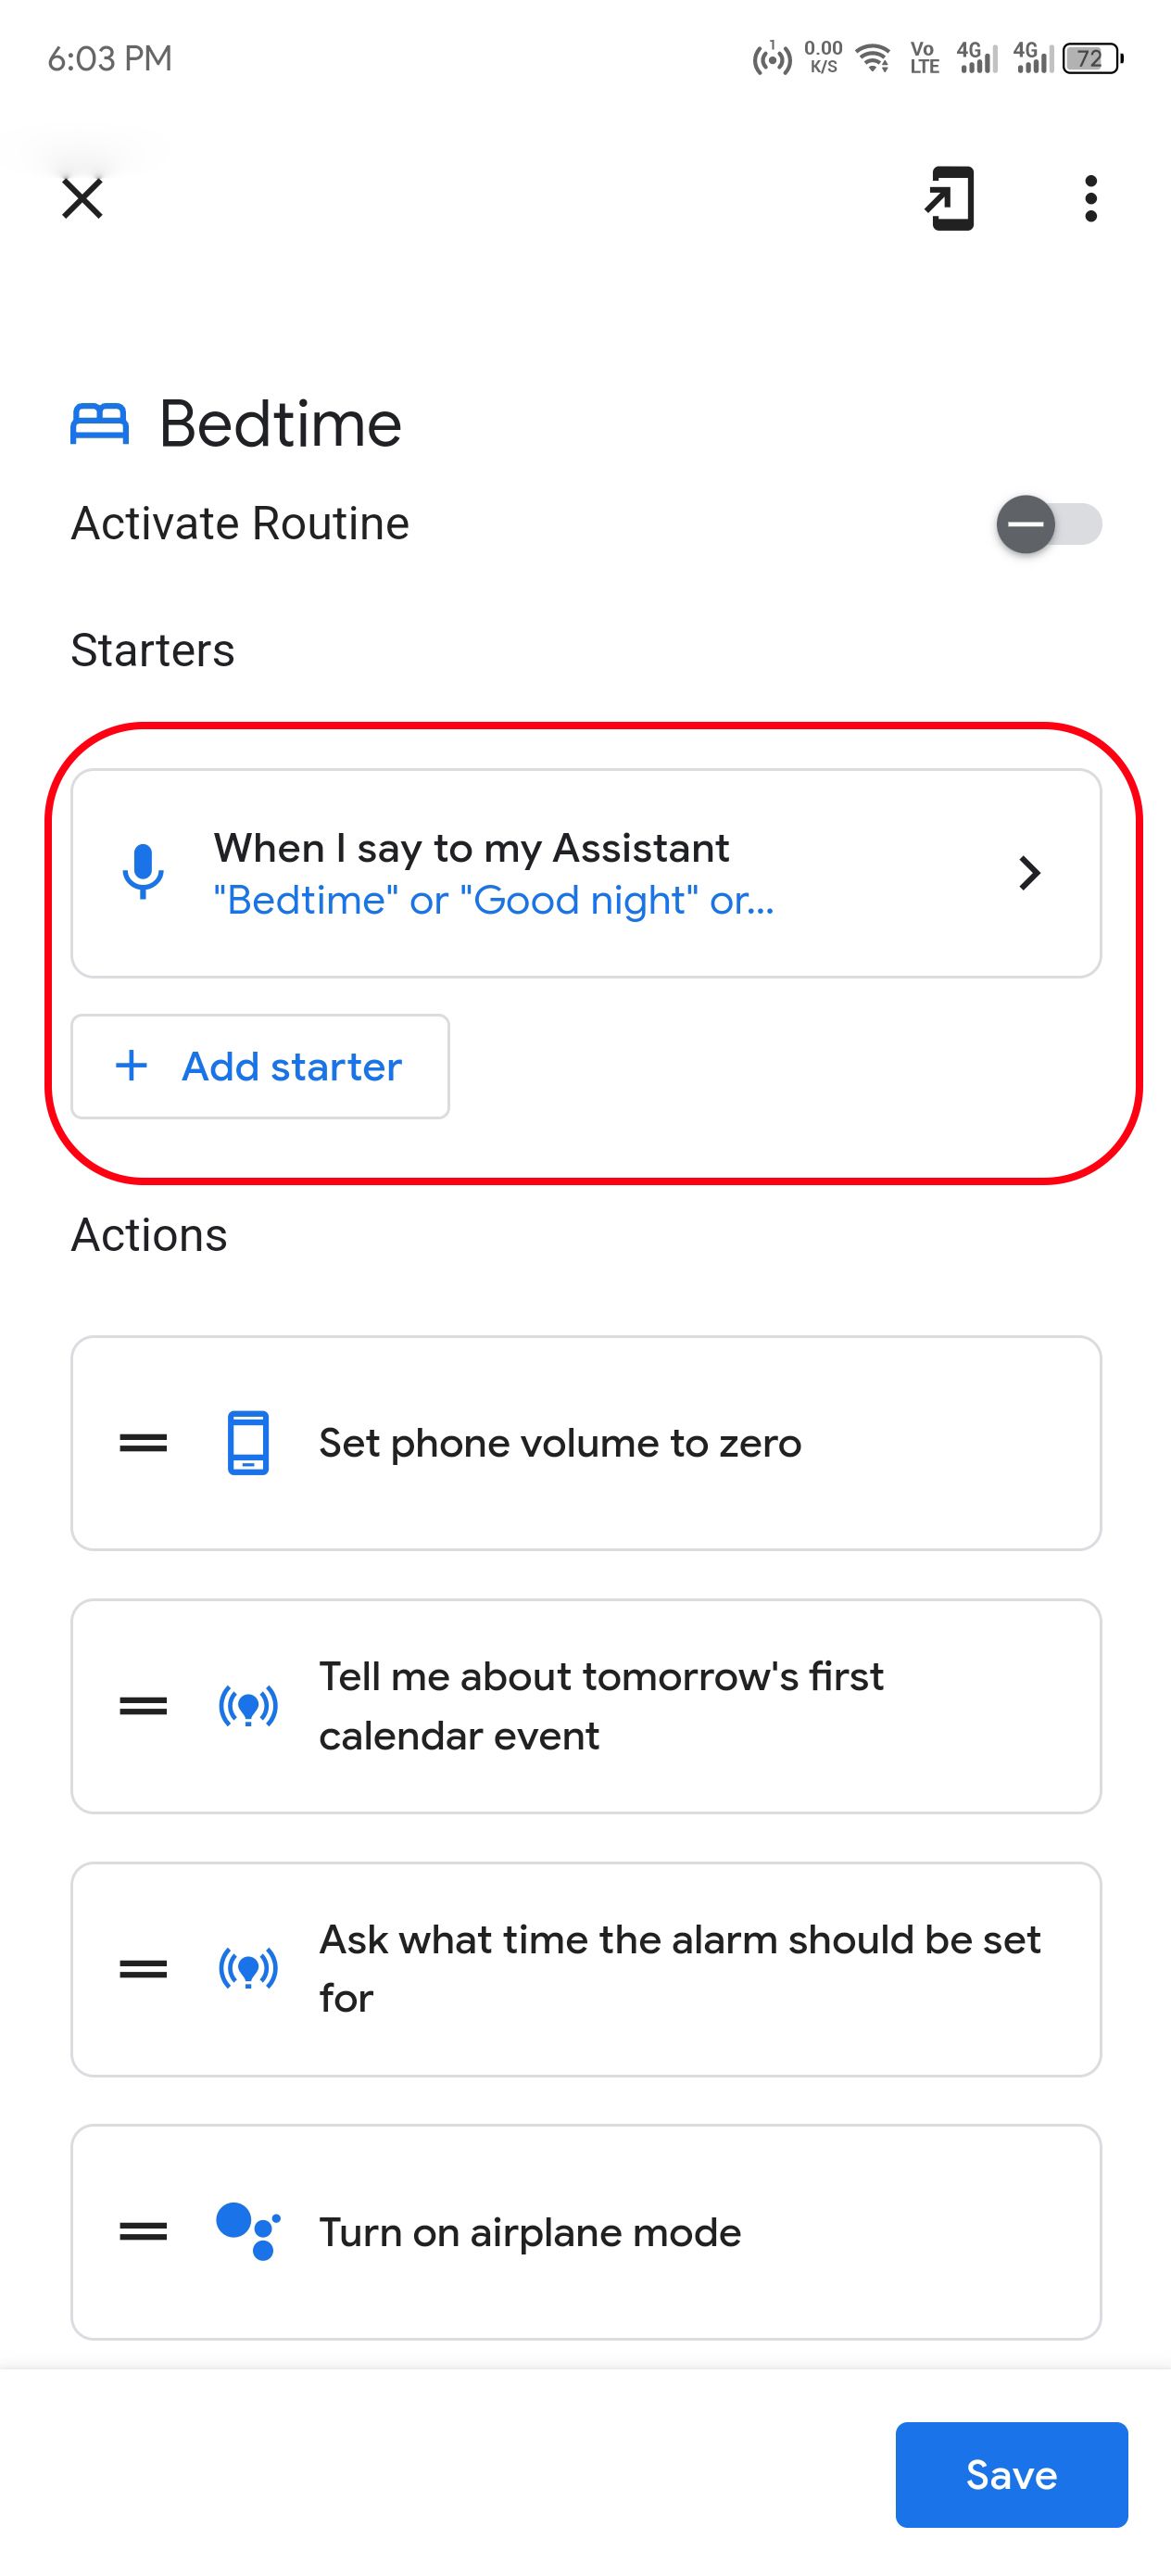
Google preloads some personal routines to get you started on the Home app. Some, like the Bedtime routine, work fine with your Google smart home products, but you can personalize them or turn off those you don’t need.
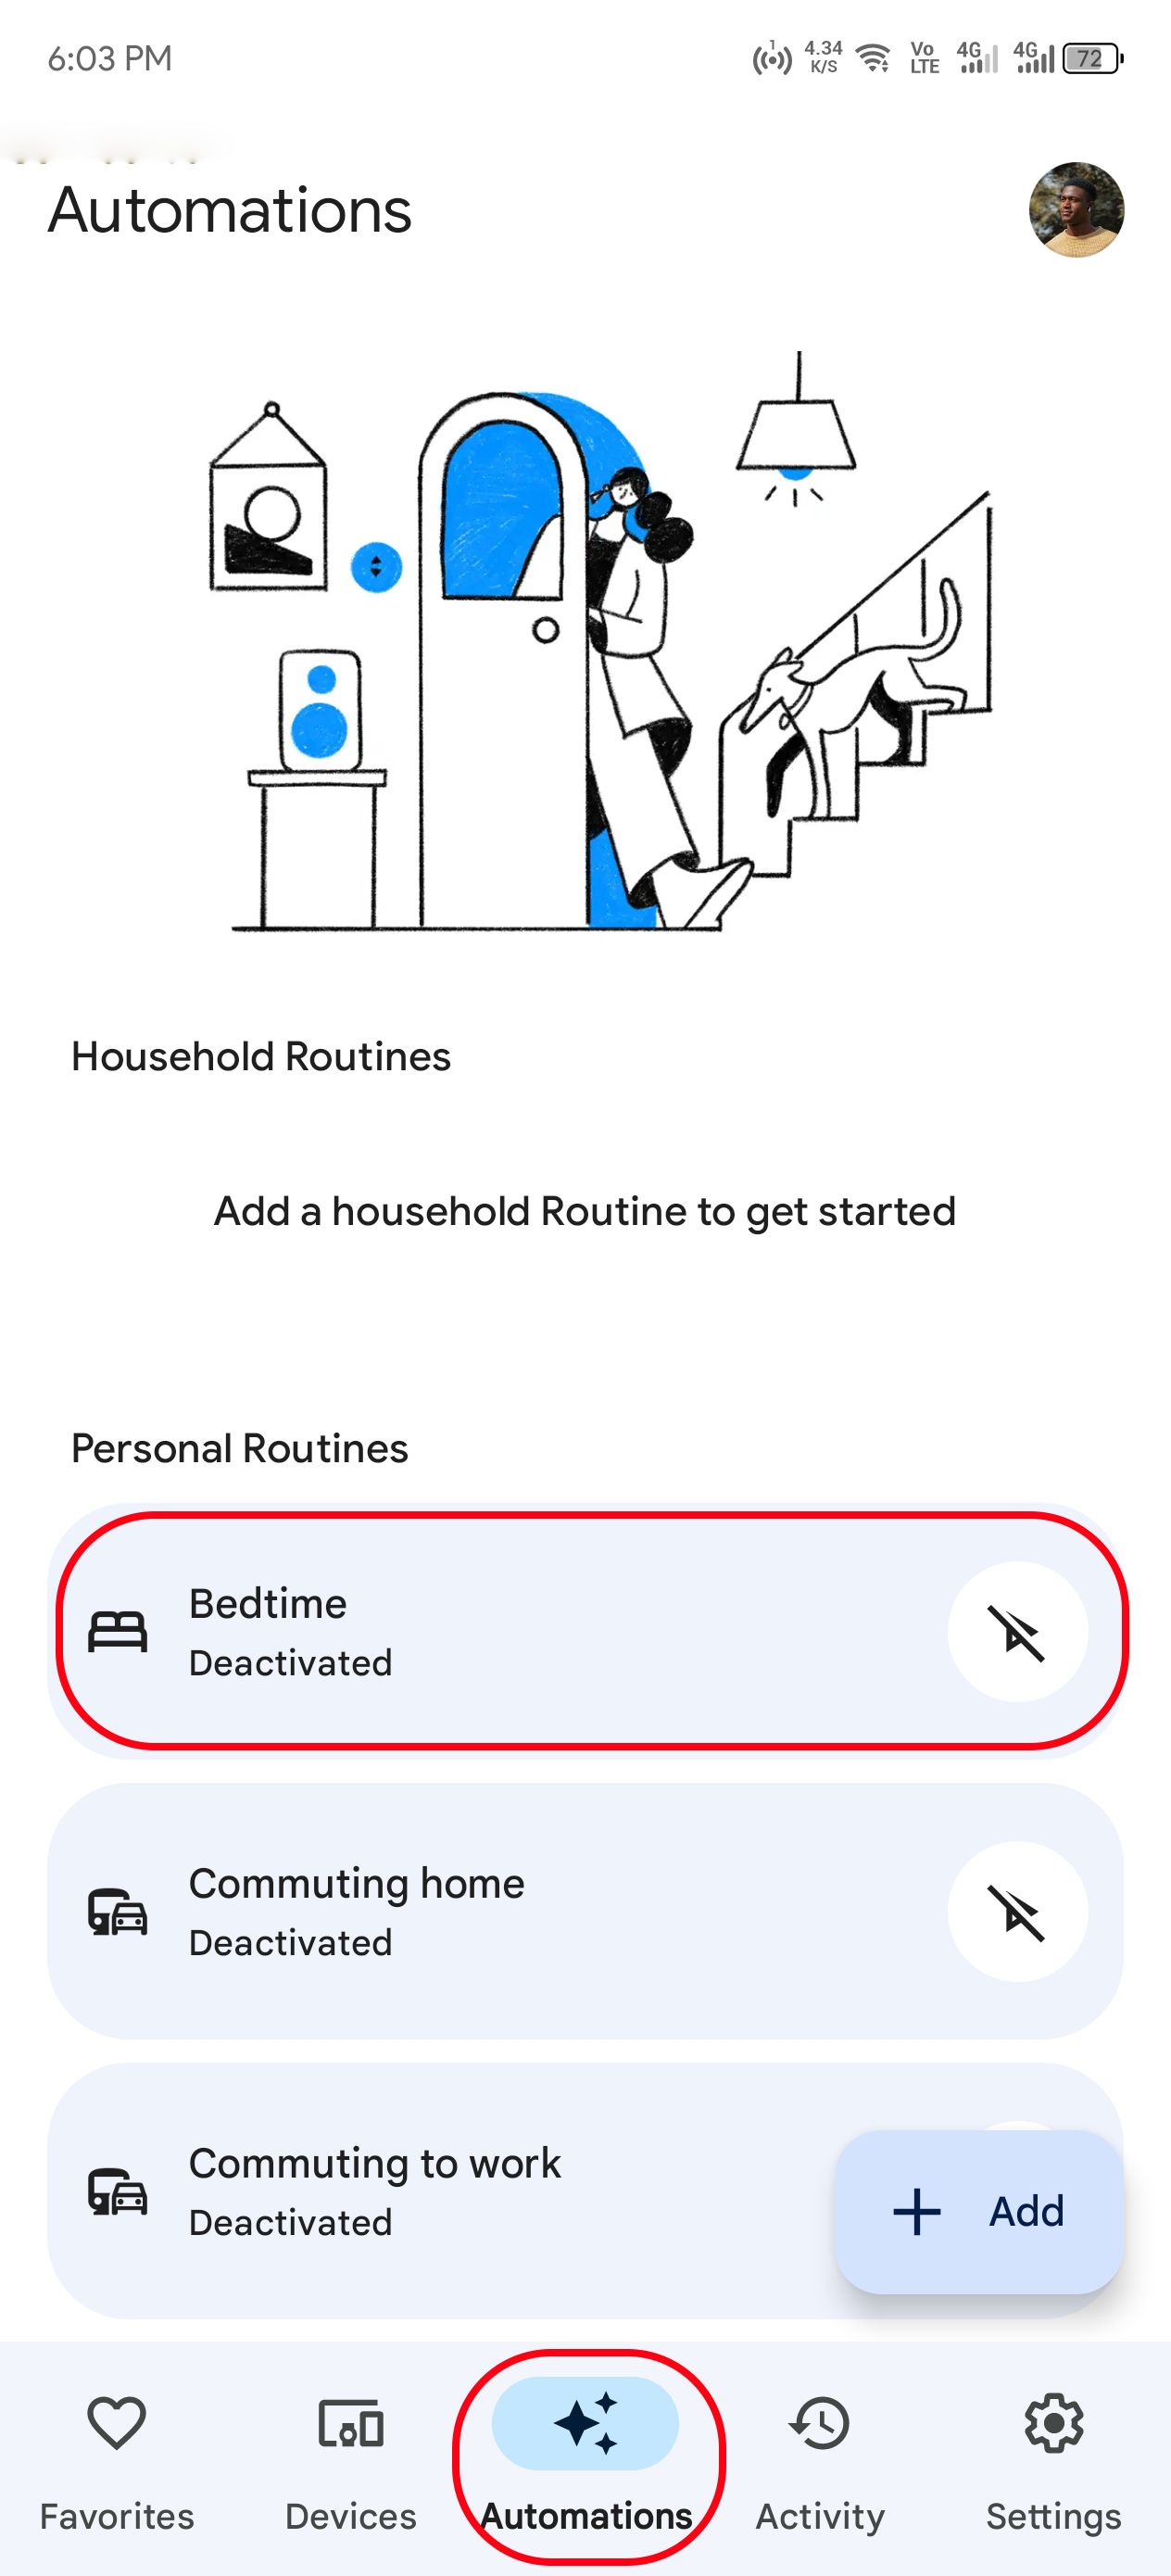
- Open Google Home and switch to the Automation tab.
- Select a routine you want to modify.
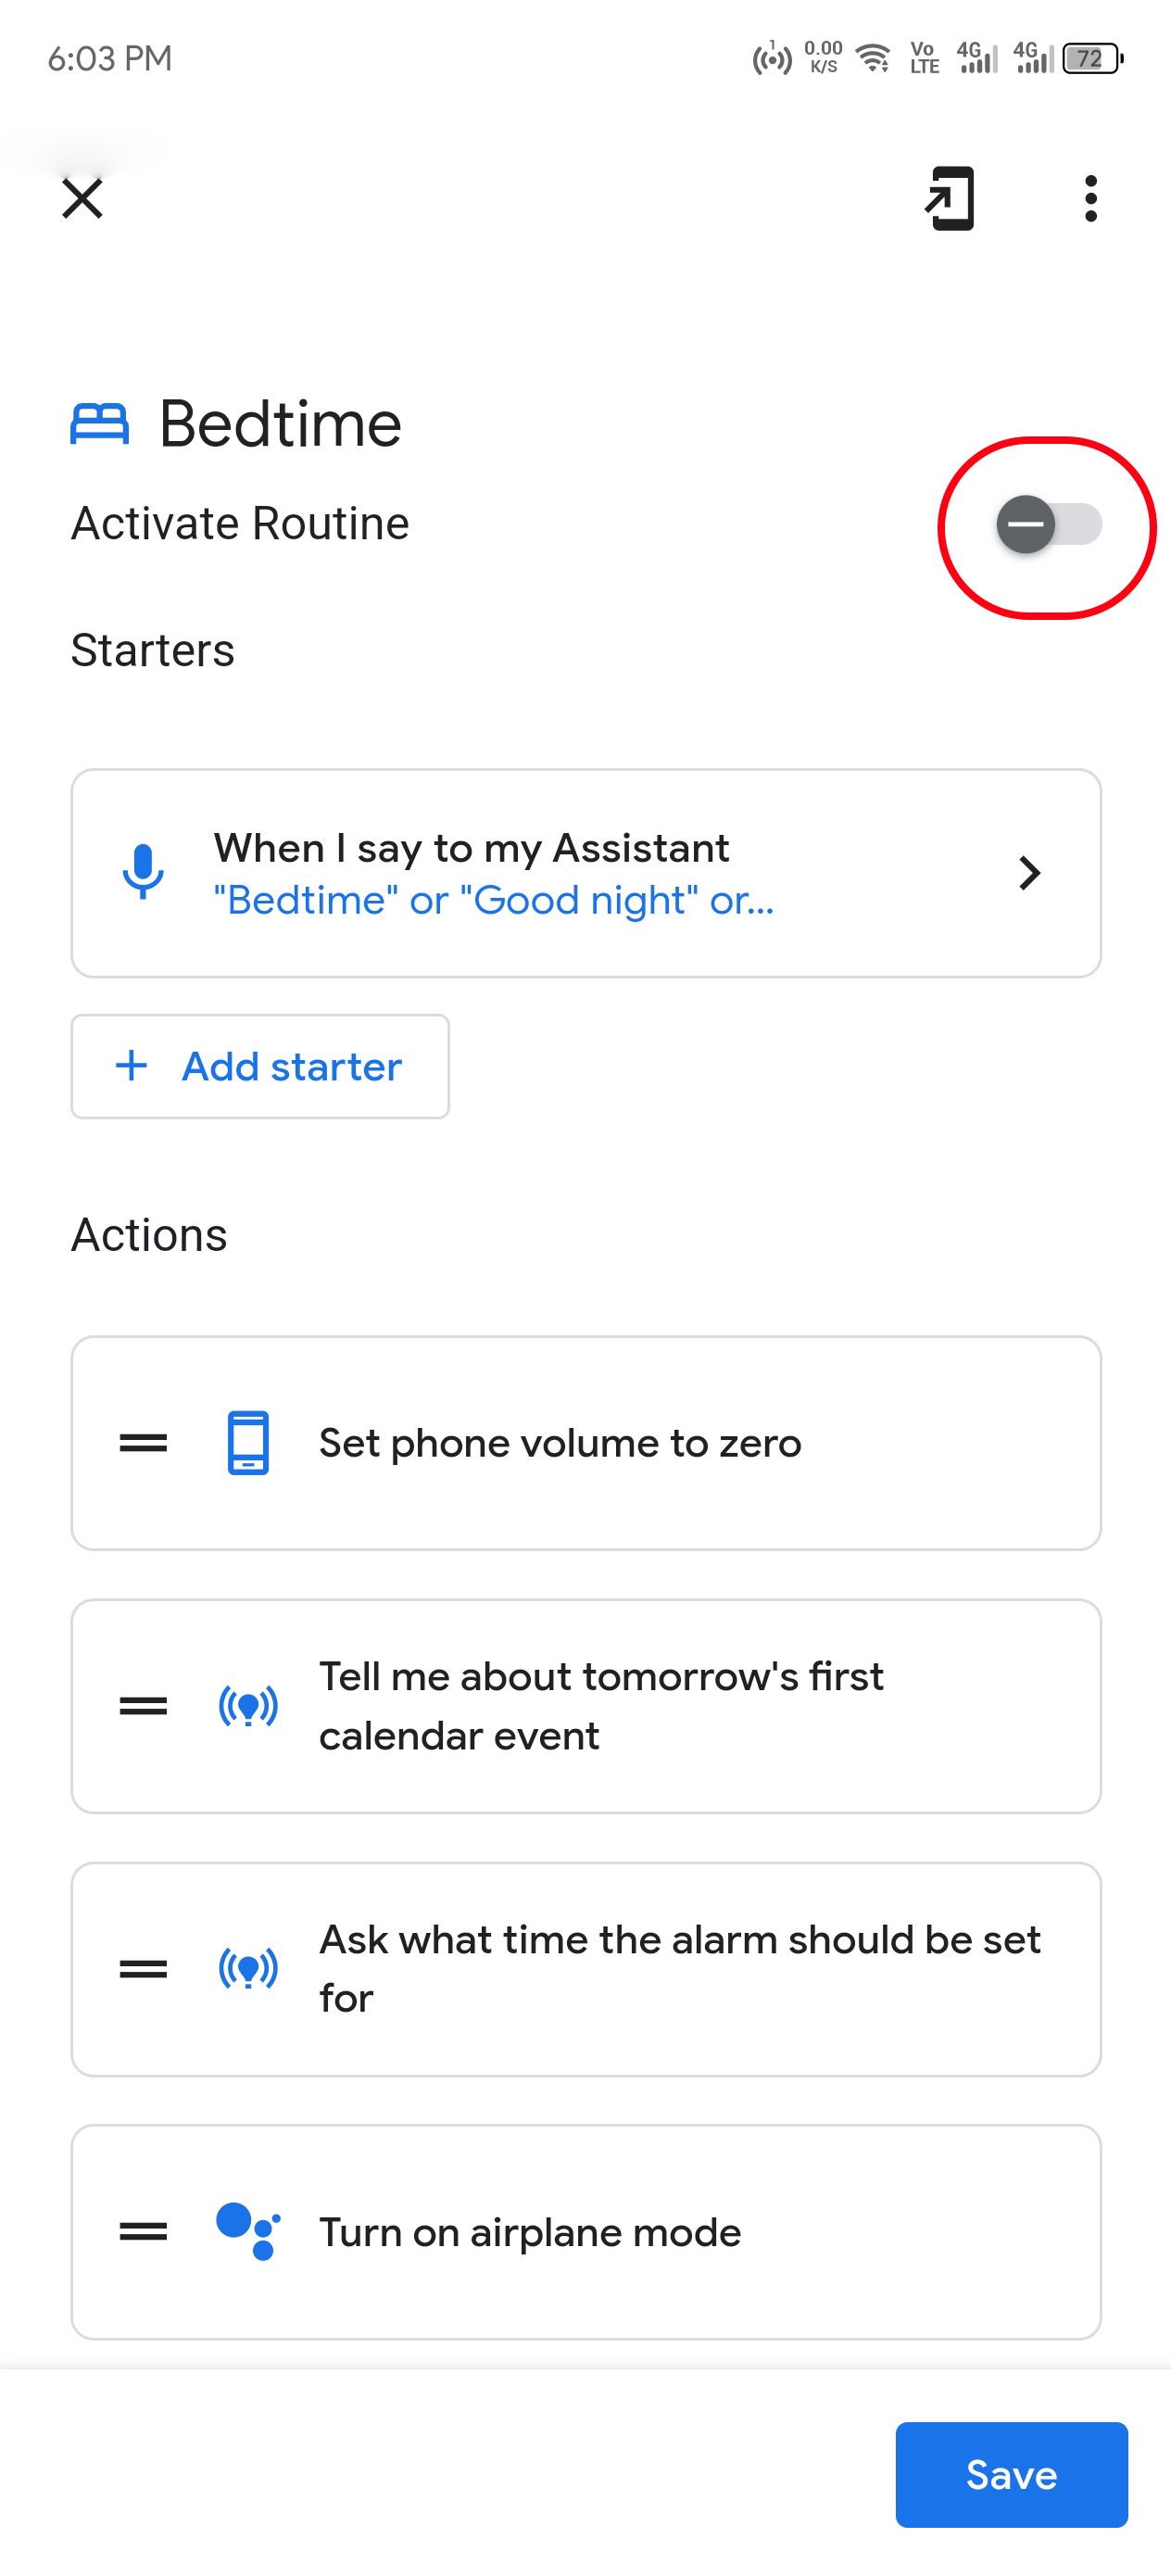
- Use the toggle in the upper-right corner to activate or deactivate the routine.
- In the Starter section, tap the current one to modify it or tap Add starter to add another.
- Scroll down and tap Add action to add another activity to the routine. Google offers a few suggestions that suit the routine. Tap the Add button if you find one that aligns with the routine.
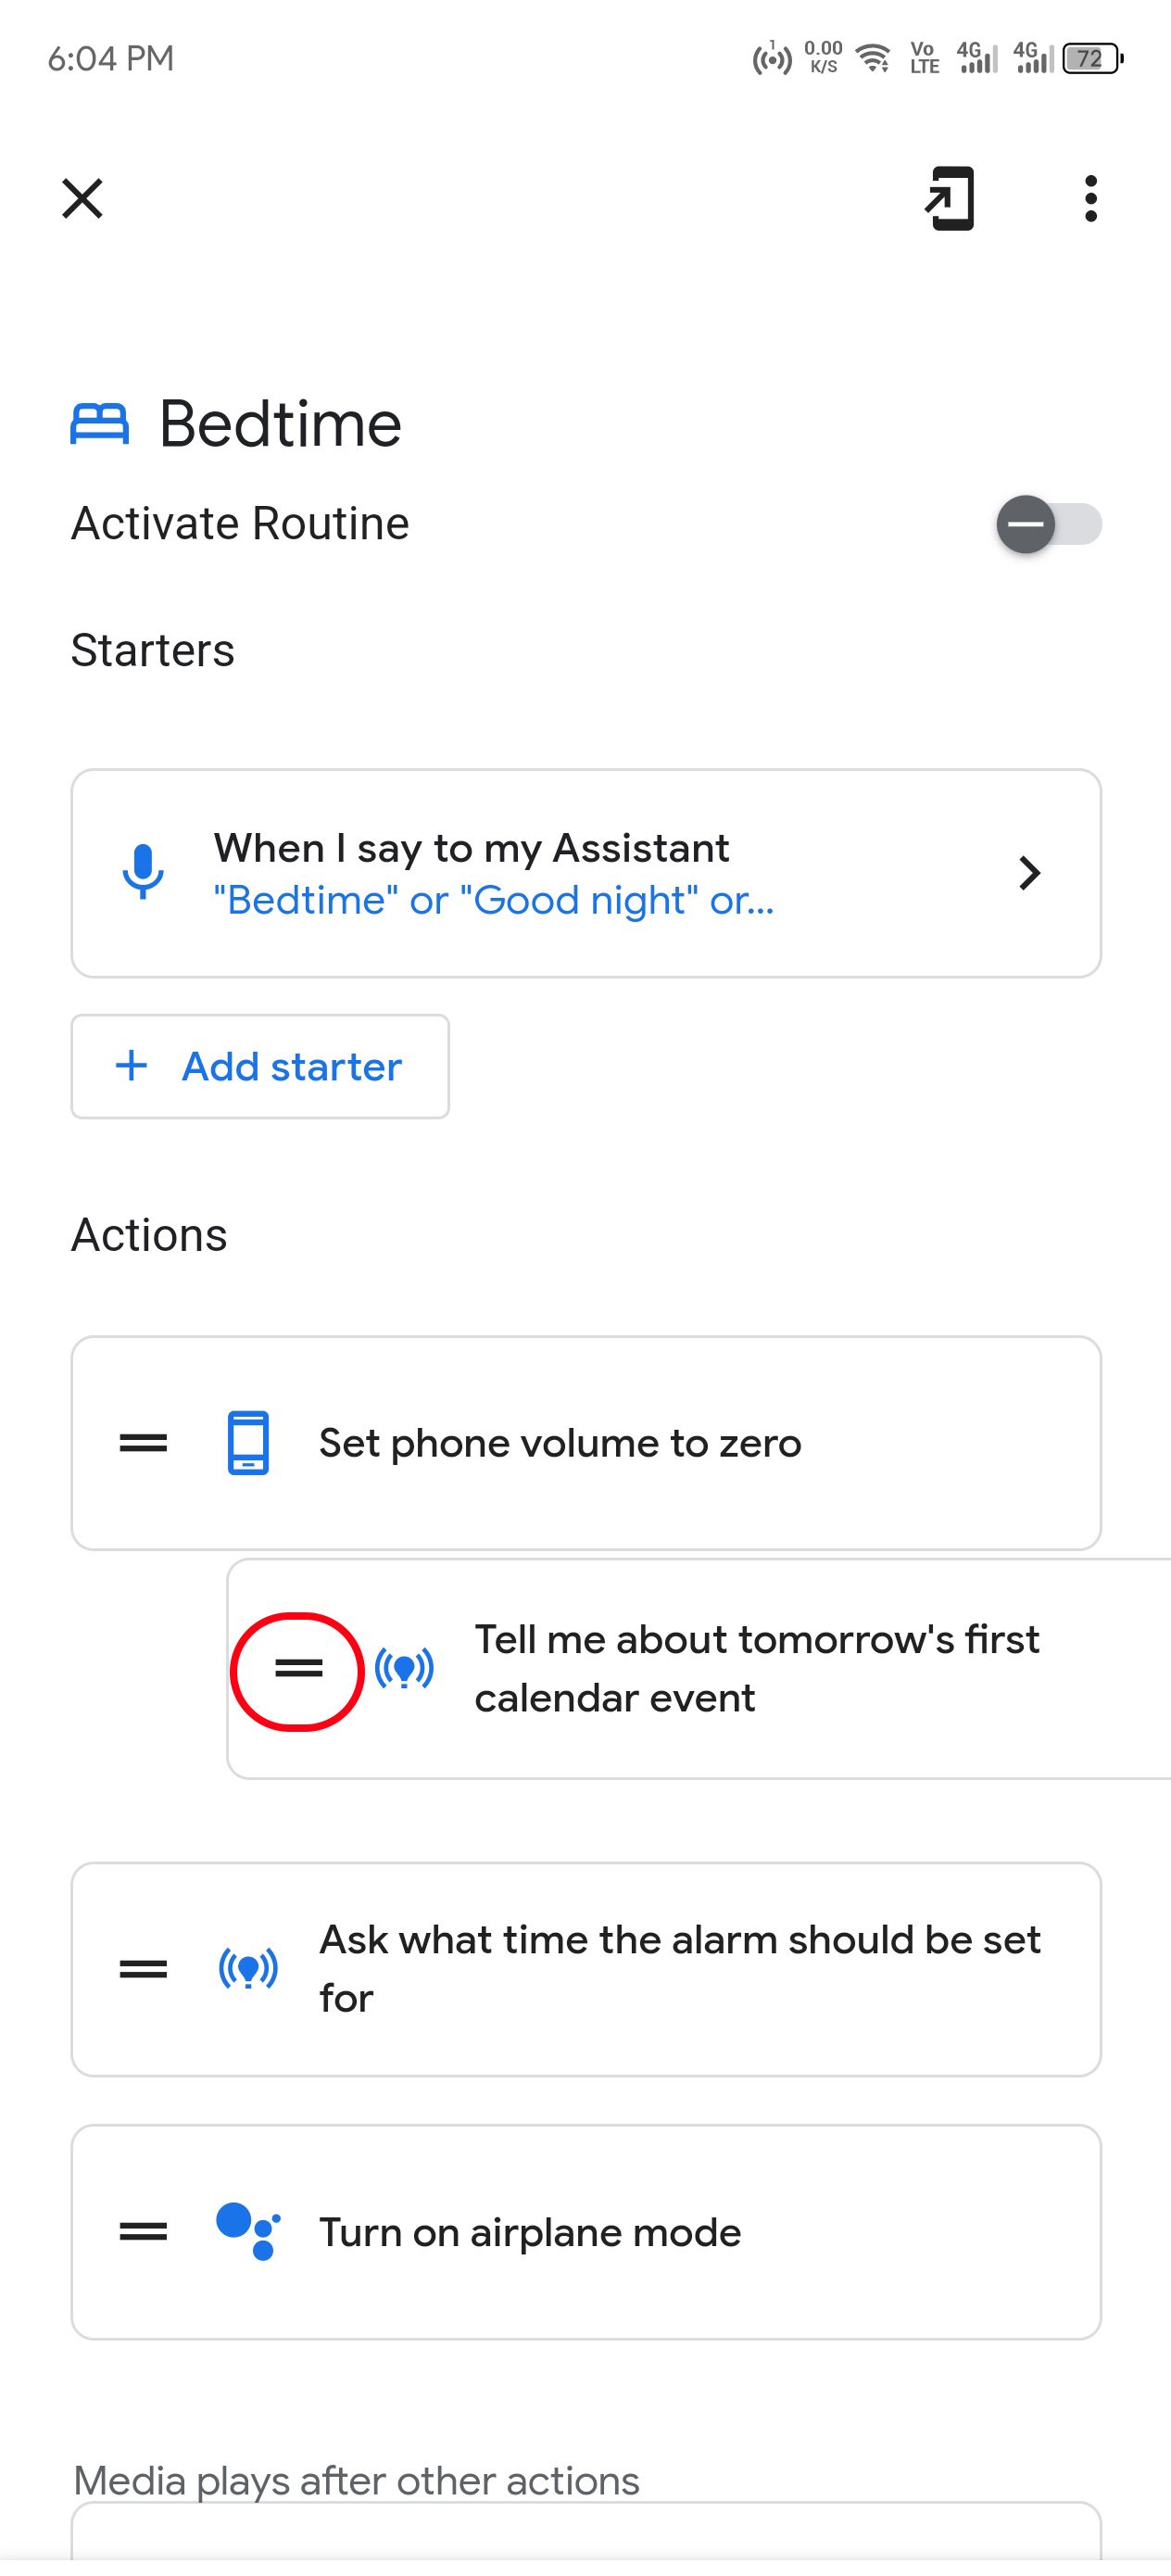
- To rearrange the sequence of the actions, drag the handle beside an action to move it up or down the list.
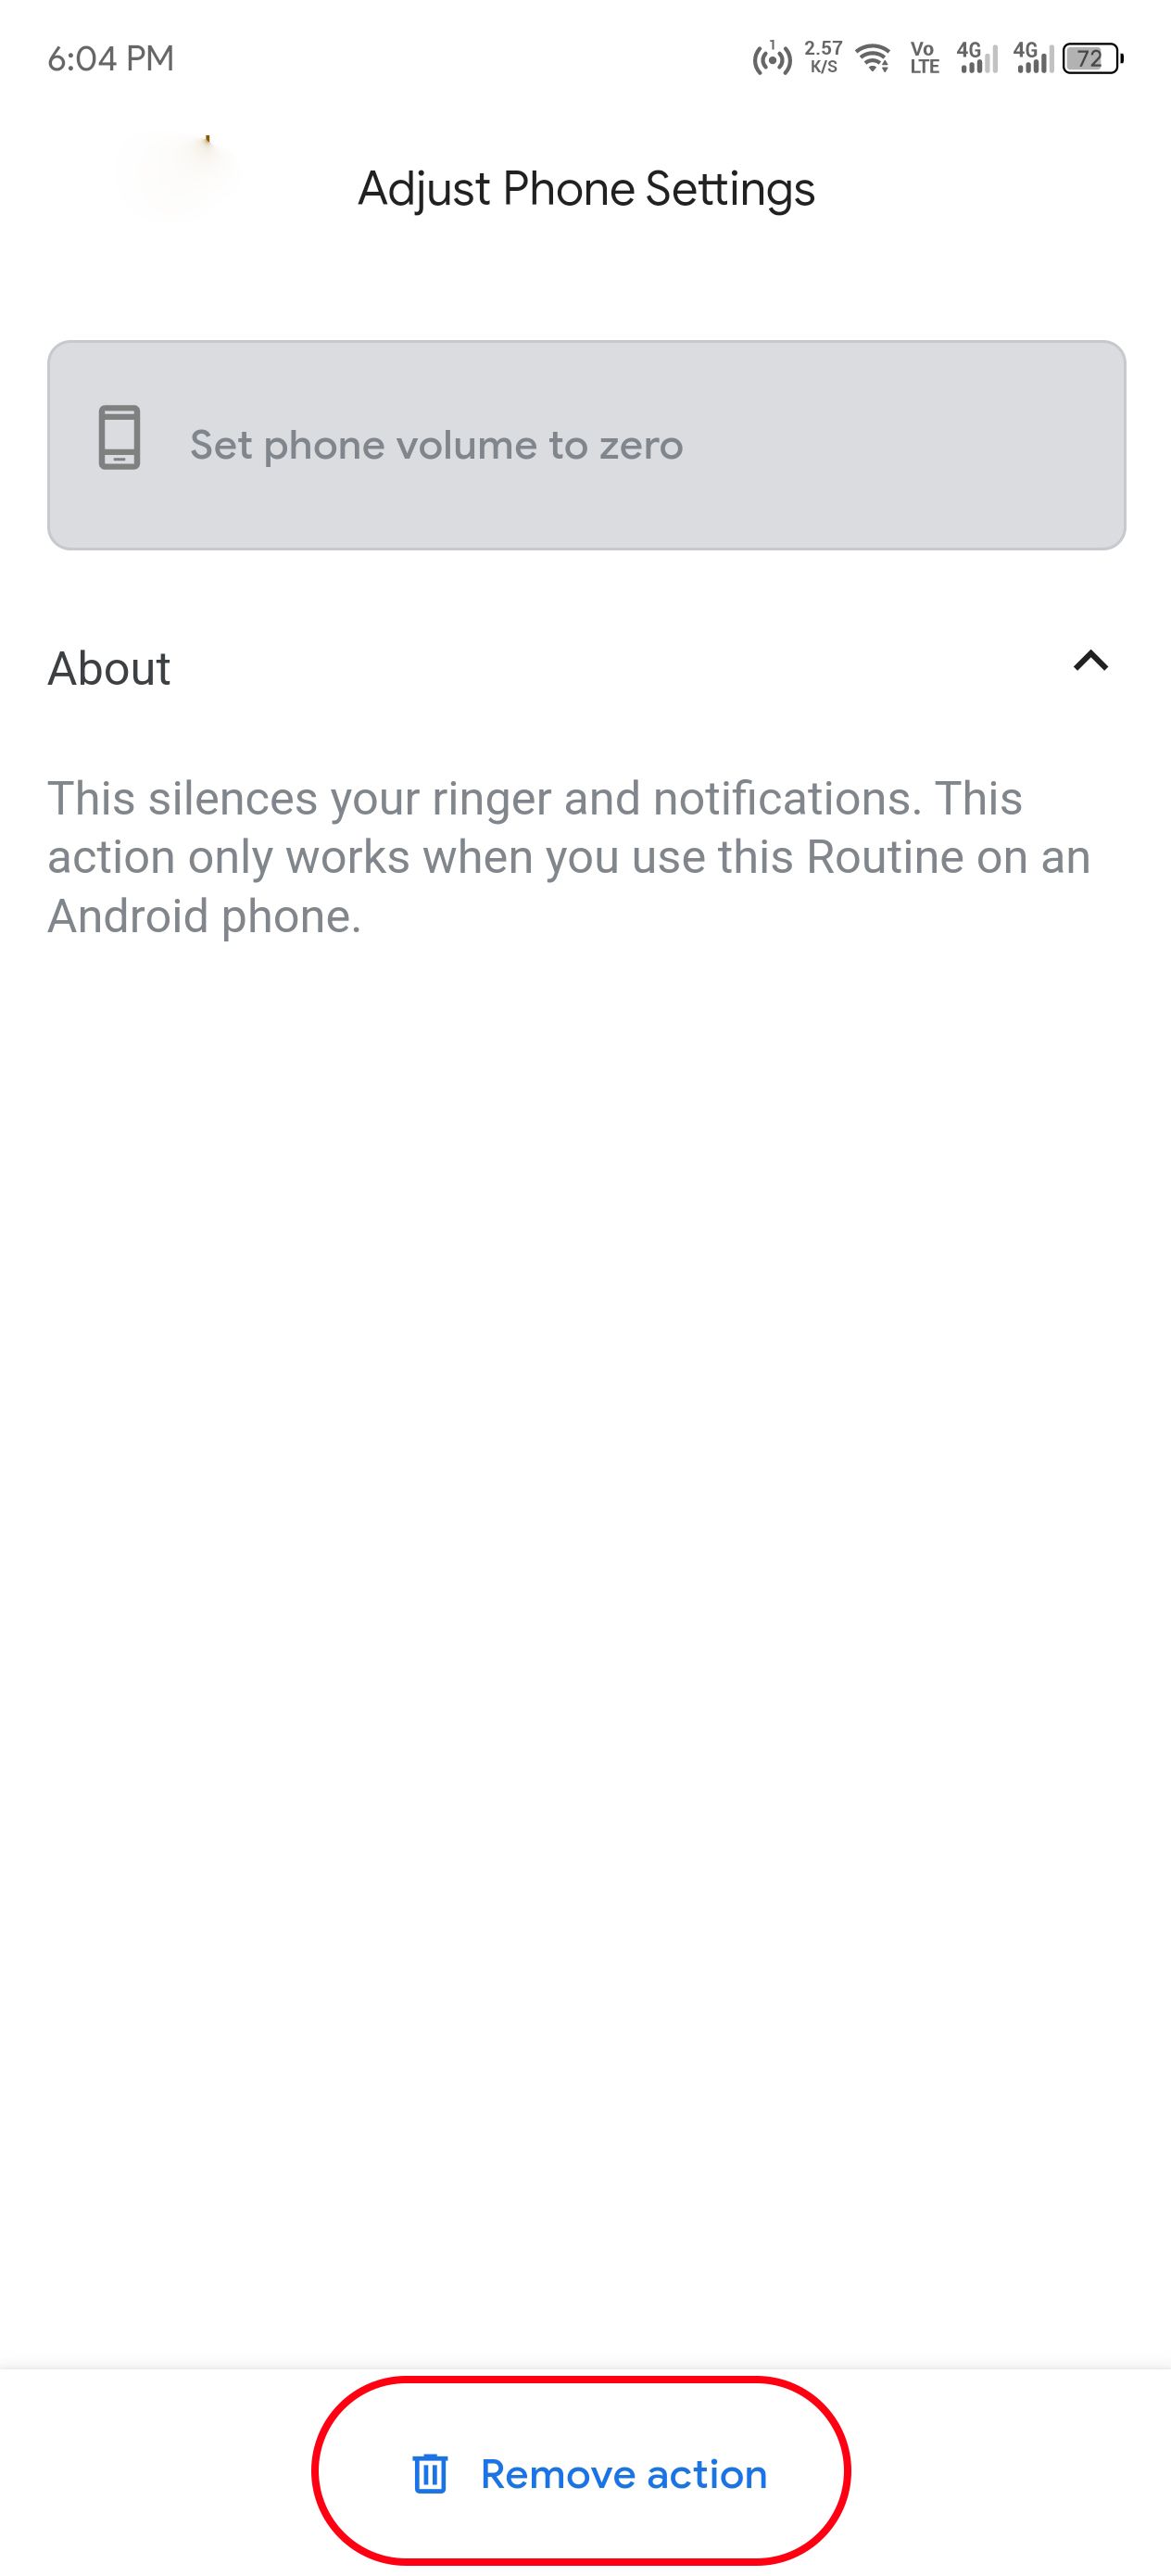
- To delete an action from the routine, tap it and click Remove action.
- When everything is correct, tap Save.


Ways to start your Google Nest automation
“Hey Google, tell me about my day” and other voice commands are the common methods to trigger your Google Home assistant. But that’s not all. Talking to gadgets can get tiring for routines that should start automatically.
- When I say to Google Assistant: Starts your routine by saying a phrase like “Let’s start working” to your voice assistant.
- At a specific time: Automation starts automatically at the time and day you choose. For example, starting a coffee machine connected to a smart plug by 7 a.m. on weekdays.
- At sunrise or sunset: Starts routines around sunrise and sunset.
- When a device does something: Starts the routine after a device does something, such as when you dismiss an alarm on your Google Nest Hub Max.
- When I arrive at or leave a location: Automates tasks that start when you get to or leave a location, such as ensuring your Nest Doorbell, Nest Cam, or another smart lock or security system is active when you leave home.
Save time and money with Nest automations
Setting up smart home automation can be daunting, but the result is usually sweet and time-saving. It gets better as you add new devices and tweak routines to match your daily life. Smart home automation is especially helpful for home security. Check out our tips on how to make a theft-deterrent system.

Khám phá thêm từ Phụ Kiện Đỉnh
Đăng ký để nhận các bài đăng mới nhất được gửi đến email của bạn.

